The Complete QA Workflow Guide for Web and Mobile Teams
Learn how to build a QA workflow that catches bugs earlier, aligns your QA and dev teams, and speeds up every release cycle from planning to sign-off.


A poor QA workflow lets bugs reach production. It also burns time in other ways: vague bug reports, unclear handoffs, repeated messages, missing environment details, and last-minute release calls where nobody feels fully confident.
By the time a defect reaches users, the cost extends beyond the fix, potentially causing delayed roadmap work, lower customer satisfaction, and revenue loss. Tricentis’s 2025 Quality Transformation Report found that 42% of global organizations believe poor software quality costs them $1 million or more each year.
A good QA workflow process helps every stage connect clearly, especially the stages between the people involved. In this guide, you’ll get a practical end-to-end QA workflow you can adapt to your team, tips to speed up releases, and a closer look at where workflows quietly break down.
What is a QA workflow?
A QA workflow is the structured, repeatable sequence of steps a team follows to verify that software meets agreed quality standards before release.
It typically covers:
- Requirements review
- Test planning
- Test case design
- Test execution
- Bug reporting
- Retesting
- Regression testing
- Final sign-off
Think of it as the operating system for your quality assurance process.
Without a documented quality assurance (QA) process, teams fall back on ad-hoc testing: someone clicks through the app; someone else checks a few risky areas; bugs get posted in Slack; QA engineers chase screenshots; project managers chase status updates.
A documented workflow ensures everyone is following the same map. It makes quality assurance repeatable, measurable, and easier to improve over time. It also helps your QA team maintain quality standards across releases, products, test environments, and teams.
Workflows vary by team size, methodology, product type, and release cadence. A five-person startup won’t run QA like a dedicated QA team inside a multi-brand enterprise with 10 websites, several mobile apps, and distributed development squads.
However, the core stages still exist for most web and mobile teams, and once those stages are clear, you can tighten the handoffs between them.
The stages of an end-to-end QA workflow
A strong end-to-end process starts before a build reaches staging, when requirements are still being shaped, which is where quality planning starts.
Requirements review
QA should be involved before a test is written.
During requirements review, QA engineers look at user stories, acceptance criteria, quality requirements, designs, technical notes, and business rules. The goal is simple: find ambiguity before it becomes code.
Good requirements review surfaces missing edge cases, untestable acceptance criteria, conflicting requirements, unclear user roles, and non-functional aspects like accessibility, performance testing, security, and compatibility.
Here’s an example:
A requirement says: “Users should be able to upload a profile image.”
QA can turn that into a clearer requirement by asking which file formats are supported, what the maximum file size is, what happens on a slow network, whether it works on mobile browsers, and which error message appears if the upload fails.
Catching issues at this stage prevents one small ambiguity from turning into a much larger rework problem later. Once code has moved through the release cycle, a single missed requirement can affect how the feature looks, how it behaves behind the scenes, how APIs respond, which test data is valid, what documentation says, and what support teams tell customers.
Test planning
Test planning defines what QA will test, how it will test it, and what success looks like.
A useful test plan covers scope, quality objectives, test environments, resource allocation, risk areas, device and browser coverage, and entry/exit criteria.
For web and mobile teams, test environments deserve special attention.
Your staging environment should be close enough to the production environment to make test results useful. That includes:
- Realistic data
- Feature flags
- Third-party integrations
- Payment settings
- API versions
- Permissions
- Browser and device coverage.
The test plan should also cover load and performance testing where risk justifies it. A high-traffic launch, CMS migration, checkout change, or localization wave may need performance testing alongside functional checks.
Test case design
A test case describes what needs to be tested, under what conditions, and what result should happen.
A test script is more prescriptive. It tells the tester exactly what to do, step by step, often with less room for judgment.
Both are useful.
- Test cases work well when you want coverage and repeatability while still leaving room for human testers to think
- Test scripts work well when consistency is critical, such as payment flows, onboarding, role-based permissions, or run release tests
A strong test case includes a clear title, linked requirement, preconditions, test data, detailed test steps, expected results, actual results, status, priority, and any linked defects.
Here’s an example of what changes to make a weak test case into a stronger one:
Weak test case:
“Check login works.”
Stronger test case:
“Verify that a registered user can log in with a valid email and password from Chrome on desktop, then lands on the dashboard within 3 seconds.”
For larger teams, test case management helps organize test suites, modified test suites, new test suites, coverage, ownership, and quality metrics. The tool is useful only when every test case ties back to a requirement, risk, or quality objective.
Test execution
Test execution is the stage when QA runs planned checks and records results.
This stage can include manual testing, automated testing, API testing, regression testing, developer-owned unit tests, exploratory testing, cross-browser checks, load and performance testing, and release smoke tests.
During execution, QA engineers execute test cases, logging pass and fail results. They capture evidence of those results to identify quality issues.
Automated testing is especially useful for stable features and repetitive regression coverage. Test automation can run quickly, consistently, and often, and automation testing tools help check core flows after every build.
Manual testing tools still play a central role in ensuring new functionality, while also identifying visual issues, usability problems, confusing states, and edge cases. Exploratory testing, meanwhile, is valuable when the feature is new, complex, or likely to behave differently across devices.
The output of your test execution should be clear: what was tested, what passed, what failed, what wasn’t tested, which defects block release, and which risks remain.
Bug reporting and tracking
A well-written bug report enables a developer to reproduce an issue without asking follow-up questions.
In real QA cycles, incomplete bug reports are one of the biggest sources of wasted time. They slow triage, interrupt developers, frustrate testers, and create noise in project management tools.
Here’s the difference between a well-written and weak bug report.
Weak report:
“Checkout is broken on mobile.”
Developer-ready report:
“Checkout submit button does not respond on iPhone 14 Safari after applying promo code. Steps: add item to cart, apply code SPRING20, tap Checkout, enter valid address, tap Pay now. Expected: payment modal opens. Actual: button spinner appears for 1 second, then nothing happens. Environment: staging, build 2.14.6, Safari iOS 17, user role: guest. Console error and screenshot attached.”
The second report saves a conversation. Otherwise, every missing detail creates another loop:
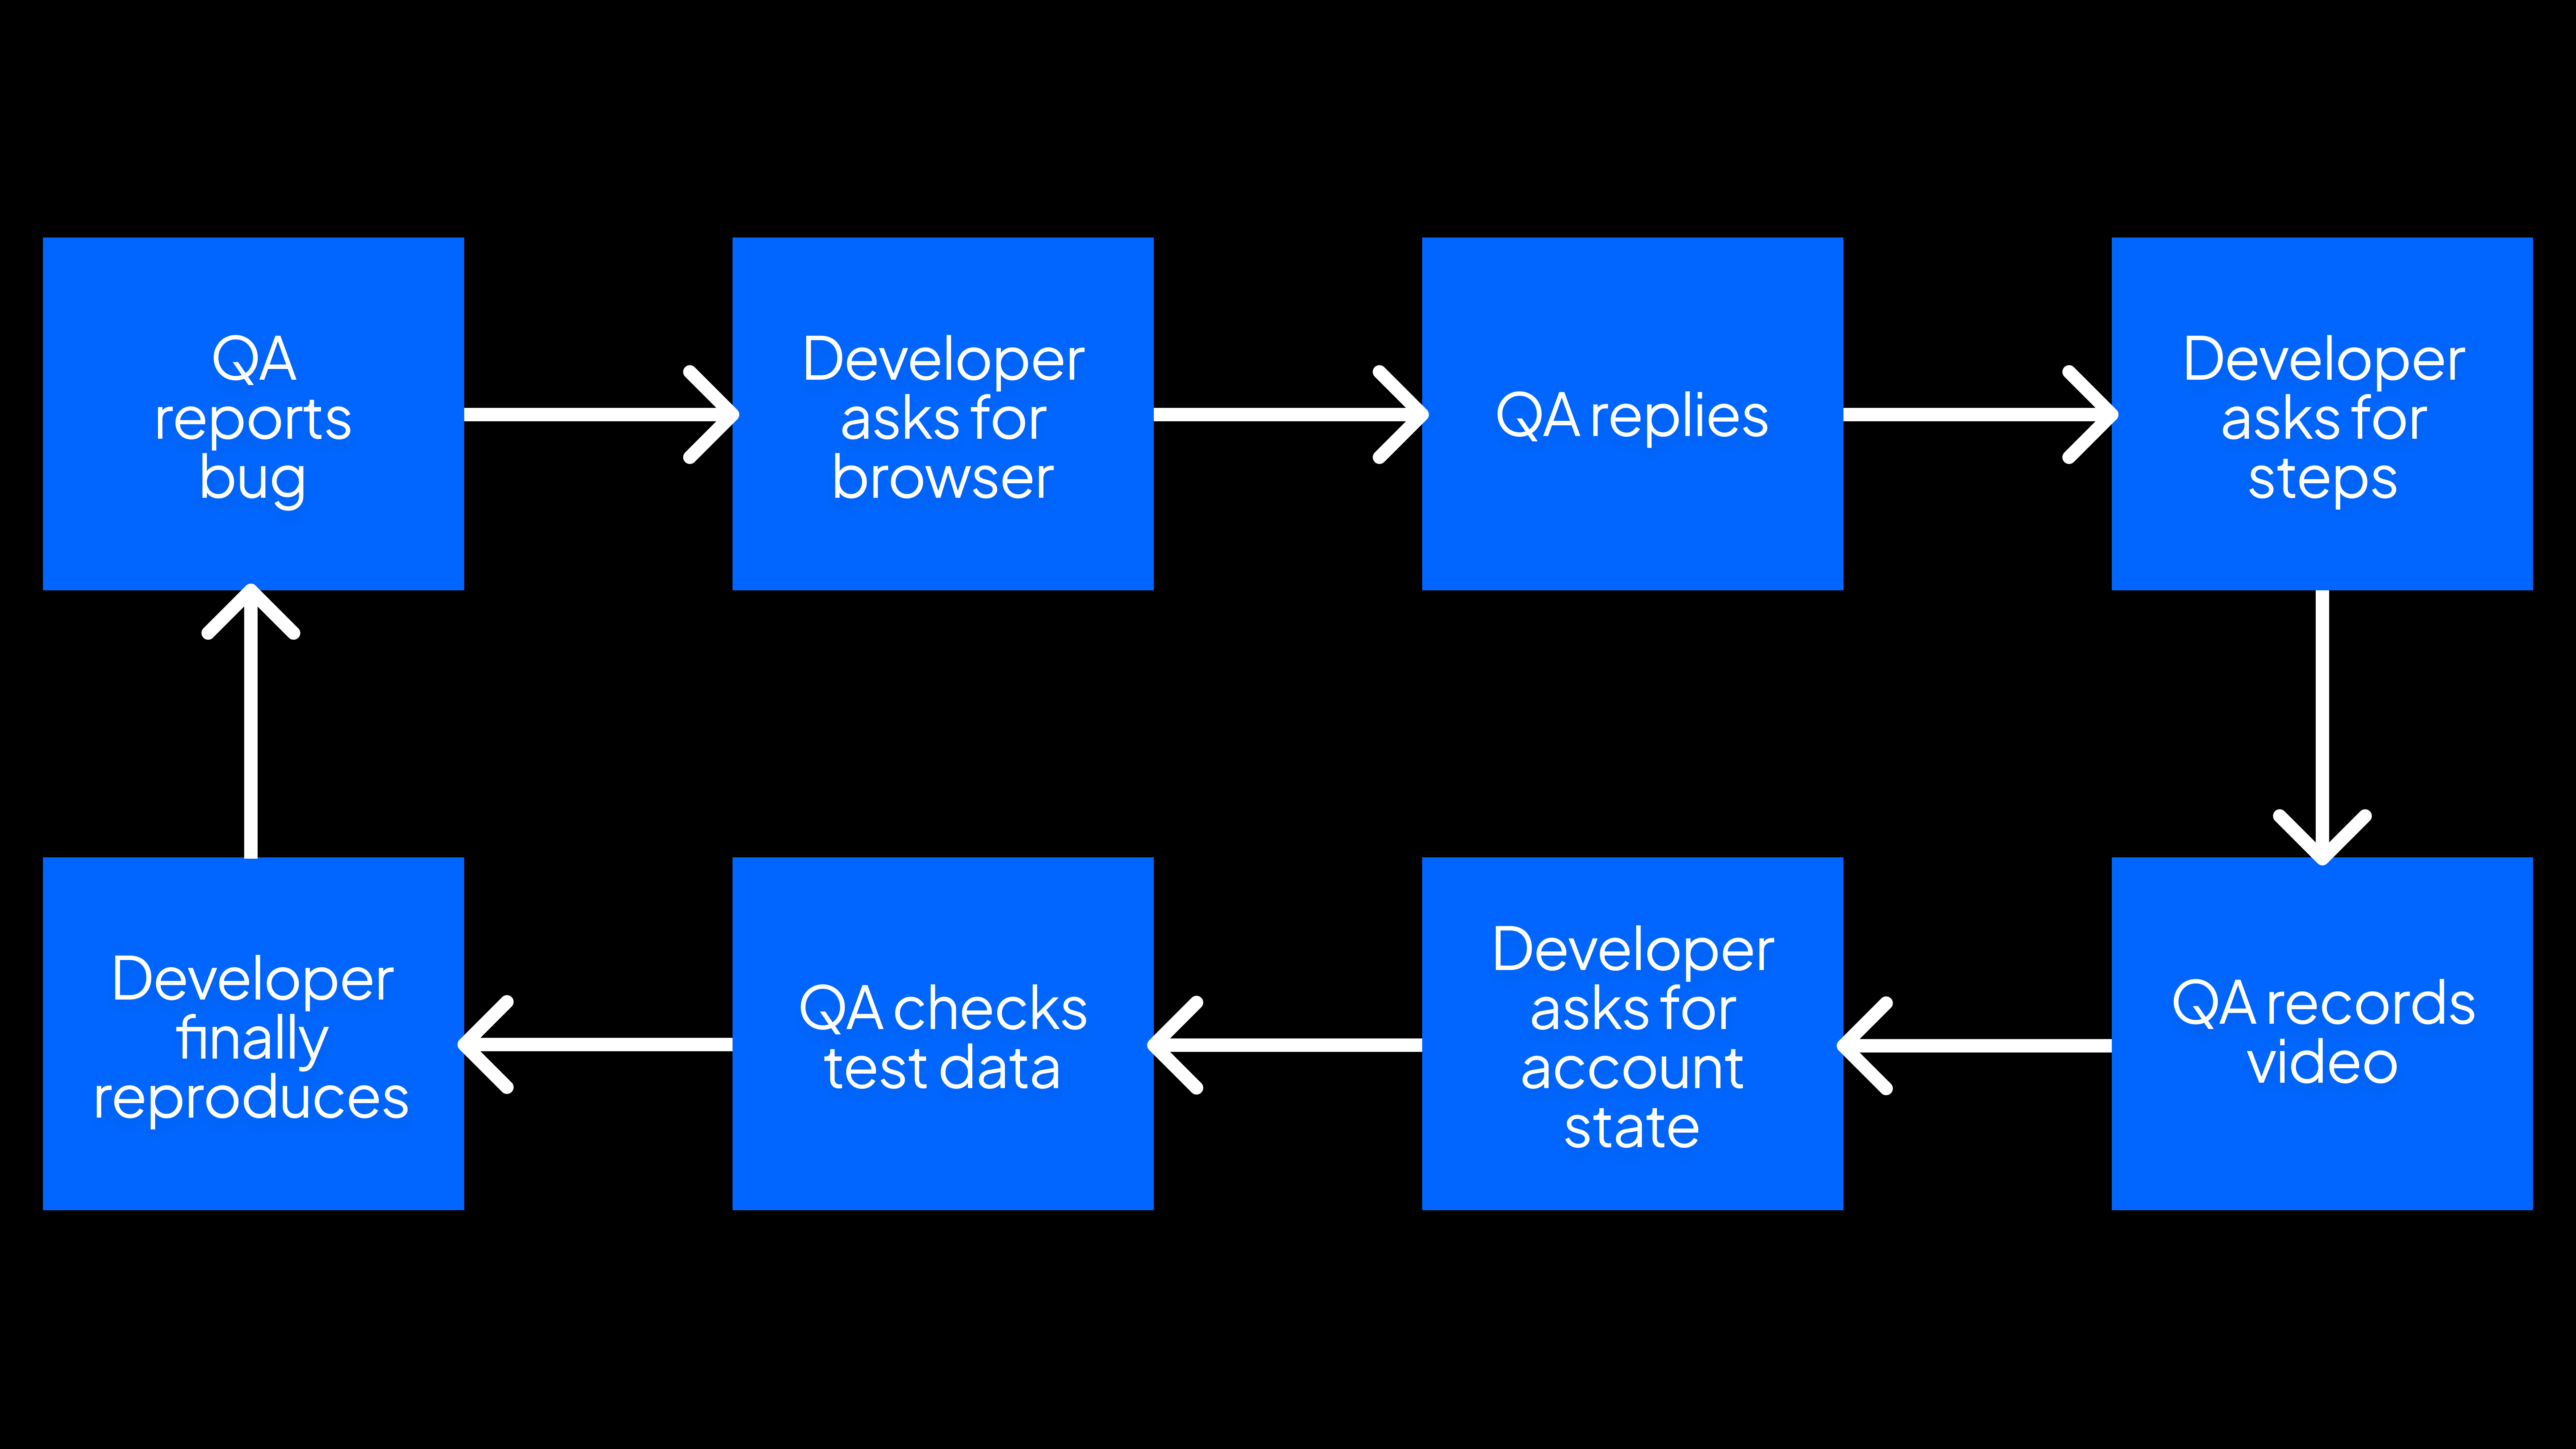
That back-and-forth becomes a bottleneck in the QA workflow process.
In a well-organized QA process, bug tracking also includes triage – the team decides whether a defect blocks release, affects customer satisfaction levels, requires regression testing, or can wait.
Retesting and regression testing
Once a developer marks a bug as fixed, QA needs to verify it, which is called retesting.
Retesting answers one question: did the fix solve the reported issue?
Regression testing answers a different question: did the fix break anything else?
A bug fix in checkout might solve the promo code issue, but break saved cards, while a mobile layout fix might solve one viewport problem, but create another on tablet.
Regression testing can be manual, automated, or both. Stable features are good candidates for automated regression coverage, while newer or high-risk areas often need human review.
The goal is to run the right test suites based on risk, so the team can maximize quality outcomes without slowing every release to a crawl.
Sign-off and release
QA sign-off means the team has enough evidence to release with confidence.
In practice, sign-off confirms that planned tests are complete, critical defects are resolved or accepted, release tests passed, regression testing covered affected areas, known issues are documented, release notes are ready, and the right person accepted the remaining risk.
Ownership should be explicit, and everyone should know who signs off and what criteria must be met.
Depending on the team, sign-off may come from a test lead, QA manager, product owner, engineering manager, or release manager. For larger teams, project management quality assurance may also include governance, compliance, audit trails, and quality control checkpoints.
How to build your QA workflow process
A QA workflow needs to be visible, owned, and easy to improve.
Start by documenting your current process as it works today, mapping each stage from requirements to release and identifying where handoffs happen.
Next, make five decisions.
1. Define ownership at each stage
Every stage needs an owner.
That person or role keeps the stage clear, but they don’t do all the work alone.
For example:
- Product owns requirements readiness
- QA owns test planning and test execution
- Developers own unit tests and fixes
- QA and product jointly own bug triage
- Engineering owns release readiness
- The test lead owns QA sign-off.
2. Set entry and exit criteria
Entry and exit criteria make handoffs less subjective.
For example, QA testing should begin only when acceptance criteria are complete, the feature is deployed to the right test environment, test data exists, feature flags are configured, known limitations are documented, and the developer has completed basic checks.
Testing should be marked complete only when planned test cases are executed, blocking defects are resolved or accepted, regression testing is complete, known risks are documented, and QA sign-off is recorded.
Don’t skip this basic quality management, even if you’re under pressure.
3. Choose tools that fit the workflow
QA Testing tools should reduce friction.
A typical QA stack might include project management tools like Jira, Linear, Asana, Azure DevOps, or ClickUp; test case management tools; automation testing tools; browser and device testing platforms; API testing tools; performance testing tools; bug reporting tools; and dashboards for key performance indicators.
Your tools should support the workflow you want.
If QA has to copy screenshots or console logs into one tool and then paste console logs into another, the process is leaking time.
4. Establish quality metrics
Quality metrics help you see whether the workflow is improving.
Useful KPIs include:
- Defect escape rate
- Reopen rate
- Average time to reproduce
- Average time to resolve
- Test coverage by risk area
- Regression pass rate
- Bugs found by stage
- Release frequency
- Customer-reported defects
- Customer satisfaction levels after release
Pick metrics that support your quality objectives and process improvement goals.
5. Build in feedback loops
A robust quality assurance process improves after every release.
Use retrospectives, defect reviews, and root cause analysis to ask where bugs escaped, which test scenarios were missing, which bug reports caused back-and-forth, which tests slowed the team down, which quality requirements were unclear, and which handoff failed.
The best QA workflows are built iteratively: You run the process, inspect the weak points, and then improve it – which is where continuous improvement becomes a reality.
QA testing workflow for agile teams
Agile teams need thorough validation inside short sprint cycles, which is why the agile QA process works best when quality starts earlier.
Digital.ai’s State of Agile Report tracks broad Agile adoption across software teams and the recurring challenges that come with scaling Agile across departments, tools, and leadership groups, with 42% of respondents reporting that their organizations use a hybrid model including Agile, DevOps, or more.
Start with refinement. QA engineers should review stories before sprint planning, giving testers time to question acceptance criteria, identify edge cases, flag environment needs, and spot missing quality requirements.
During sprint planning, QA should help scope testing effort. Different tickets need different levels of coverage.
For example, a copy change may need a quick visual check, while a payment change may need detailed test cases, API testing, and regression testing. A new authentication flow may need manual testing, automated regression, security checks, and exploratory testing.
Automation becomes more valuable as the codebase grows.
Automated regression coverage protects stable flows so manual testing can focus on new and changed functionality. Continuous testing also helps teams detect defects earlier, especially when automated tests run on pull requests, nightly builds, or release branches.
In a two-week sprint, you won’t test everything. Triage testing by risk: what changed, which areas depend on it, what would frustrate customers most if it broke, what has broken before, what’s hard to fix after release, and what the business cares about this sprint.
Retrospectives close the loop.
If QA was squeezed at the end, talk about it. If test data wasn’t ready, fix the setup. If developers kept asking for more context in bug reports, improve the template or tooling.
Agile makes a QA workflow more important because the team has less time to recover from unclear handoffs.
QA workflow tips to speed up releases
A faster QA workflow removes avoidable friction.
Here are practical ways to build a QA workflow for faster, more reliable software releases.
1. Define entry and exit criteria for every stage
Ambiguous handoffs waste time.
Write down what must be true before work moves from one stage to the next.
Example:
A feature or ticket is “ready for QA” only when:
- Acceptance criteria are complete
- The feature is deployed to the correct test environment
- Test data exists
- Feature flags are configured
- Known limitations are documented
- The developer has completed basic checks
This prevents QA from becoming the first team to discover that the build is untestable.
2. Automate regression coverage for stable features
Automate the flows that are stable, repetitive, and business-critical.
Good candidates include:
- Login
- Signup
- Checkout
- Search
- Permissions
- Password reset
- Core API flows
- High-value mobile journeys
Automating flows lets your QA team spend more time on new functionality, edge cases, and exploratory testing.
Automation should support human testers, not replace them.
3. Use a consistent bug report template
A bug report template gives developers the same structure every time.
At minimum, you should include:
- Steps to reproduce
- Expected behavior
- Actual behavior
- Environment
- Browser/device
- Screenshot or recording
- Console logs
- Severity
- Related requirement or test case
Consistency improves bug triage and reduces follow-up questions. It also improves dashboard quality as reports are easier to filter, compare, and prioritize.
We have created a bug report template you can use as a starting point:
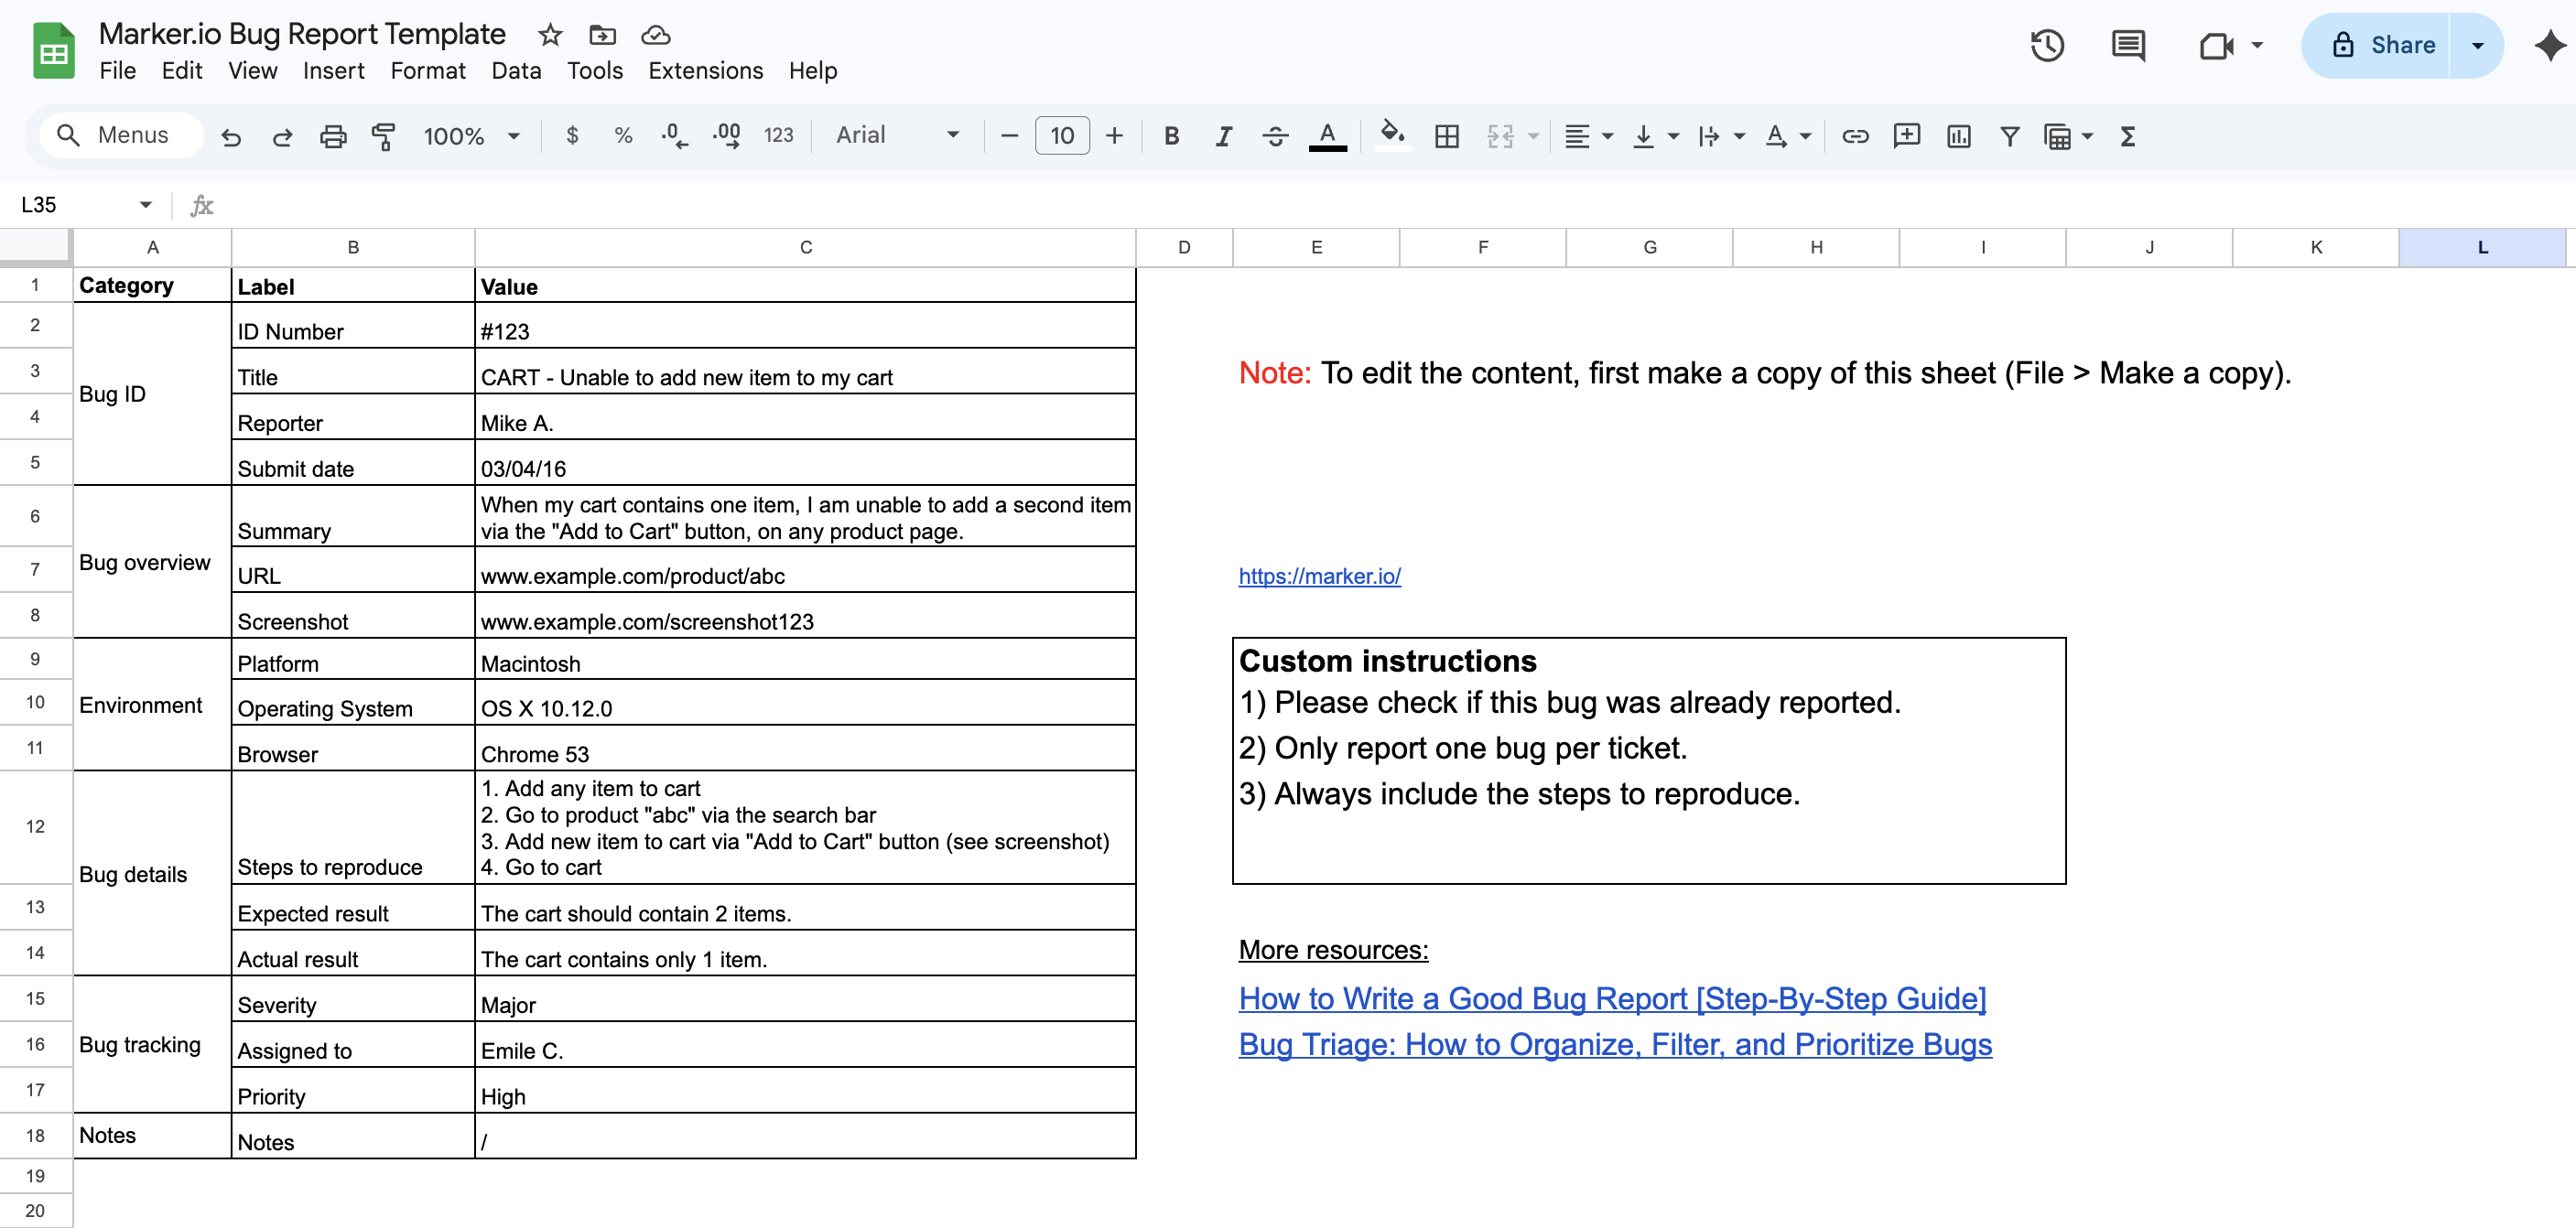
Download this spreadsheet in two different formats:
- Access the Google Spreadsheets bug report template (File > Make a copy)
- Download for Microsoft Excel (.xlsx)
4. Involve QA in sprint planning and requirements review
QA should be part of the early stages.
That helps the team catch missing acceptance criteria, unclear test scenarios, risky dependencies, and non functional aspects before implementation begins.
This is one of the simplest ways to improve an effective QA process.
5. Triage bugs by severity and business impact
Not every bug needs to block a release.
A typo on a low-traffic settings page and a broken checkout button are both defects, but they don’t carry the same risk. If your team treats them equally, QA becomes slower and release decisions get harder.
A better triage process looks at:
- Severity – How badly does the bug affect the product?
- Business impact – Does it affect revenue, customer satisfaction, compliance, or a key launch?
- Frequency – How often will users run into it?
- Workaround – Can users still complete the task another way?
- Release risk – What happens if this ships?
Prioritization helps the QA team decide which bugs must be fixed before release, which can be accepted temporarily, and which should be moved into the backlog.
6. Run exploratory testing alongside scripted tests
Scripted tests confirm expected behavior. Exploratory testing finds surprises.
Set aside focused sessions where QA engineers explore high-risk areas without following a strict script. Give each session a task, such as:
- “Explore checkout failures on mobile Safari.”
- “Test role-based permissions around account settings.”
- “Look for broken states in slow-network conditions.”
- “Try edge cases around empty, invalid, and expired test data.”
This is where human testers shine.
7. Review and prune your test suite regularly
Old tests slow teams down, so review your test suites after major releases and remove or update tests that no longer add value.
Look for:
- Tests tied to removed features
- Duplicate test cases
- Flaky automated tests
- Overly detailed scripts nobody maintains
- Low-value checks that block release without reducing risk
A lean test suite is easier to trust, and a trusted test suite makes release decisions faster.
Where QA Workflows Break Down
Most QA cycles lose time after testing, when defects need to be explained, reproduced, triaged, assigned, fixed, and retested.
This is the messy middle of the QA workflow.
Common failure points include:
- Bug reports without reproducible steps
- Screenshots without context
- Missing browser or device metadata
- Missing console logs
- No environment details
- Unclear expected vs. actual behavior
- Duplicates across project management tools
- Bugs only being reported in Slack
- Developers unable to reproduce the issue
- QA waiting for clarification before retesting
Most teams don’t have a reliable way to capture bug context at the moment the issue happens. Testers have to assemble the report manually, which means switching tools, copying URLs, checking browser versions, taking screenshots, annotating images, opening DevTools, exporting logs, and pasting everything into Jira, Linear, Asana, or another web project management system.
Under release pressure, details get missed.
Then developers have to reconstruct the issue from fragments:
- “Can you send steps?”
- “What browser was this?”
- “Was this staging or production?”
- “Do you have console logs?”
- “Can you try again with this user role?”
- “I can’t reproduce it.”
Every loop adds delay.
For QA leads and engineering managers, this is one of the highest-leverage places to improve the quality assurance program. Better bug context shortens the distance between “found” and “fixed.”
That’s where Marker.io fits into the workflow.
Better Bug Reporting With Marker.io
Marker.io is a QA tool that helps testers send complete, structured bug reports directly from the page they’re testing.
It improves the stage of the workflow that often slows teams down: bug reporting and triage.
Instead of manually collecting screenshots, technical details, logs, and environment data, QA testers can capture and annotate the issue visually. Marker.io automatically includes key technical context such as screenshots, console logs, environment data, browser metadata, OS details, and more, then syncs the report into your existing project management tool.
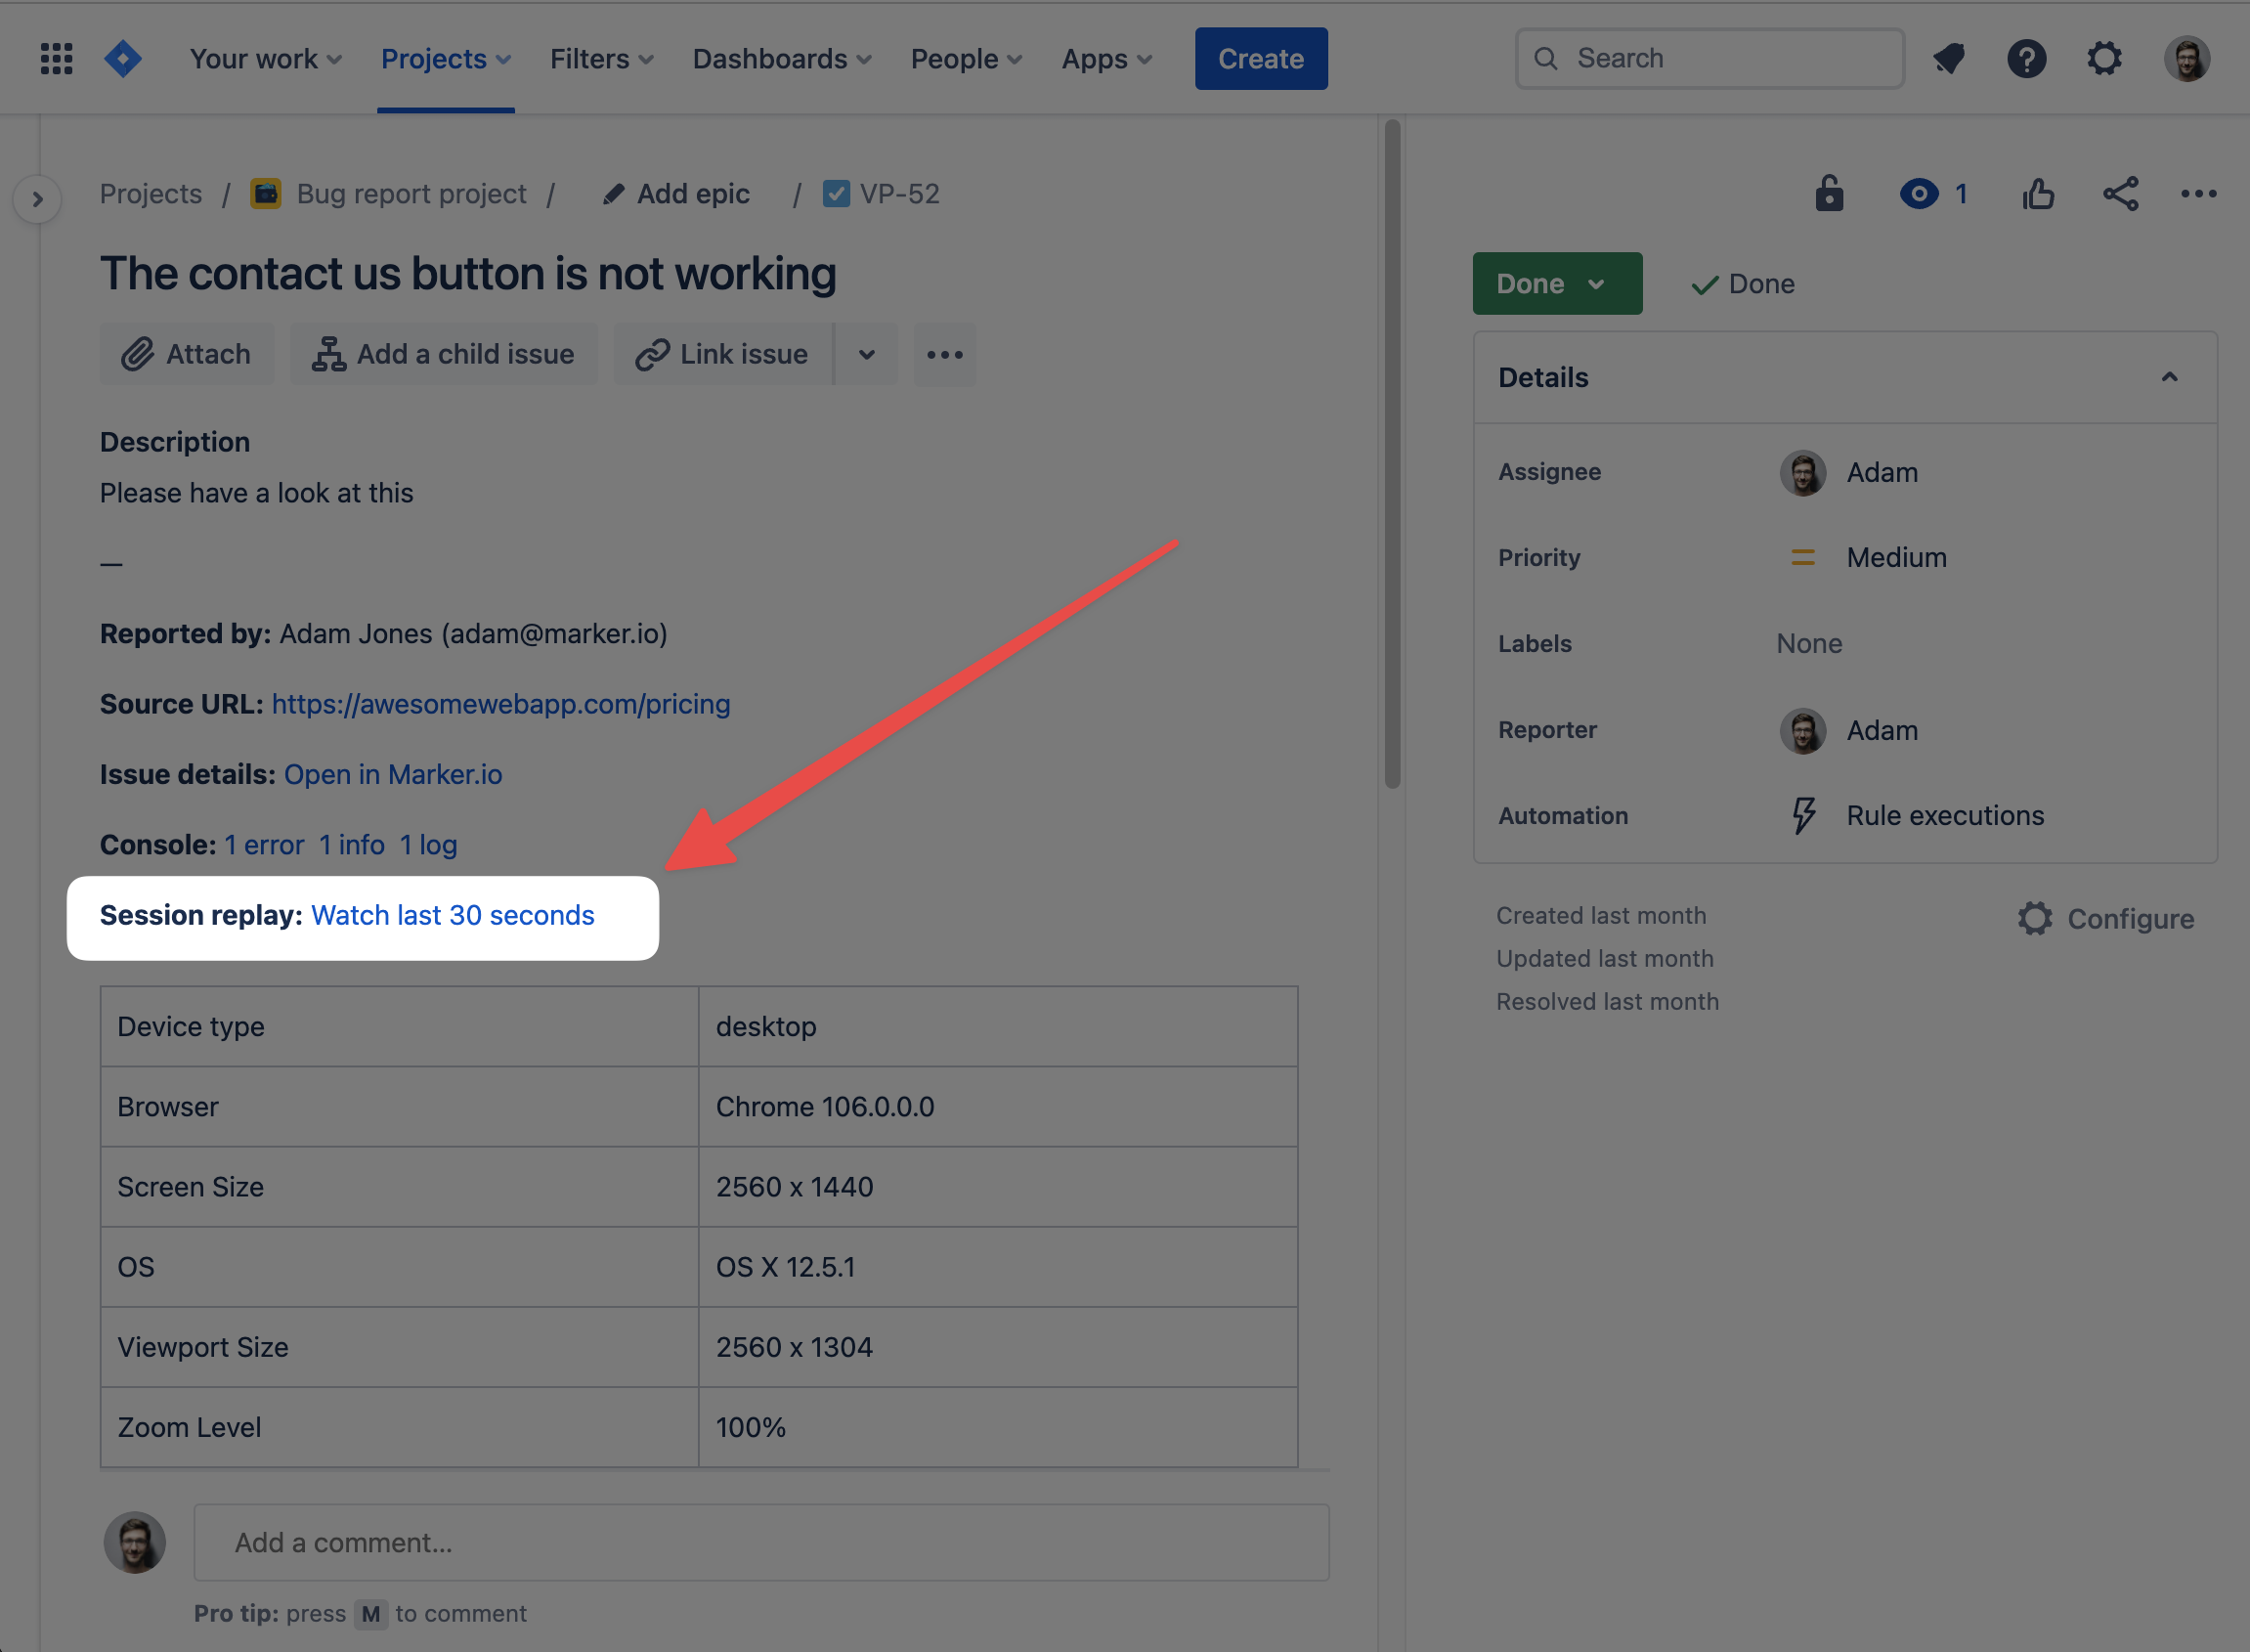
That means bugs can flow into tools like Jira, Linear, Asana, Trello, ClickUp, Azure DevOps, and others without creating a separate reporting system.
For developers, the benefit is simple: they get what they need to reproduce the bug.
For QA teams, the benefit is speed: fewer follow-up questions, fewer manual reporting steps, and cleaner bug tracking.
Teams managing complex web and mobile experiences across multiple brands, regions, sites, test environments, and stakeholder groups really benefit. The more people involved in feedback, the more important that structure becomes.
Marker.io strengthens the handoff between QA and development, where many release cycles quietly lose days.
Try Marker.io free to see how it can improve your QA workflow.
Conclusion
A strong QA workflow is a set of connected stages: requirements review, test planning, test case design, test execution, bug reporting, retesting, regression testing, and release sign-off.
Each stage has a role. The handoffs between those stages are where quality issues often grow: unclear requirements, mismatched test environments, fuzzy ownership, or bug reports without enough context to act.
For many teams, improving bug reporting is one of the highest-leverage changes they can make.
It reduces noise between QA and development, speeding up triage and giving developers the context they need. It also means QA engineers spend less time chasing details and more time improving quality outcomes.
What should I do now?
Here are three ways you can continue your journey towards delivering bug-free websites:
Check out Marker.io and its features in action.
Read Next-Gen QA: How Companies Can Save Up To $125,000 A Year by adopting better bug reporting and resolution practices (no e-mail required).
Follow us on LinkedIn, YouTube, and X (Twitter) for bite-sized insights on all things QA testing, software development, bug resolution, and more.
Will Sigsworth
Will manages organic content at Marker.io. He also works as a marketing advisor and contributor to a number of other SaaS businesses.
Related blog posts

Get started now
Free 15-day trial • No credit card required • Cancel anytime