Manual Testing vs Automation Testing: Comparison & Differences
In this post, we explore the key differences between manual testing and automation testing—and how to implement them in website testing.


Deciding between manual testing or automation testing can be tricky for QA and development teams.
That's why we've put together this handy comparison of manual testing vs automation testing.
The project requirements influence the testing types and testing methods. The key difference is:
- The automated testing approach uses software and scripts;
- Manual uses people only.
In this post, we go over the following in more detail:
- What is manual testing and how to implement it?
- What is automated testing and how to implement it?
- Types of manual and automated testing?
- Where do both fit into QA workflows?
- Comparison: manual testing vs automation testing.
What is manual testing?

Manual testing checks software for bugs and errors and provides feedback.
It’s about seeing how well a new website or web app performs under real-world conditions.
Manual testing involves QA engineers working with human testers:
- Internally during QA testing;
- Externally, with the help of alpha, beta, or crowd-sourced manual testers.
After feedback and bug reports are submitted, those bugs are fixed and changes made.
In most cases, another round of testing and fixes are done before a website or web app is ready to launch.
For complex websites and web applications, manual testing requires more effort.
Manual is more time-consuming than automated testing. You’ll need a team of paid or volunteer testers, or even work with a testing provider.
Testing providers provide a pool of 100s or 1000s of testers worldwide.
This helps you see if a website is user-friendly in multiple regions and on multiple devices.
Whichever route you take depends on:
- Your budget for QA and manual testing;
- QA and manual testing timescales. Do you have a few weeks to deliver a sign-off-ready product or a couple of months?
- How high-profile the software you’re launching is.
Now, let’s look at the six steps of manual testing and the pros and cons of this approach.
How to do manual testing

There are 6 main steps you can follow to implement manual testing.
How you go about this depends on the testing scope, inputs, use cases, and test scenarios.
1. Analyze testing requirements
Every manual test starts with knowing what needs testing. There are a lot of options, such as usability, exploratory, security, and accessibility.
In most cases, during the first internal testing phase, you’ll want to test for all of the above.
Especially anything that could impact the UX, security, or functionality.
2. Create a test plan
Create a test plan that covers everything, including tests based on conditional logic.
For example:
A user wants to add a product to their basket.
- What steps do they need to take?
- Why can they or why can’t they complete the task?
- What can be done to improve the UX/UI and logic flow?
3. Create a testing environment
Before running tests, you need to establish a secure, password-protected staging environment.
You can’t just release your new website or web app into the wild.
In a test environment, changes won't impact the product until they're ready to be put into production.
This also prevents Google from indexing this version of your website before the real one goes live.
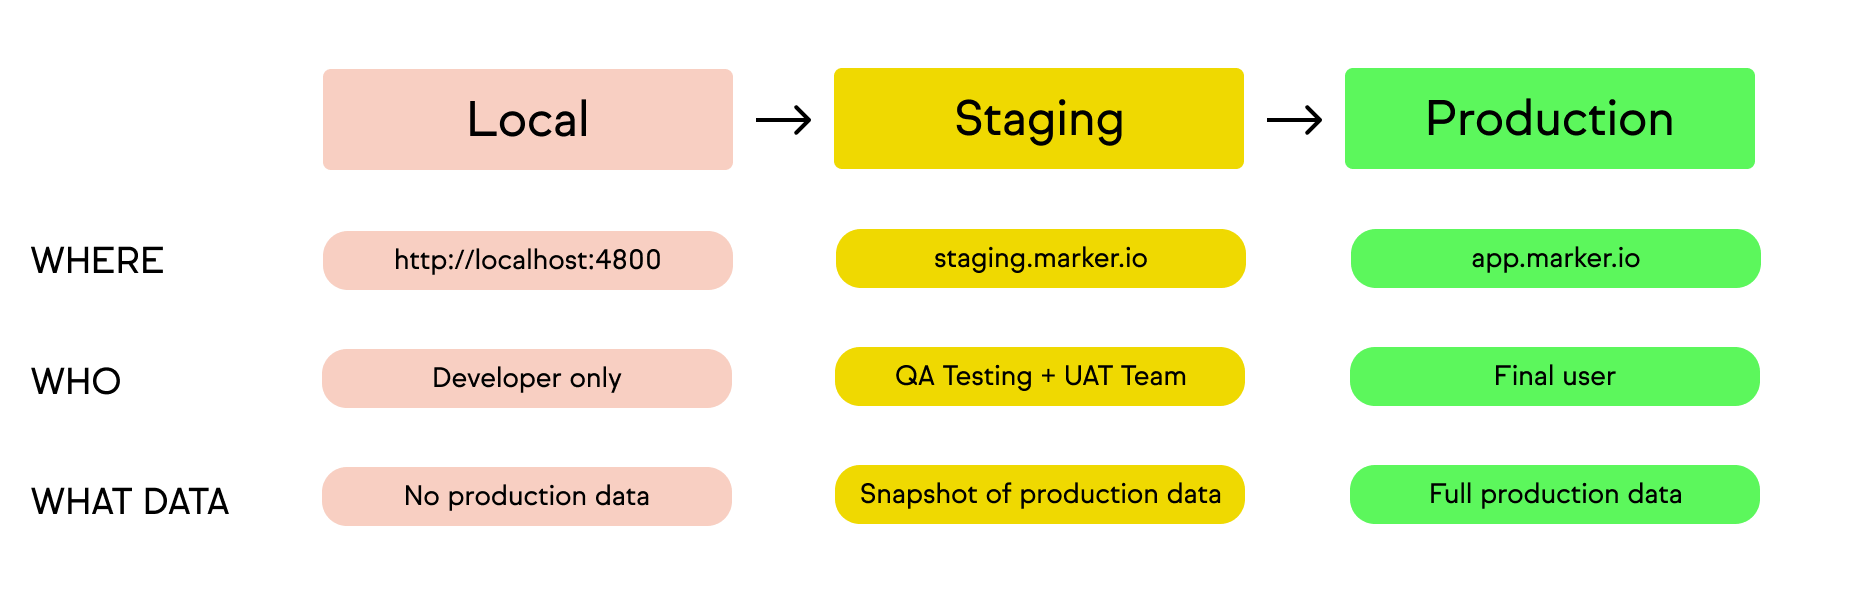
A staging environment allows you to run tests with production data and services in a non-production setting.
4. Write test cases
Now you’ve got a staging environment, you need to write test cases.
Test cases are useful to understand how users will actually use a website or web app in the wild.
Writing these may require revisiting the project scope and user flows to understand each page, function, and button.
Base test cases on those goals.
Each test needs clear-to-follow instructions. Target outcomes such as:
- “Yes, 90% of testers did X successfully”;
- Or it’s a “Fail, as only 5% managed to do Y on [URL]”.
5. Have test cases reviewed by the QA lead
Test cases should always be reviewed before human testers start testing them.
Once tests have been run, feedback and test results can be assigned for bug fixing.
6. Use manual testing tools
Testing a new website or web app without being able to provide useful feedback is pointless.
That’s why manual testing tools should play an integral role in your QA.

Marker.io is one of the most effective manual testing tools you can use.
The tool covers website feedback and bug reporting.
You can use it at every stage of the process: internal QA, client feedback, and user acceptance testing.
With Marker.io:
- It’s easy to collect manual QA feedback—in one click
- Marker.io has the advantage of 2-way sync integrations with every popular PM tool
- Screenshots and videos are included, and plenty of options for annotations too
- Environment, console logs, and network logs capture
- Unlimited number of projects and websites
- Client communication in-app
Save hours on manual testing— try Marker.io for free today.
Pros and cons of manual testing
Now, let’s look at the pros and cons of manual testing.
Pros:
- Can be more cost-effective than automated testing. For example, ad-hoc testing and exploratory testing can be executed quickly.
- For smaller websites and apps, manual testing can be faster since it requires less regression and iterative testing.
- Manual testers mimic real users and can catch things automated scripts might miss. Scripts can't fully replicate human behavior.
Cons:
- Assembling a testing team requires more effort than creating automated test scripts.
- Constantly monitor testers to ensure they follow instructions and submit test reports, bug reports, and any other feedback.
- Repetitive tests can bore testers, making automated testing better for these tasks.
Depending on scope, timescales, and budget, some QA teams use both automated and manual testing.
If using both isn't an option and you're unsure about manual testing, let's explore the benefits of automated testing.
What is automation testing?
Automated testing uses automated tools to perform real-world condition tests at scale.
Automated test execution needs an agile automation framework that’s repeatable.
Automation testing can involve any of the following:
- Usability
- Performance testing
- Load testing;
- API testing;
- Integration testing
- And various other types of repetitive tasks that can be automated and tested.
The ability to test how a website will perform in different environments is crucial.
Businesses need to know how a new website and user interface (UX/UI) perform on different browsers, devices, and operating systems.
All of this testing can be automated.
How to do automation testing
There are 6 main steps that you can follow to implement automated testing.
Implementation depends on the scope, functionality, and required test coverage.
1. Analyze testing requirements
Every automated test starts with knowing what needs testing.
Options include regression testing, performance testing, and aspects of UI and acceptance testing.
Take the same approach as manual testing when working out what needs to be tested.
The advantage is that you can test a lot more, at scale, and a lot faster than with human testers.
2. Create a test plan
Create a test plan that maps out everything that needs testing.
There are 2 ways to write automated scripts:
- You can turn words into scripts using a testing tool such as Selenium or BrowserStack Automate.
- You can write advanced scripts yourself using the more traditional approach.
3. Create a testing environment
Before running tests, you need to establish a secure, password-protected staging environment.
You can’t just release your new website or web app into the wild.
In a test environment, changes won't impact the product until they're ready to be put into production.
This also prevents Google from indexing this version of your website.
A staging environment allows you to run tests with production data and services in a non-production setting.
4. Write test cases
You can now write the relevant test cases that will be input into the software being used to run the automated test cases.
For example, a test case could be to see whether users can login via dozens of popular mobile browsers.
The aim would be to find out:
- Does the login sequence work on every mobile browser?
- How quickly does the website and login sequence function on every browser?
- Are there any browser-specific issues we need to address?
- Are there any bugs we need to fix depending on the environment, browser, or operating system?
All you need to do is write the following (which the software will turn into automated sequences):
- Scenario: Login to the client's website.
- Test steps: The steps it would take a user to login.
- Browsers: List all of the browsers and versions being tested.
- Test data: Confirmation that the login was successful on every browser, plus data on speed.
- Target results: All browsers passed.
- Actual results: All browsers passed.
- Test status: Pass or fail.
5. Have test cases reviewed by the QA lead
Before test cases can be executed, a QA lead should check them.
After running tests, assign feedback and results to relevant team members for implementation.
6. Use automation testing tools
You have dozens of choices when it comes to automation testing tools.
Here’s a list of testing tools we’ve compiled that includes automation testing tools.
Now, let's examine the pros and cons of automated testing and compare it with manual testing.
Pros and cons of automation testing
Pros:
- Can be a lot faster to plan and execute, with quicker results than human testing.
- More accurate than manual testing, especially for testing across hundreds of devices and operating systems.
- Collects data from testing more accurately than a human tester.
Cons:
- Requires an investment in resources or tools to get started.
- Automated testing tools can be complex to use and not needed for simple projects.
- Automated tools can't capture user sentiment and experience like humans can.
Comparison: manual testing vs automation testing
Frequently Asked Questions
How to integrate manual testing with automated testing?
Depending on the scope of testing, timescales, and budget, some QA teams use both automated and manual testing.
💡Pro Tip: Here are 3 ways to integrate manual and automation testing:
- Run manual and automated testing in parallel. The tricky part is avoiding duplication with tests from people and automation tools. You can avoid this by ensuring different test cases and scenarios address different questions.
- Plan which types of testing will answer key questions and implement some manually, like 2-factor authentication logins and purchases.
- Collaborate internally to implement. Ensure both testing teams communicate and share results openly to avoid duplication of tasks and confusion.
Wrapping up...
We hope you’ve found this manual testing vs automation testing comparison useful.
Remember: the goal is not to choose between one or the other, but leverage the strengths of both.
This will ensure thorough quality assurance—and better products and websites.
Did we miss anything? Let us know via e-mail or on Twitter!
What should I do now?
Here are three ways you can continue your journey towards delivering bug-free websites:
Check out Marker.io and its features in action.
Read Next-Gen QA: How Companies Can Save Up To $125,000 A Year by adopting better bug reporting and resolution practices (no e-mail required).
Follow us on LinkedIn, YouTube, and X (Twitter) for bite-sized insights on all things QA testing, software development, bug resolution, and more.
Nathan Vander Heyden
Nathan is Head of Marketing at Marker.io. He used to work as a SEO consultant for various SaaS companies—today, he's all about helping Web Ops teams find more efficient ways to deliver bug-free websites.
Related blog posts


Get started now
Free 15-day trial • No credit card required • Cancel anytime