A Practical Guide to Website QA Testing
In this blog post, we explain how to run website QA testing with manual and automated checks. Step-by-step guide covering functionality, usability, performance, security, and more.


What is website QA testing?
Website QA testing is the process of systematically reviewing a website to make sure it performs and delivers as intended without friction. Your website must be usable and functional enough that users can achieve their end goal.
In other words, going through a quality assurance process helps you improve user experience whenever they visit your website.
A quick note on manual vs. automated website QA testing
There are two major website QA testing approaches:
- Manual testing: Here, QA testers execute test cases for user acceptance testing (UAT), functional testing, UI/UX testing, etc. These are phases that require human judgement to ascertain that your website meets user expectations.
- Automated testing: Here, scripts and tools like Selenium, Cypress, or Playwright run automatic tests to validate your website’s functionality. Automated tests are for repeatable and predictable tasks like regression testing, usability testing, performance testing, and cross-browser compatibility tests.
In short:
Read more: What is manual testing vs. automation testing.
So, when should you combine automated testing and manual testing?
Developers use automated tests for repetitive tasks and manual tests for areas where an actual user needs to verify that every part of your website works as it should.
Together, they can help you understand how your website performs during your QA process.
Types of website QA testing
A QA team tests many aspects of a website, and it usually falls into these 11 types:
- Functionality testing: Ensures all features and elements work as intended. This includes links, forms, and interactive elements of your website.
- Usability testing: Verifies that the website is user-friendly, with intuitive navigation and an effortless user experience.
- Cross-browser testing: Confirms the website works consistently across different browsers (Chrome, Firefox, Safari, etc.), operating systems, and screen resolutions.
- Accessibility testing: Ensures the site is usable for people with disabilities, and that it meets WCAG 2.2 AA standards.
- Performance testing: Measures the website’s speed, load times, and overall performance under various traffic conditions.
- User acceptance testing (UAT): Validates that the website meets the needs and expectations of real users.
- Content testing: Ensures all content is accurate, consistent, and free of errors, including spelling and grammar.
- Regression testing: Checks that recent changes in code or new features haven’t affected existing functionality.
- Security testing: Finds vulnerabilities and weaknesses to protect user data and privacy.
- SEO basics: Verifies that the site is optimized for search engines, with proper titles, meta descriptions, and a clean URL structure.
- Analytics & tagging: Ensures that the tracking systems (e.g., Google Analytics) are properly configured and they collect accurate data.
How to actually QA test your website (step-by-step)
In this section, I will explain different QA checks to carry out during the quality assurance phase of your website development.
Whether you have an existing website test plan, here’s how to QA test your website for each testing type:
1. Functionality testing
Here, the QA team wants to answer the question: "Do all features and flows work as intended?"
This is because if users can’t interact with key elements (think forms, sign up, or add to cart buttons) on your website, it becomes hard to use. It’ll affect user experience or lead to high-bounce rate.
Functionality testing checks
- Verify all links work (no 404s or 302 loops, external links open in a new tab if that’s how you’ve configured it).
- Ensure forms submit correctly, trigger validations, and retain success/failure states.
- Error messages must appear where needed with a helpful copy that nudges users on what to do next.
- Test authentication flows (sign-up, login, password reset, SSO) end-to-end.
- Check that search, filters, pagination, and sorting work properly.
- Confirm file uploads/downloads work and enforce file type/size limits.
- Test the add to cart > checkout > payment workflow (if applicable) to know it’s functional.
- Ensure webhooks/integrations fire with correct payloads.
- Check if emails/notifications are triggered and not sent multiple times.
- Verify that 404/500 error pages render properly and redirects follow rules.
Tools that can help
- Selenium: Automated, cross-browser & cross-platform UI testing.
- Cypress: For functional, end-to-end testing of web applications.
- Marker.io: For manual UAT and QA test on performance and website’s functionality.
2. Usability testing
Here, QA engineers want to answer the question "Can users understand and complete tasks easily?"
This helps you verify that the website is intuitive, user-friendly, and provides the intended user experience. Otherwise, users will struggle to use your site or complete tasks, which can reduce your engagement rate and potentially drive customers away.
Usability testing checks
- Verify that all buttons are clickable and lead to the correct actions.
- Ensure forms are easy to fill, with correct labels, clear validation, and feedback for errors.
- Check that dropdowns, checkboxes, and radio buttons are functional and clearly labeled.
- Test that the website is fully responsive, with readable text and functional buttons on mobile devices.
- Confirm that CTAs (Call-to-Action) buttons are visible and lead users to the next logical step.
- Verify that confirmation messages, pop-ups, and tooltips appear at the right time and are clear.
- Ensure the website's flow is intuitive: users should be able to complete tasks without confusion.
- Check for consistent font sizes, colors, and spacing throughout the site to ensure legibility.
- Test if the website’s search feature is easy to use and provides relevant results.
- Verify that media (images, videos) are properly displayed and load without issues.
Tools that can help
- Marker.io: Collect instant feedback from QA testers (or stakeholders) directly on the site. Each report creates a ticket with an annotated screenshot automatically in your PM tool, and you can assign someone to resolve it as soon as possible.
- UsabilityHub: Test designs with real users to understand how they interact with the website.
- Lookback: Conduct remote usability tests and track user interactions on desktop and mobile browsers for better insights into website performance.
3. Cross-browser testing
Cross-browser testing helps you answer the question "Is there visual and functional parity across browsers, versions, and devices?"
This is because different browsers may render websites differently, and inconsistent experiences can harm the reputation of your website.
It may even affect how visitors use your website especially if they take specific actions from different devices (e.g. shop on mobile, buy on a laptop).
Cross-browser testing checks
- Verify that the website looks consistent design-wise on major browsers (Chrome, Firefox, Safari, Edge).
- Test that all elements (buttons, links, forms) are interactive and work as expected across browsers.
- Confirm that all media (images, videos, animations) are displayed properly and load without issues.
- Ensure the website layout adjusts appropriately across screen sizes and devices.
- Check for any layout shifts, overlaps, or missing content on older browser versions.
- Verify that JavaScript runs smoothly across all browsers and doesn’t affect the features.
- Test forms and input fields to ensure they work correctly in all browsers.
- Confirm that cookies and local storage behave as expected in different browsers.
- Test browser-specific functionalities like caching, pop-ups, and downloads.
Tools that can help
- BrowserStack: Test on a wide range of browsers and devices to ensure cross-browser compatibility. You can also integrate BrowserStack with Marker.io.
- Selenium: Automate cross-browser testing to ensure consistency across multiple browsers.
- LambdaTest: Cross-browser testing tool to verify functionality and visual design on various browsers and devices.
4. Accessibility testing
Here, QA engineers are answering the question "Can everyone perceive, operate, and understand the UI?"
This is because accessibility issues can exclude the over 1 billion people living with disabilities, and lead to negative user experience and legal risks.
Currently, 75% of U.S. adults living with disabilities use the Internet. If they can’t access your website, you’ll lose customers (and can even be sued).
Accessibility testing checks
- Verify that all images have descriptive alt text for screen readers.
- Ensure that all forms are properly labeled with clear instructions and error messages.
- Confirm that the website is navigable via keyboard for users who cannot use a mouse.
- Check that videos have captions and transcripts for hearing-impaired users.
- Ensure color contrast is sufficient for colorblind users to read text and identify UI elements.
- Test whether interactive elements like buttons and links work with keyboard up, down, left, right and enter shortcuts.
- Verify that headings are used correctly to provide clear navigation for screen reader users.
- Confirm that the website works with screen readers (e.g., NVDA, JAWS) and does not cause any interruptions.
Tools that can help
- WAVE: A browser extension to evaluate accessibility issues on your website and provide suggestions to fix them.
- Axe Accessibility Checker: A tool to identify common accessibility issues during manual and automated testing.
- Lighthouse: An open-source tool by Google that audits your site for accessibility, performance, SEO, and more. Lighthouse will analyze your website and return a score out of 100, including a description, affected elements, and suggestions for fixing it.
5. Performance testing
This part of the QA process answers the question: "Is the website fast, stable, and efficient under real conditions?"
Performance testing measures your website’s load times response rate under normal and peak traffic levels. The last thing you want is website crashes when you’ve just released a new product, a new PR just led massive traffic to your website, or you’re in the Black Friday season.
It’ll affect user experience, lead to high bounce rates, abandoned carts, and lost revenue.
So, in preparation for a major event, conduct these …
Performance testing checks
- Measure page load times on high-value pages (e.g., homepage, product pages, checkout).
- Verify time-to-first-byte (TTFB) and Largest Contentful Paint (LCP) are within recommended thresholds to ascertain that your page renders fast.
- Check how quickly images, fonts, and scripts load across devices and network speeds.
- Test how the website handles high traffic or simultaneous user sessions without crashing.
- Confirm that third-party scripts (e.g., analytics, chat widgets, ad pixels) don’t block rendering or affect speed.
- Use lazy-loading for images, videos, and non-critical content to increase page speed and user experience, especially on mobile.
- Verify that caching policies (browser caching, CDN rules) are correctly applied for static content.
- Check for render-blocking resources (CSS or JS) that delay visual content.
- Monitor backend performance (e.g., API response times, database queries) for delays under load.
- Test mobile performance separately, especially on 3G/4G connections and lower-end devices to know the response times.
Tools that can help
- Google Lighthouse: Provides lab data for key performance metrics in the Core Web Vitals (LCP, CLS, and INP). It also provides actionable suggestions to improve website performance.
- GTmetrix: Uses Lighthouse data to diagnose factors that reduce load times. It then provides waterfall charts and performance scores to know the issues and how to fix them.
- WebPageTest: Also integrated with Lighthouse, it helps you analyze the real-world performance of your website from multiple devices, browsers, and locations globally. It helps you find performance issues and bottlenecks (but tests are run manually, unlike GTmetrix that can monitor your website automatically).
- New Relic or Datadog: To monitor your backend performance, slow database queries, and server response time.
6. User acceptance testing
Here, QA testers want to answer the question "Does the website meet the needs and expectations of real users?"
User acceptance testing checks
- Confirm that the website meets the defined business requirements and user needs.
- Ensure that key workflows (e.g., sign-ups, purchases, account management) work in sync from start to finish.
- Test that users can complete tasks without confusion or errors.
- Verify that the user interface is intuitive and that users can easily find what they need.
- Ensure that the website performs as expected under real-world circumstances, with no critical bugs or usability issues. You can use a staging environment for this and install the Marker.io widget to collect reports on bugs and other issues.
- Check that feedback mechanisms (e.g., surveys, contact forms) are functional.
- Validate that all content is accurate, consistent with the brand, and contributes to a good user experience.
Read more: An in-depth guide into UAT.
Tools that can help
- Marker.io: Collect UAT feedback directly on the website through a widget. Each bug report contains annotated screenshots and includes details such as browser type, OS, viewport, etc. and a 30-second playback feature to give you context into what triggered the report.
- UserTesting: Conduct usability tests with real users to get direct feedback on website functionality and experience.
- Lookback: A tool for remote user testing, where you can observe users interacting with the site in real-time.
- Hotjar: Track user behavior through heatmaps and session recordings to identify areas for improvement in user experience.
7. Content testing for quality and SEO
Here, you ask "Is the content fresh, accurate, and consistent with the brand?"
The goal is to ascertain that all website copy and media are correct and aligned with the brand's voice.
Content testing checks include
- Verify all text is grammatically correct and the spelling is accurate.
- Ensure that images, videos, and other media are properly displayed and relevant to the content.
- Confirm that all links within the content are working and lead to the correct pages.
- Check that metadata (titles, descriptions, keywords) is optimized for SEO and is consistent across web pages.
- Verify that published content is consistent with the brand's tone, voice, and messaging.
- Ensure that content is up-to-date, with no outdated references or broken links.
- Check for consistency in formatting, including headings, subheadings, and body text.
- Validate that content is structured properly for readability (e.g., short paragraphs, bullet points, clear CTAs).
- Ensure that legal content (e.g., terms and conditions, privacy policy) is included and up-to-date.
Tools that can help
- Grammarly: A grammar and spelling checker to make sure the content is error-free.
- Yoast SEO: An SEO optimization plugin to optimize the metadata, actual content, and increase readability.
- Screaming Frog SEO Spider: A tool to audit your SEO content, backlink quality, and broken links to find where you can re-optimize your content to increase performance.
8. Regression testing
This answers the question "Did recent changes break previously working features?"
You’ll often make changes in the code or architecture of your website as it evolves (or even during a redesign). Regression testing helps you ensure that new updates or features don’t negatively affect your website’s functionality.
Regression testing checks
- Whether all previously tested and working features still function as intended after updates.
- Whether all major workflows (e.g., sign-ups, checkouts, login) still work.
- To confirm that there are no new bugs in previously stable areas of the site.
- Ensure that all integrated third-party services (e.g., payment gateways, APIs) work without issues after updates.
- Confirm that no visual regressions have occurred, including broken images, layout shifts, or styling issues.
- Test on multiple devices and browsers to ensure consistency across environments.
Tools that can help
- Selenium: Automate regression testing by running the same tests across different browsers and environments.
- Cypress: A robust tool for end-to-end testing of dynamic web applications.
- TestComplete: Use for automated regression testing to check for issues across multiple platforms and devices.
9. Security testing
This part of the quality assurance testing answers the question: "Is the website and user data safe from common security threats?"
This gives you confidence that the website is protected from vulnerabilities and it can protect user data (from theft) and the website (from hackers).
Security testing checks
- Verify that SSL/TLS certificates are correctly implemented and active for secure communication.
- Ensure that all forms and login pages are protected with HTTPS encryption.
- Test for common vulnerabilities, such as SQL injection, XSS (cross-site scripting), and CSRF (cross-site request forgery).
- Confirm that passwords are stored securely using proper hashing and encryption methods.
- Check that user session management is secure (e.g. sessions expire properly to protect against session hijacking).
- Ensure that all sensitive user data (e.g., credit card information) is securely processed and stored according to regulations (e.g., PCI-DSS).
- Test for proper authentication and authorization controls to prevent unauthorized access.
- Verify that error messages do not expose sensitive information, such as database or server details.
- Ensure that third-party integrations (e.g., payment gateways, APIs) are secure and do not introduce vulnerabilities.
- Check for proper protection against malware, spam, and other malicious code injections.
Tools that can help
- Burp Suite: A web application security testing tool to find vulnerabilities such as SQL injection, XSS, and CSRF and assess website security.
- Nessus: A vulnerability scanner to detect potential network-level vulnerabilities and configuration errors.
- SSL Labs: A simple tool to test and ensure that SSL/TLS configurations are properly set up and secure.
10. Analytics & tagging
This quality assurance testing phase helps you answer the question, "Are we tracking the right data accurately, without duplication or gaps?"
This stage helps you ensure that your tracking systems (e.g., Google Analytics, Facebook Pixel) are properly implemented to capture relevant user data.
Without proper analytics and tagging, you can’t measure performance, track user behavior, or make data-driven decisions. Incorrect or missing data can also lead to poor insights and ineffective marketing strategies, which will affect bottom-line revenue.
Analytics & tagging checks
- Verify that Google Analytics (or any other tracking tool) is correctly installed on all web pages.
- Confirm that all relevant events (e.g., clicks, engagement rate, form submissions, etc.) are tracked accurately.
- Ensure that e-commerce tracking (e.g., transactions, cart abandonment) is configured correctly.
- Test that UTM parameters for campaigns are properly tagged and tracked in Analytics.
- Verify that social media tags (e.g., Facebook Pixel, Twitter Tag) are firing correctly on all relevant pages.
- Test that the tracking code does not affect website performance or cause any delays in page load time.
- Ensure that cross-domain tracking is set up properly if your site uses multiple domains.
- Confirm that tag management tools (e.g., Google Tag Manager) are configured and firing tags correctly.
Tools that can help
- DataTrue: A platform for automated tag audits, detect sensitive data leakages, and integrate with CI pipelines for a full analytics QA coverage.
- Google Tag Assistant: Chrome extension for checking if Google tags are installed correctly on the website.
- Hotjar: Provides session recordings and heatmaps to visualize how users interact with your website for qualitative analysis.
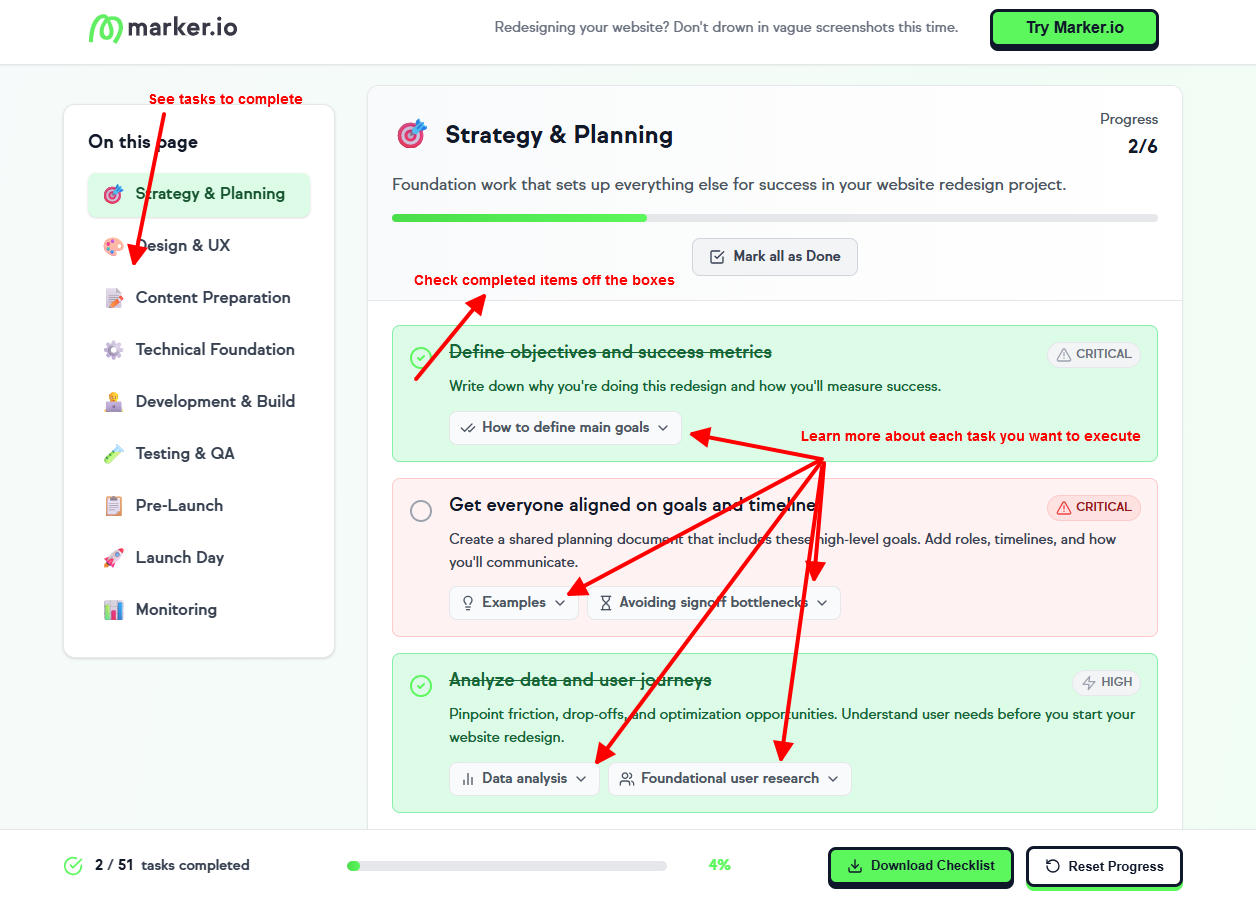
Note: If you want to run a comprehensive website redesign, we designed a full QA checklist for you here.
- It’s intuitive (just check the items on the boxes you’ve completed),
- Divides your activities into the essential phases, so you can easily figure out what you’ve done and haven’t done. (See left page in the image below), and
- provides more information on important aspects you shouldn’t miss:
To get started on your website QA process, here’s a workflow many developers follow:
The website QA workflow
The website quality assurance workflow is a process to make sure a website is functional, secure, and user-friendly before it goes live. It’s designed to identify potential issues early in the web or software development phase to improve usability and user experience.
Here's a step-by-step breakdown of how the QA process typically works:
1. Set acceptance criteria
This is where you establish clear expectations for the website’s performance and functionality. These criteria help define what success looks like and give the testing team specific, measurable goals.
For example, the acceptance criteria of a checkout process might include:
- "The user can successfully add items to the cart and proceed to checkout."
- "The payment process is completed without errors."
- "Confirmation emails are sent after the successful purchase."
These criteria should be reviewed and agreed on by stakeholders before testing begins to avoid misunderstandings about the task to achieve.
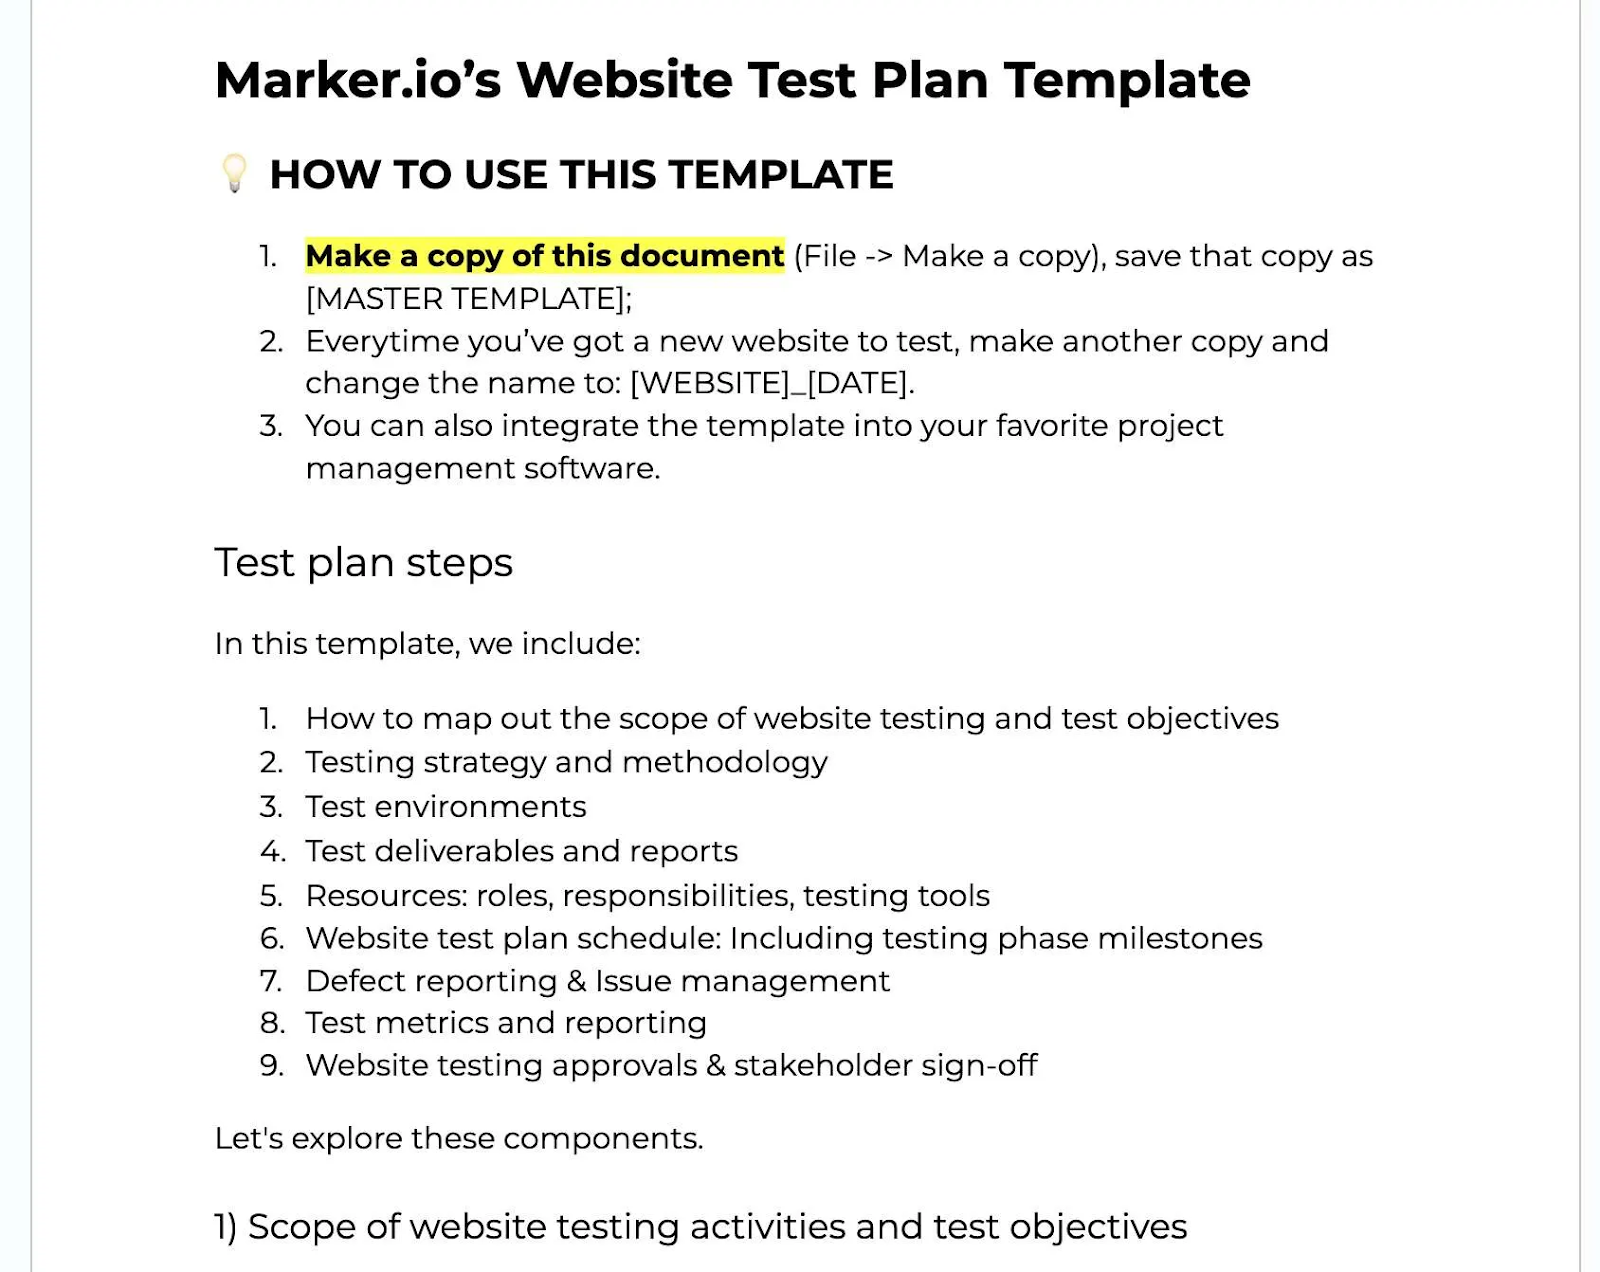
2. Create test plan/checklist
A test plan or checklist outlines the full scope of what needs to be tested. It serves as the roadmap for testing to ensure that all aspects of the website, from functionality, to navigation and user experience, are covered.
This plan should include:
- Test scenarios for each feature (e.g., forms, search functionality, user authentication).
- Test cases for common user interactions (e.g., login process, purchase flow).
- Assigning roles: Who will be responsible for testing each feature or area? Are manual testers needed for subjective tests like usability tests? Will automated tests be used for repetitive tasks like regression tests?
- Testing environment setup: Where will the tests occur? Is it a staging environment, or will there be live site testing (with precautions)?
Agree on a plan and decide on how you’ll execute the specific tests you’ve decided to run.
You can use our website test plan template to get through this phase faster.
3. Run manual/automated tests
Testing can be done manually or automatically, depending on the nature and complexity of your test.
You can run a manual test to check if the website is easy to navigate on mobile devices. You can also use a manual test to validate if the buttons are appropriately sized and clickable on different screen sizes.
Automated testing, on the other hand, is used for repetitive tasks that can be easily scripted, such as regression testing or performance testing. So choose either of the test approaches (based on what you want to test), and go to the next phase.
4. Log/report issues

During testing, log and report all bugs or issues found so you can track them through the resolution process. This step involves documenting each issue clearly, so the development team can address it effectively.
You need to write the following in your bug report:
- A detailed description of the problem.
- Steps to reproduce the issue to help the developers recreate the scenario easily.
- The severity of the issue (e.g., critical, high, low) to prioritize which problems need to be fixed first.
- Screenshots, videos, or console logs to provide more context to the development team.
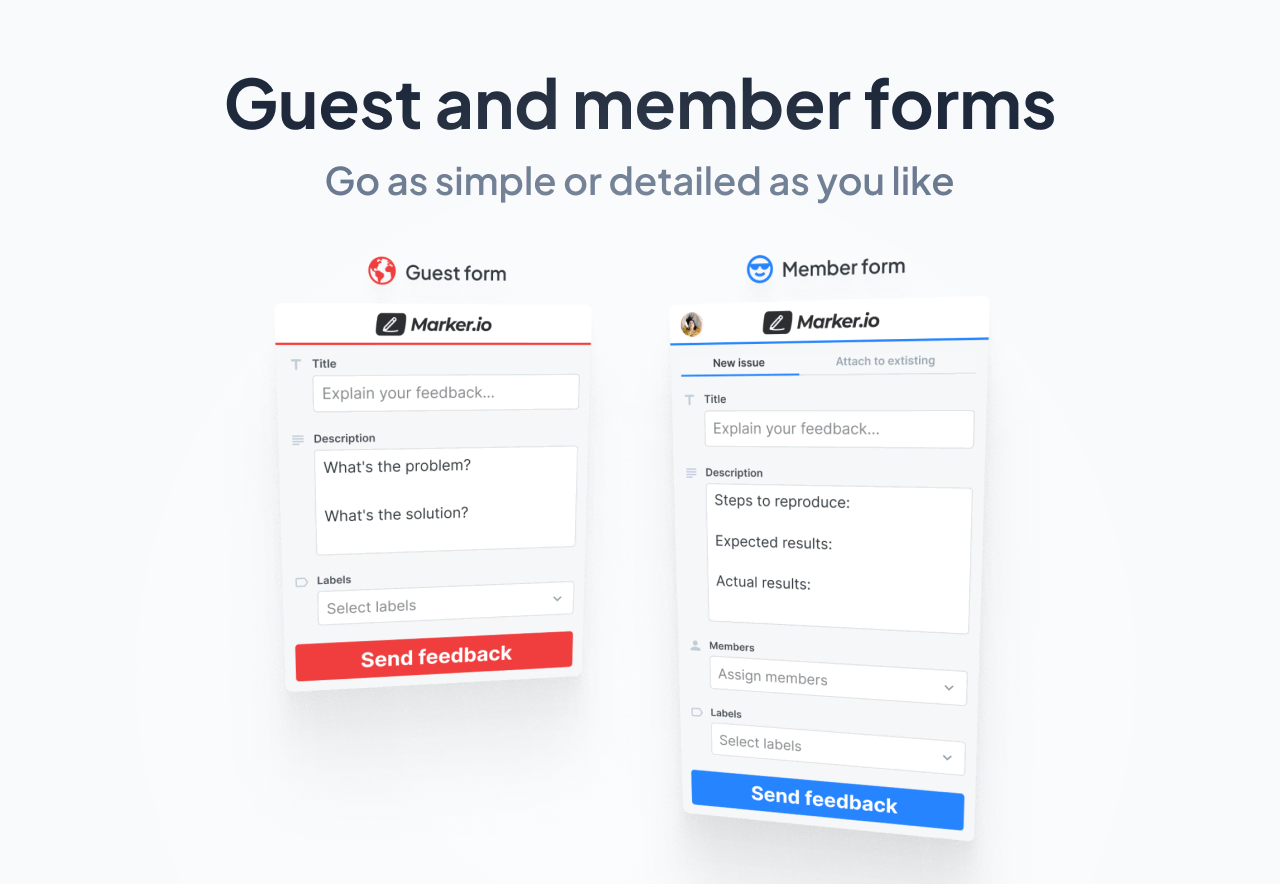
You can easily log annotated screenshots of bugs with Marker.io.
For example, users or stakeholders can report an issue like this:

And you can watch a replay of what they were looking to achieve that triggered the error.
Each report comes with context such as the annotated texts, console logs, and device/browser metadata so your developers can get full context at first triage.
You can also have custom forms for your team members (so they can provide more detailed information for each issue they encountered).
5. Fix & re-test
Once issues are logged, the development team will work on resolving them. And after the fixes are implemented, re-test said issues to confirm that they’ve been addressed and that the fixes didn’t trigger any new issues.
This cycle of fixing and re-testing continues until all issues are resolved and the website meets the acceptance criteria.
6. Stakeholder/client sign-off
Once the website passes all tests and meets the acceptance criteria, get approval from the stakeholder or client. This is the final step before the website goes live.
For an easy sign-off process, encourage the stakeholders to review the website and confirm that it meets their expectations.
Final thoughts
Website QA testing is an ongoing process that ensures your site remains functional, secure, and user-friendly as it evolves.
By combining manual and automated testing, running through different QA types, and following a structured workflow, you can catch issues before they reach users and protect both their experiences and your business outcomes.
Need a simple way to collect, organize, and act on feedback during QA? Try Marker.io free for 15 days.
What should I do now?
Here are three ways you can continue your journey towards delivering bug-free websites:
Check out Marker.io and its features in action.
Read Next-Gen QA: How Companies Can Save Up To $125,000 A Year by adopting better bug reporting and resolution practices (no e-mail required).
Follow us on LinkedIn, YouTube, and X (Twitter) for bite-sized insights on all things QA testing, software development, bug resolution, and more.
Nathan Vander Heyden
Nathan is Head of Marketing at Marker.io. He used to work as a SEO consultant for various SaaS companies—today, he's all about helping Web Ops teams find more efficient ways to deliver bug-free websites.
Related blog posts


Get started now
Free 15-day trial • No credit card required • Cancel anytime