The User Acceptance Testing Checklist to Use Before Every Go-Live
Use this user acceptance testing checklist to prepare your team, environment, test cases, and sign-off process before every go-live. Free template included.


You’re ready to release a new page or part of your site. Internal QA has gone smoothly and the build looks solid in staging. The development team feels confident heading into launch week.
Then real users step in, business stakeholders review the flows that matter most, and gaps start showing up. That’s why user acceptance testing is the last line of defense before go-live – and why running it with a structured checklist is how you make sure you fix every important issue.
In this guide, you’ll get a practical user acceptance testing checklist you can use before every release. We’ll walk through the five phases that matter most: preparation, environment readiness, test case readiness, execution, and sign-off. You’ll also get a ready-to-use user acceptance testing checklist template your team can copy and adapt.
What is a user acceptance testing checklist?
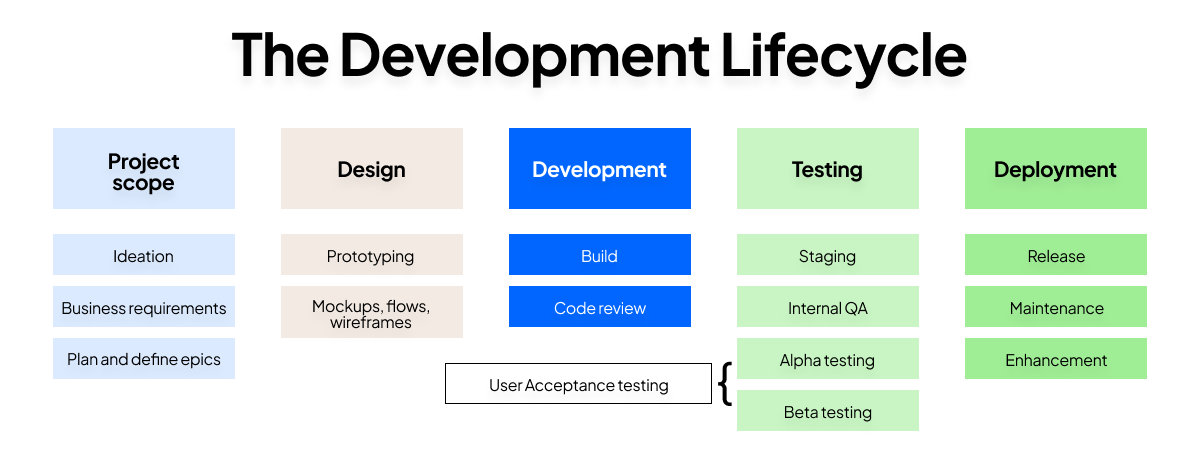
A user acceptance testing checklist is a structured set of checks that guides the full UAT process from pre-testing preparation through to stakeholder sign-off. It helps teams confirm that the software meets business requirements, supports real-world scenarios, and is ready for the final phase before release or deployment – which is where UAT comes in the development lifecycle.
In practice, the checklist serves two jobs at once.
- It keeps the testing team organized. A UAT checklist makes sure the right people are involved, the UAT environment is ready, the right test cases exist, and the testing process doesn’t drift once execution starts.
- It creates a clear record for stakeholders. That matters because user acceptance testing isn’t just about finding bugs. It’s also about proving that real users validate the product from the user’s perspective, and that the software performs the way the business expects before it reaches the production environment.
That record becomes especially important in larger organizations, where business analysts, QA leads, project managers, external users, and end users may all play a role in conducting UAT.
The user acceptance testing checklist
Now that the purpose of a checklist is clear, let’s break it into the phases teams actually move through in practice. This user acceptance testing checklist follows the same sequence most QA leads and project managers use during the final testing phase – and that order matters.
The steps in each phase build on one another. Skip scope alignment, and your test results won’t mean much. Skip environment readiness, and your UAT results may reflect the wrong setup. Skip structured execution, and it becomes harder to monitor progress, track defects, and reach a reliable sign-off stage.
Phase 1: Pre-testing preparation
Before anyone starts clicking through flows, the team needs alignment. This is where a successful UAT process starts, because unclear expectations early on usually become expensive surprises later.
Use this checklist before testing begins:
- Confirm UAT scope and objectives are documented and signed off – Define exactly what this UAT phase will validate, which user journeys matter most, and what is out of scope.
- Define acceptance criteria for each user journey being tested – Every critical flow should have a clear definition of done tied to business requirements and user expectations.
- Identify and assign roles – Name the project manager, QA lead, documentation owner, and testers so ownership is never vague.
- Confirm UAT entry criteria have been met – The build should be feature-complete, internal QA should be passed, and the team should be confident enough to perform user acceptance testing without obvious blockers.
- Brief all stakeholders on what UAT will and won’t cover – That prevents confusion between acceptance testing, regression testing, operational acceptance testing, and broader post-launch validation.
- Confirm the rollback plan is in place before testing starts – If go-live issues surface later, the team should already know how disaster recovery and rollback decisions will work.
- Decide on a UAT tool – There are plenty of user acceptance testing tools out there, but each is slightly different. If you want the best tool for close collaboration between testers and your team, try Marker.io.
Get this phase right, and you create a stable starting point. From there, the next priority is making sure the test environment itself won’t distort what testers see.
Phase 2: Test environment and data readiness
Once scope and roles are locked in, the environment becomes the next risk area. A weak setup creates misleading results, which can make the site seem ready when it isn’t.
Use this checklist to confirm readiness:
- Confirm the UAT environment closely mirrors production settings – The closer it mirrors production, the more confidence you’ll have that the software delivers the same behavior after release.
- Verify that test data is realistic and representative of real-world use – Fake or overly clean data often hides usability issues and workflow edge cases.
- Confirm testers have the correct access, permissions, and login credentials – Nothing slows testing progress faster than access problems.
- Verify that any integrated third-party systems are available and configured – Payment tools, CMS connections, identity systems, analytics setups, and other dependencies should behave as they would in a real-world environment.
- Confirm the build deployed to the UAT environment is the correct version – Teams should never run test runs against the wrong release candidate.
- Check that session recording or bug reporting tools (which Marker.io can support with, as well as UAT) are installed and working in the environment – Good reporting setup makes detailed feedback easier to collect and defect management easier to run.
This phase matters because an environment that doesn’t mirror production closely enough will produce false confidence or false alarms. Once the UAT environment is trustworthy, the next step is making sure testers have the right scenarios to execute.
Phase 3: Test case and scenario readiness
A good environment helps, but it’s not enough on its own. Testers still need a clear structure for what they’re validating, how they’ll record outcomes, and which user needs matter most.
Use this checklist before execution starts:
- Confirm test cases map back to acceptance criteria and user stories – Every UAT test case should support a specific business requirement or expected user outcome.
- Cover core user journeys as well as edge cases – Include sign-up flows, checkout journeys, CMS publishing, compliance checks, and other real-world examples that reflect how the software meets actual needs.
- Ensure test cases include the goal, steps, expected result, actual result field, and any required test data – That creates cleaner test results and makes retesting easier later.
- Confirm all test cases have been reviewed and are accessible to testers in a shared format – A spreadsheet can work. So can a test management tool. The important thing is that everyone can use the same source of truth.
- Check that both structured test cases and exploratory testing time are included in the plan – Not all test cases will catch what real users notice when they move through the site naturally.
This is also the phase where teams should prioritize test cases based on business risk, release scope, and the impact of failure. In some launch projects, you may also include contract acceptance testing or regulation acceptance testing checks, if you need to comply with specific obligations.
Once the scenarios are solid, the checklist moves into live execution, where structure matters even more.
Phase 4: Test execution
This is where the UAT process becomes visible. Testers are running flows, giving user feedback, and surfacing issues in real time. Without discipline here, even thorough testing can turn messy fast.
Use this checklist during active UAT:
- Confirm all testers have been onboarded and briefed before execution begins – They should know the goals, the test environment, the reporting workflow, and how to flag blockers.
- Verify that every issue report includes what was tested, steps to reproduce, expected result, actual result, and environment details – That context reduces back-and-forth with the development team.
- Confirm a defect triage process is in place – Teams should classify issues clearly, such as blocker, high, medium, or post-launch.
- Check that critical and blocker defects are being retested after fixes, not just marked resolved – A closed ticket is not the same as a verified fix.
- Confirm test case completion is being tracked against the plan – Teams need a reliable way to monitor progress, testing progress, and coverage across individual test runs.
- Verify that a feedback categorization system is in place to separate issues needing discussion from quick fixes – Not every piece of user feedback belongs in the same queue.
For larger teams, this is where a test management tool can help with powerful tracking capabilities, customizable dashboards, and clearer ownership. Whether you use software or a shared document, the goal is the same: assign tasks, track defects, monitor progress, and keep the UAT phase moving.
For larger teams, a tool like Trello can help with powerful tracking capabilities, customizable dashboards, and clearer ownership. Marker.io integrates natively with Trello so you can make it easy for testers to communicate issues to your team. Here’s the Marker.io and Trello integration in action:

Once execution is complete and retesting is done, the final question is whether the release is truly ready for go-live.
Phase 5: Sign-off and go-live readiness
Everything in the earlier phases leads here. If preparation, environment setup, test cases, and execution were handled properly, sign-off becomes a decision backed by evidence instead of one based on gut-feel.
Use this checklist before release:
- Confirm all blocker and critical defects have been resolved or formally accepted – Open risk should be visible, intentional, and agreed.
- Get written sign-off from business stakeholders confirming UAT is complete – Informal approval is not enough when the stakes are high.
- Document any known issues being deferred to post-launch with agreed owners – Deferred work should never disappear into a vague backlog.
- Confirm the go-live date, deployment plan, and rollback process are agreed and communicated – Everyone should know what happens before, during, and after release/launch.
- Verify that post-launch monitoring is in place for the first days after release – Even successful UAT needs follow-up once real traffic hits the production environment.
That completes the checklist flow from entry criteria to exit criteria. Now let’s turn it into a ready-to-use format your team can copy immediately.
Phase 6: document what worked and what didn't for future UAT
Once sign-off is complete, most teams move straight into the next release. But that usually means the same friction points show up again in the next UAT phase. Adding one final review step turns the checklist into a continuous improvement tool, not just a pre-launch control document.
Use this checklist after go-live readiness has been confirmed:
- Summarize test results, defect trends, and recurring blockers – Capture what slowed the testing process down and where issues clustered across user journeys.
- Document which test cases and scenarios delivered the most value – Note which UAT test cases uncovered meaningful issues and which ones added little insight.
- Gather feedback from testers, stakeholders, and the QA lead – Ask what caused confusion, where the process felt slow, and what would make the next round easier to run.
- Record environment, access, test data, or tooling issues – If the UAT environment didn’t fully mirror production, or if reporting tools created friction, document it clearly.
- Note any gaps in acceptance criteria, scope, or communication – This step helps teams tighten entry and exit criteria before the next release.
- Assign owners for improvements before the next UAT cycle – Lessons learned only matter if someone is responsible for acting on them.
- Store the retrospective in a shared location – Future project teams should be able to reuse what was learned instead of rebuilding the process from scratch.
This final step helps teams run a more effective UAT process over time and makes sure that the checklist becomes stronger with each release.
User acceptance testing checklist template
Now that the full process is mapped out, here’s a user acceptance testing checklist template to use before go-live. You can copy this into a doc, spreadsheet, or test management tool and adapt it to your own software development process.
Phase 1: Pre-testing preparation
Phase 2: Test environment and data readiness
Phase 3: Test case and scenario readiness
Phase 4: Test execution
Phase 5: Sign-off and go-live readiness
Phase 6: Document what worked and what didn’t for future UAT
This template covers the checklist itself. Here’s a simplified version you can download for a quick one-pager:
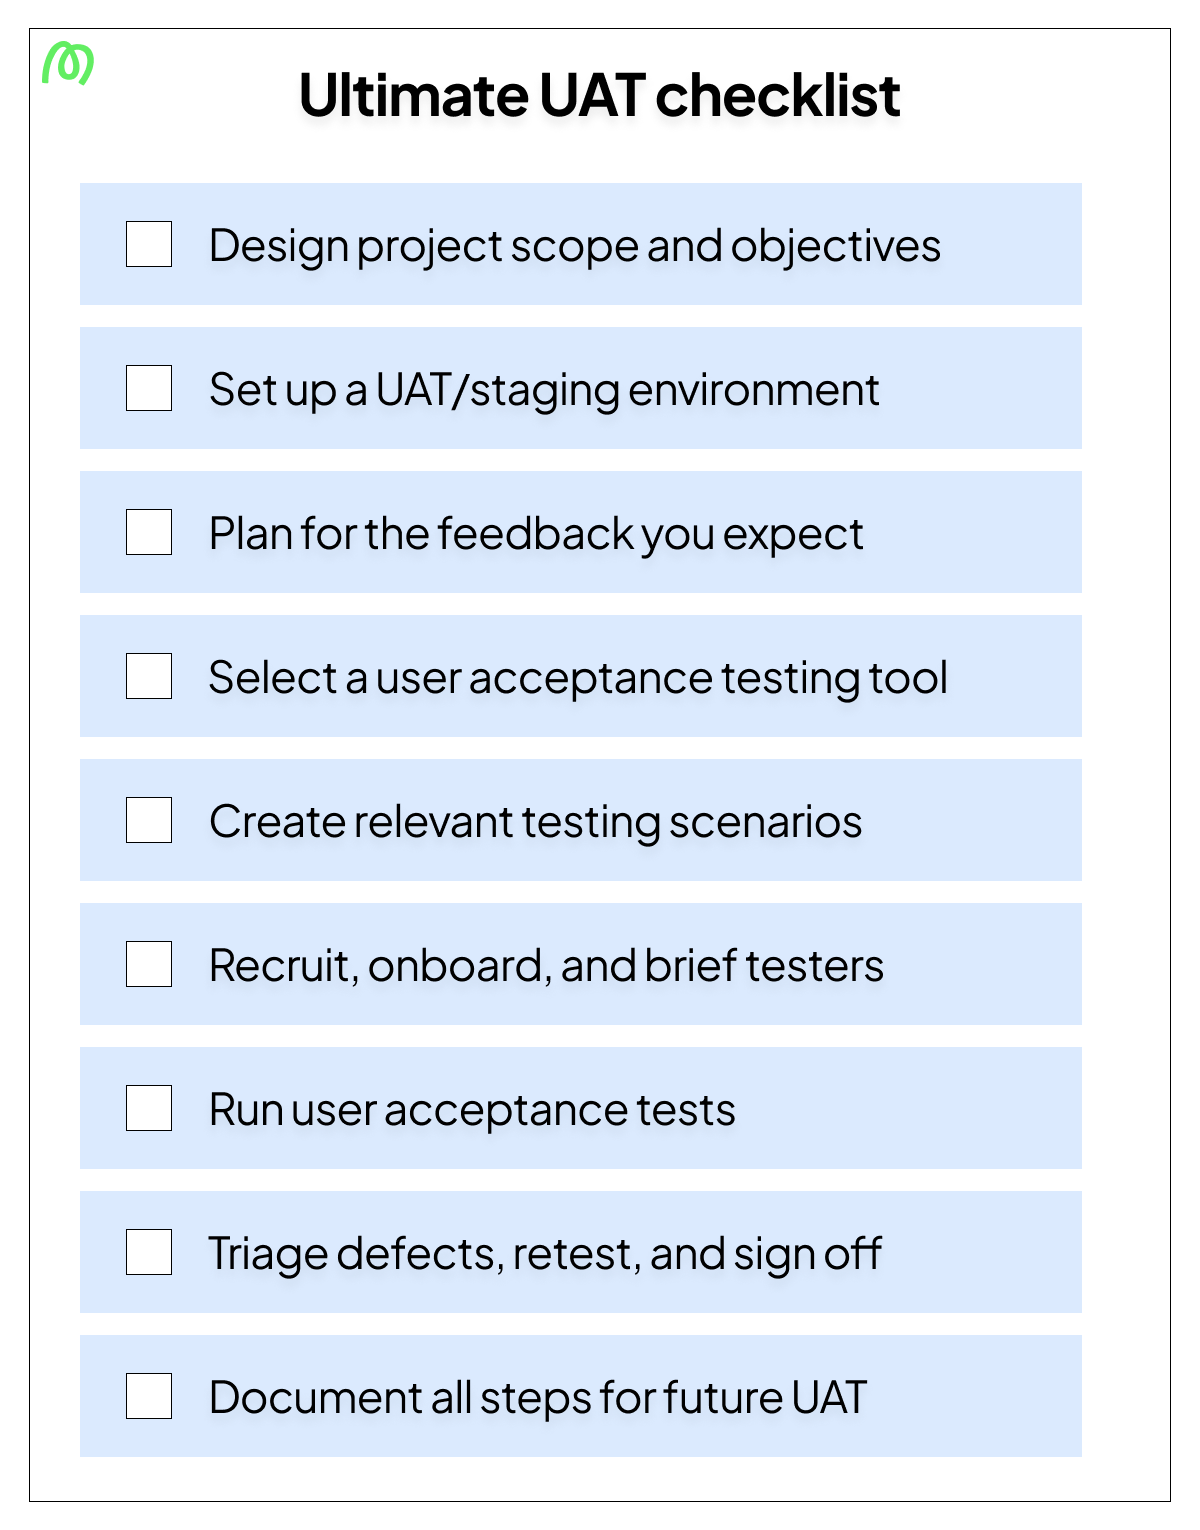
Download your UAT checklist PDF
Get your free user acceptance testing checklist PDF to share with colleagues and manage accessibility offline. Simply save this page as a PDF with these easy steps:
- Open this checklist in your browser.
- Open Print
- Windows:
Ctrl + P - Mac:
⌘ + P
- Windows:
- In the printer/destination options, select Save as PDF (or PDF).
- Tap/click Save (or Download) and choose where to store it.
- Share the saved PDF with your colleagues across email, Slack, WhatsApp, AirDrop, and more.
Teams looking for a full UAT plan document can use our user acceptance testing template to go deeper.
Common UAT checklist mistakes
A checklist helps only when teams use it properly. In real projects, the biggest problems usually come from rushing the basics or treating the checklist like a formality.
Here are the most common mistakes:
- Starting UAT without agreed acceptance criteria: If there’s no shared definition of done, teams can’t judge whether the software meets business requirements or user expectations.
- Using the wrong testers: Developers and QA can support the process, but user acceptance focuses on real users, end users, business stakeholders, beta testers, or external users who can validate the product from the user’s perspective.
- Skipping environment readiness checks: A staging setup that doesn’t simulate real-world conditions can make software performs differently in testing than it does after launch.
- Not tracking defect status systematically: If teams don’t track defects, retests, and ownership, it becomes unclear what has actually been fixed and what still threatens go-live.
- Treating sign-off as informal: A thumbs-up in chat is not the same as documented approval. Formal sign off protects the team, clarifies risk, and creates accountability.
Avoiding these mistakes makes the checklist far more useful from one release to the next.
Conclusion
A thorough user acceptance testing checklist is what separates a confident go-live from a last-minute scramble. The more consistently teams use one, the easier it becomes to run an effective UAT process, collect better user feedback, and release with less uncertainty.
And when you want to make test execution easier, Marker.io helps. Testers can report issues directly from the staging environment with annotated screenshots and automatic metadata, so your team spends less time chasing context and more time fixing what matters.
Start a free trial of Marker.io today.
User acceptance testing checklist FAQs
What should a user acceptance testing checklist include?
A strong UAT checklist should cover five areas: preparation, environment readiness, test case readiness, execution, and sign-off. That means confirming scope, acceptance criteria, roles, entry and exit criteria, test environment setup, UAT test cases, issue reporting standards, defect management, and final stakeholder approval.
How is a UAT checklist different from a UAT test plan?
A UAT checklist is a control document. It tells you what must be confirmed before go-live.
A UAT plan goes deeper. It explains the broader user acceptance testing process, including objectives, scope, timelines, testers, reporting workflows, and how the team will conduct UAT from start to finish.
Who is responsible for completing the UAT checklist?
Usually, the QA lead or project manager owns the checklist. But completing it is a shared effort.
Business analysts may define acceptance criteria. The development team may confirm build readiness. Stakeholders and real users may validate outcomes. The documentation owner may maintain the evidence trail. Ownership is central, but input is cross-functional.
When should you run through the UAT checklist in the development lifecycle?
You should start using the software user acceptance testing checklist before the UAT phase begins, not on the day testing starts. Preparation checks happen before execution. Environment and scenario checks happen before test runs begin. Sign-off checks happen after testing is complete and before release.
That timing is what makes the checklist useful inside the software development lifecycle. It supports the final testing phase instead of reacting to it.
What happens if items on the checklist aren’t completed before go-live?
Risk increases. Fast.
You may end up testing the wrong build, using weak test data, missing critical user journeys, or launching without documented acceptance. That can lead to poor user satisfaction, avoidable defects, confusion across stakeholders, and, in some cases, damage to the company’s reputation.
Can the same UAT checklist be reused across different projects?
Yes, but it should be adapted, not copied blindly.
The best checklist structure is reusable across software development projects, future updates, and release cycles.
However, specific acceptance criteria, test cases, roles, regulation checks, and sign-off requirements should reflect the project’s scope, risk, and user needs.
What should I do now?
Here are three ways you can continue your journey towards delivering bug-free websites:
Check out Marker.io and its features in action.
Read Next-Gen QA: How Companies Can Save Up To $125,000 A Year by adopting better bug reporting and resolution practices (no e-mail required).
Follow us on LinkedIn, YouTube, and X (Twitter) for bite-sized insights on all things QA testing, software development, bug resolution, and more.
Will Sigsworth
Will manages organic content at Marker.io. He also works as a marketing advisor and contributor to a number of other SaaS businesses.
Related blog posts


Get started now
Free 15-day trial • No credit card required • Cancel anytime