What is Tree Testing? A Practical Guide
Learn what tree testing is and how to run a tree test step by step. Improve your information architecture—and create a more user-friendly website.


A shopper wants to return an item they’ve bought and couldn’t find the label for Returns. They check the header, Help node, then check the Account parent node, and still cannot find it.
They then raise a support ticket.
Findability issues like this often overwhelm the support team with avoidable tickets. It can also increase churn when users assume your brand is hiding return information on purpose.
Findability issues happen when you rely on inside-out navigation, e.g. when categories and labels reflect how your team thinks about the site, not how your users actually look for things.
To remedy this, you need a fast, neutral way to check whether your navigation makes sense from the user’s point of view.
And that’s where tree testing comes in.
What exactly is tree testing?
Tree testing is a UX research method that evaluates how easily users can find key information in a new website or app structure.
You can use it to test a new tree structure (e.g. new nodes) and to know where people get lost in your sitemap.
The tree, in this context, is the labels on the right and left pane in the image below from Petco.
The labels on the left are the parent nodes, while the ones on the right are child nodes.

As you can see below, if I hover on another parent node, Cat, I see a new set of child nodes each of which leads to specific pages on the website.

Why do tree tests matter?
Tree tests matter because visitors rely on the labels on your website to move around.
Testing your information architecture (IA) helps you validate that they can find key information without friction, hesitation, or backtracking (which is bad for user experience).
When do you use tree testing?
A tree test is a fast and easy way to validate your website architecture and nav structure. Teams use it because it helps them:
- Find the friction in their architecture: The test points them to confusing labels, missing top-level groups, and dead-ends where users expect to find information so they can address these issues while redesigning the website.
- Define success rates in terms of how accessible a website or app is. You can track metrics like
- success rate,
- first click,
- time to find the answer and
- whether or not the participants backtracked while finding their results.
- success rate,
All of these help you understand whether your IA fits the mental model of your customers.
- Benchmark and improve architecture: you can conduct tree tests before a redesign, then benchmark again to know if it’s easier to navigate now. This helps to…
- Reduce business risk because user-friendly IA reduces support tickets, protects conversions, and improves user satisfaction across key journeys.
- Lastly, a tree test complements other methods. For example, teams use card sorting to build a tree then use tree testing to validate it with real users.
How to conduct tree testing (step-by-step)
Here is a simple 5-step process you can use to conduct a tree test.
1. Understand why you’re running a tree test (and what you need to find out)
Before you build anything, you need clarity on two things:
- What exactly are you trying to test?
- Who are you testing it for?
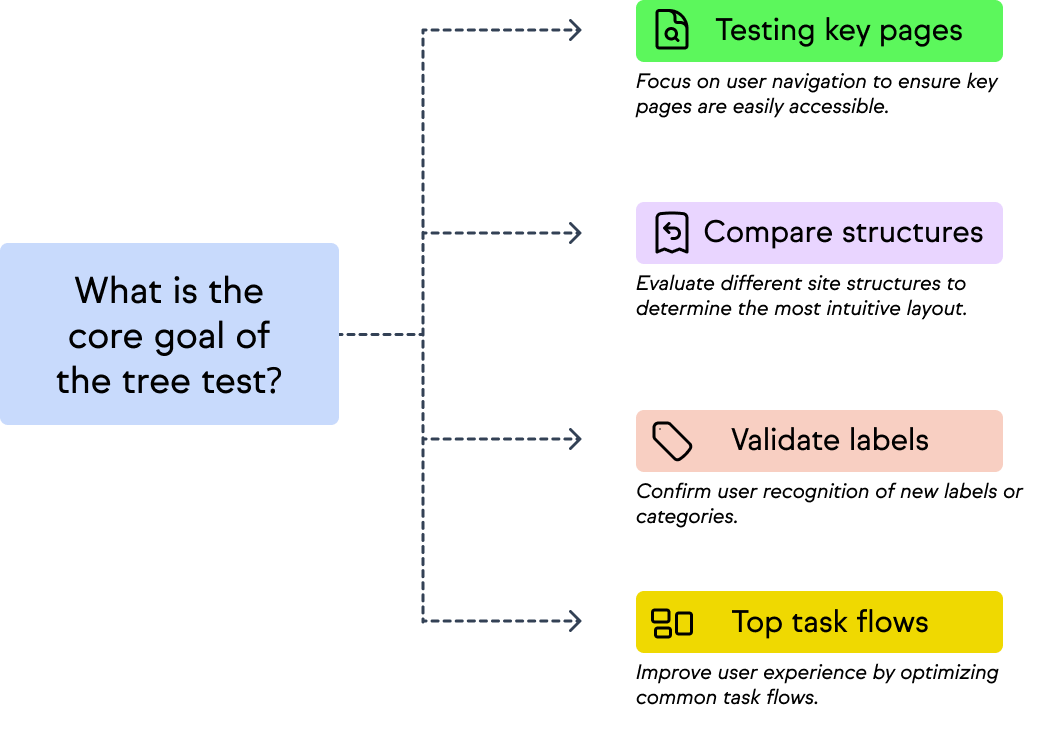
For example, are you in the development phase and are concerned that users can’t find key pages?
Do you intend to compare two or more versions of a proposed site structure, and need help deciding which grouping makes sense? E.g., whether to lump “Help & Returns” together or separate them.
Do you want to validate new labels or categories on an existing design to decide whether users will recognize “Start a return” if it’s renamed to “Process return”).
Choose a core goal so you don’t end up testing everything (which can skew your data).
Next, decide where you want to test. Rather than testing everything on your IA, decide whether to focus on a key section, a top task flow (starting a return, checking shipping options), or a nav pattern you’re unsure about.
For example, let’s say your users often contact support to ask about refund timelines. That’s a sign that the “Refund policy” may be hard to find or it’s living in the wrong place.
Instead of testing the entire Help section, you can limit the tree test to the Returns > Refund Policy path to understand the user’s POV.
2. Define your navigation structure
Once you're clear on what you're testing and why, the next step is to define the tree.
That is, the simplified structure that users will interact with during the test. At the basic level, a tree contains:
- Top-level categories (parent nodes) — broad sections like Shop, Help & Returns, Account.
- Subcategories (child nodes) — nested groupings, like Orders, Shipping, or Profile.
- Items (or leaf nodes) — the final destinations users are meant to find, like Start a return, Order history, or Refund policy.
Here’s a simple example of a tree structure from an e-commerce Help section:

This tree shows clear nesting and helps isolate user behavior when trying to find something like “Refund policy.” Are they looking under Returns? Or do they click on Orders first?
Tips for building your tree
- Keep it realistic and minimal: Again, include just enough categories to support the tasks you want to test. You don’t need to test the entire site structure, so reduce it to the branches users will interact with during the study.
- Use familiar, user-friendly labels: Your users should recognize the terms at a glance. Avoid internal jargon or team-specific phrasing. For example, if your team calls it “Logistics,” but users expect “Shipping,” use “Shipping.”
- Keep labels short and unambiguous: Stick to one to three words. Long labels can give away answers or confuse participants. For example, instead of “Click here to begin the return process,” use “Start a return.”
- Avoid duplicates or overlaps: Every item should appear in only one place. Tree testing tools don’t support cross-linking like real websites do, so pick the most likely location.
Use consistent levels: Don't mix shallow and deep branches unnecessarily. Most users lose confidence after 3-4 clicks. Ideally, structure your tree to support most tasks within two or three steps.
For example, let’s say this is a draft of a Help tree for a fashion e-commerce site:
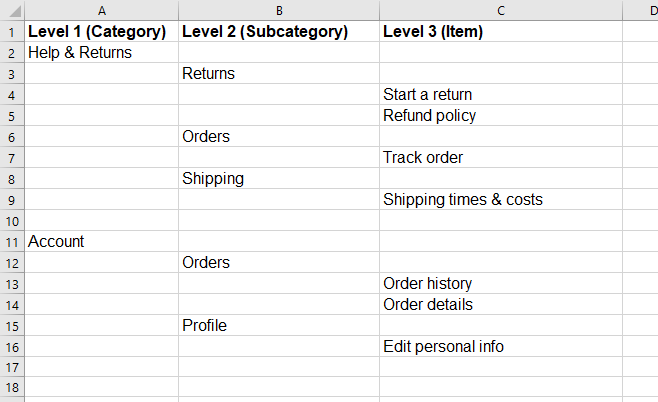
Each of these rows would become a node in your tree. Participants will see a plain-text version like the above during the test (no dropdowns, styling, no search bar). If the spreadsheet looks like this (an example from Optimal Workshop):

The actual tree will look like this (if you’re using Treejack by OptimalWorkshop for your test):

Next,
3. Choose a tree testing tool
You can choose between Optimal Workshop (Treejack), UserZoom, or Maze. You can even use spreadsheets if you’re a lean team with a tight budget. I’ll discuss more tree testing tools in the next section.
If you're just getting started, Treejack is the most widely used and easiest to learn.
Many of the tools in the market offer free trials or limited runs, so you can use them for tests before committing.
Just make sure the one you choose lets you export data (preferably in CSV) so you can dig deeper when necessary.
4. Write strong, realistic tasks
Now that your tree is structured and loaded into your testing tool, it’s time to write the actual tasks that participants will complete.
Each task is a mini scenario. A goal the user needs to achieve by navigating your structure.
Now, what makes a good tree testing task?
Good tasks are:
- Realistic (they reflect actual goals your users have).
- Neutral (they avoid hinting at the correct answer).
- Specific (they clearly state what the user needs to find).
- Relevant (they tie back to business goals, support data, or user feedback).
On the other hand, bad tasks point users to the answer, are too wordy, and are usually up to 20 tasks.
Your goal with the test is to learn how people navigate your IA when they’re trying to complete common (or problematic) tasks.
That means your task wording needs to be clear, but not leading.
Good vs. bad task examples:
Let’s say you want to test whether people can find your refund policy.
- A good task could be “You’ve returned a product and want to know when you’ll get your money back. Where would you go?”
This mirrors a real scenario, doesn’t give the answer “find refund policy”, and prompts the user to think about where the information might be.
- A bad task might be a statement like “Find the refund policy.” This is because it gives the answer by using the exact label and it skips the context that makes the task realistic.
Here are some types of tasks to include in your test
- Warm-up tasks: These are easy, familiar tasks that help participants get used to the tree. For example, “You’re shopping for a man’s jacket. Where would you go?”
- Core business goal tasks: These are tasks tied directly to your most important site journeys (think shopping, support, account settings, etc.). For example, “You want to check the status of your recent order.”
- Problem area tasks: These are based on past issues (e.g. high support tickets for the same issue, comes up often during customer interviews, etc.). For example, “You’ve been charged twice and want to speak to someone about it. Where would you go?”
5. Recruit participants and run the test
Now that your tree and tasks are set in your tree test tool, it’s time to recruit the testers. These should ideally be your target audience (or are a close match). A few tips to getting them:
- Invite your current users (through email or in-app notifications). If you have an online community via Slack or Instagram, that will also help.
- Use built-in panels of participants from platforms like UserTesting, Optimal Workshop, and Maze. They let you choose the demographics, behaviors, and other criteria to get the best possible result.
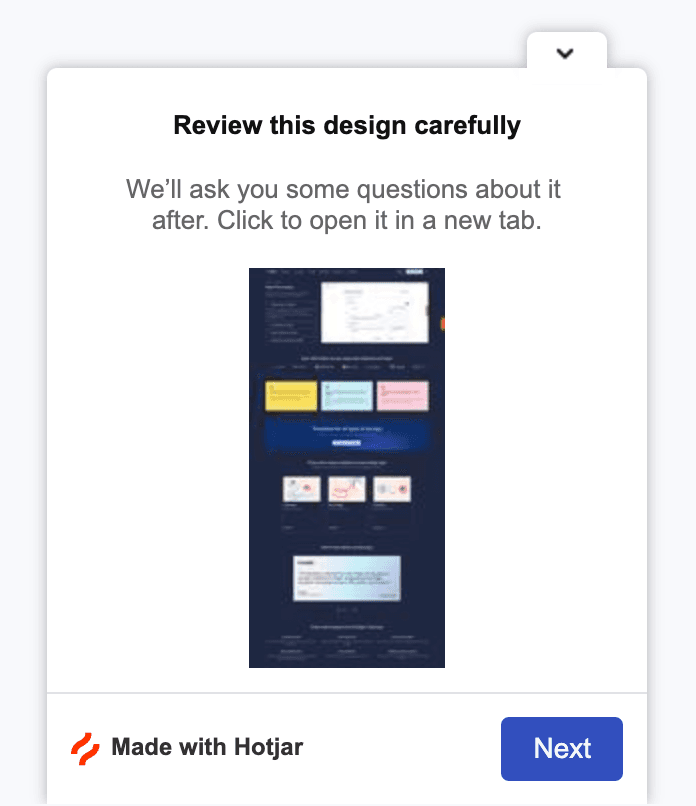
Use widgets from tools like Marker.io or Hotjar to test the usability of your website or web app when they’re navigating through something.
This is usually on a live website though, but it can be helpful for the UAT stage of your test.
Here’s an example of a prompt from Hotjar:
How many participants do you need?
Most tree testing studies need a range of 20-50 participants. That’s usually enough to find navigation patterns, major friction points, and trends in backtracking, success, and first click accuracy.
That said,
- Fewer than 15 participants may not give you enough data to spot findability issues with your IA, and
- More than 50 participants, while great to benchmark and compare multiple trees, might not be necessary for an initial run.
The key is to value quality over quantity.
Once you get participants, launch your test, and add a thank-you screen to show your appreciation. You can also include a popup to ask “Was anything confusing?” so you can decide whether to trust your test result or not.
6. Analyze results
Once your tree test is complete and have collected enough responses, analyze the results.
Most tree testing tools have built-in analytics to visualize your results, and if you’re using spreadsheets, you can still extract the same metrics manually.
Some of the metrics that matter include:
- Success rate: The percentage of testers who ended the task on the correct answer. This is your clearest signal of whether users found what they were looking for.
- Directness: The percentage of testers who went directly to the correct answer without clicking around or backtracking.
- Time taken: How long it took users to complete the task. Higher times often mean they hesitated, were confused, or had too many decisions to make.
- Path analysis: A visual trace of how users moved through the tree. It shows you where they clicked first, where they backed out, and how many steps it took to reach the destination.
Here’s an example from Optimal Workshop:

- Benchmark over time: If you run tree tests iteratively (before and after changes) or across two tree structures, you can benchmark progress, like Optimal Workshop shows here:

Tree testing tools to try
There are several tools that make it easy to run, manage, and analyze your tree testing study. Here are four popular options:
- Optimal Workshop (Treejack): This is the industry standard for tree testing because it’s great for usability teams, supports CSV import/export, and provides detailed path visualizations. It’s also super user-friendly.
- UserZoom: This is ideal for enterprise-level research. It combines tree testing with broader UX testing tools and analytics.
- Maze: A fast, modern option for unmoderated testing. It works well for product teams that already use Figma or prototypes and has AI-powered features for reporting.
- Useberry: This is a lightweight and highly visual tree testing tool. It’s good for smaller studies or when speed matters.
- DIY (Spreadsheet + Google Form): For very small teams or no-budget projects, you can simulate a simple tree test using a spreadsheet and conditional logic (e.g. Google Forms). This is not ideal for a large scale test, but it works.
Note: Choose a tool based on your team’s workflow, level of research maturity, and whether you need to collaborate with stakeholders during analysis. That said, Treejack is most preferred for many tests because it’s easy to use.
Common challenges in tree testing (and how to solve them)
Even when your test is well-planned and your tree is solid, there are a few issues that can throw off your results.
Here are three things to watch out for and how to tackle them:
1. Users succeed in the test, but still get lost in real life
This is probably the most common “false positive” you’ll see in tree testing. This happens because users can see the visual design elements and may rely on search bars, page hierarchy, styling, and even CTA buttons to navigate your site.
Just because someone could find Refund policy in a clean tree doesn’t mean they’ll find it on your cluttered mobile UI.
To fix this, pair your tree test with usability tests or first-click tests on actual mockups or prototypes.
You can use these usability test templates to get started, and you can use Marker.io to get users to log annotated screenshots of bugs or poor nav structure.
For example, users can easily file an issue like this:
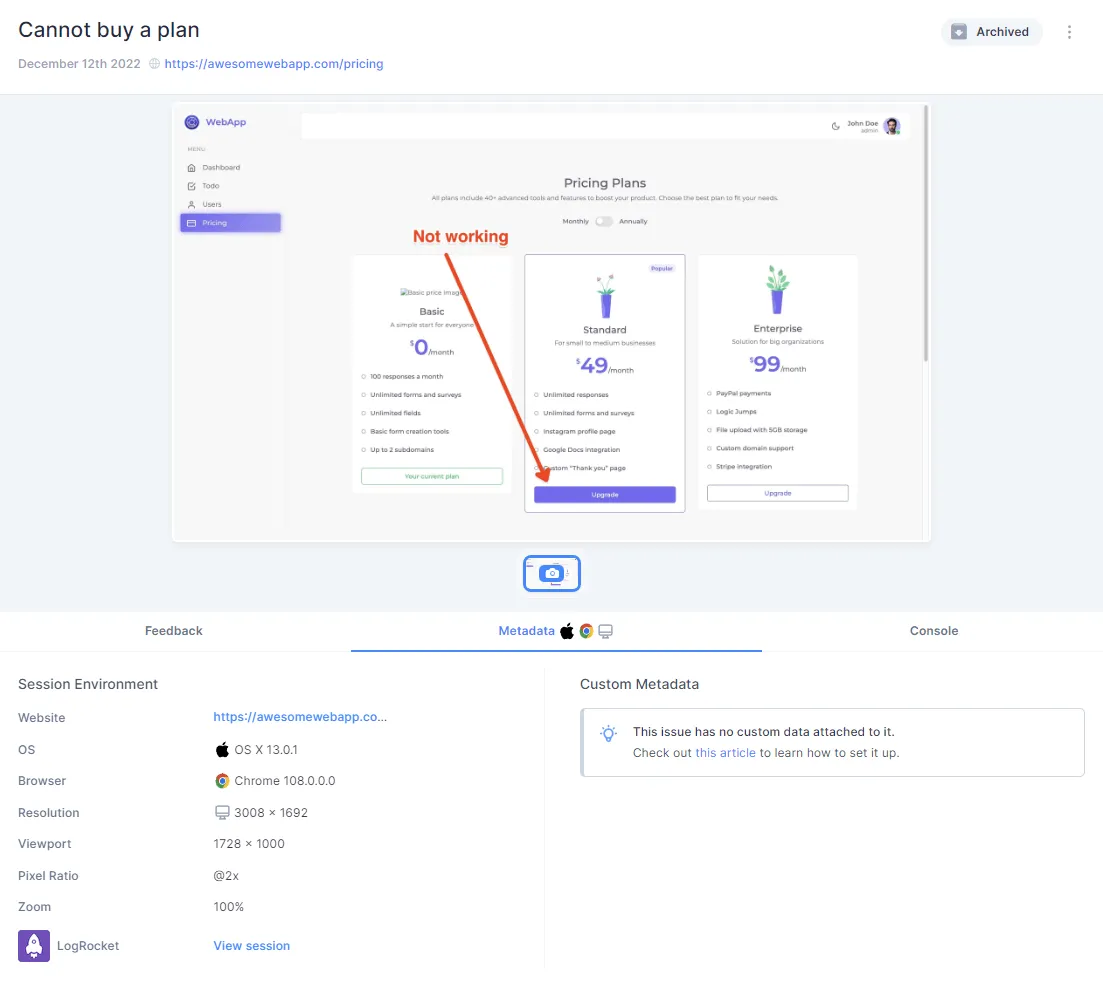
and you can watch a replay of what they were looking to achieve but couldn’t:
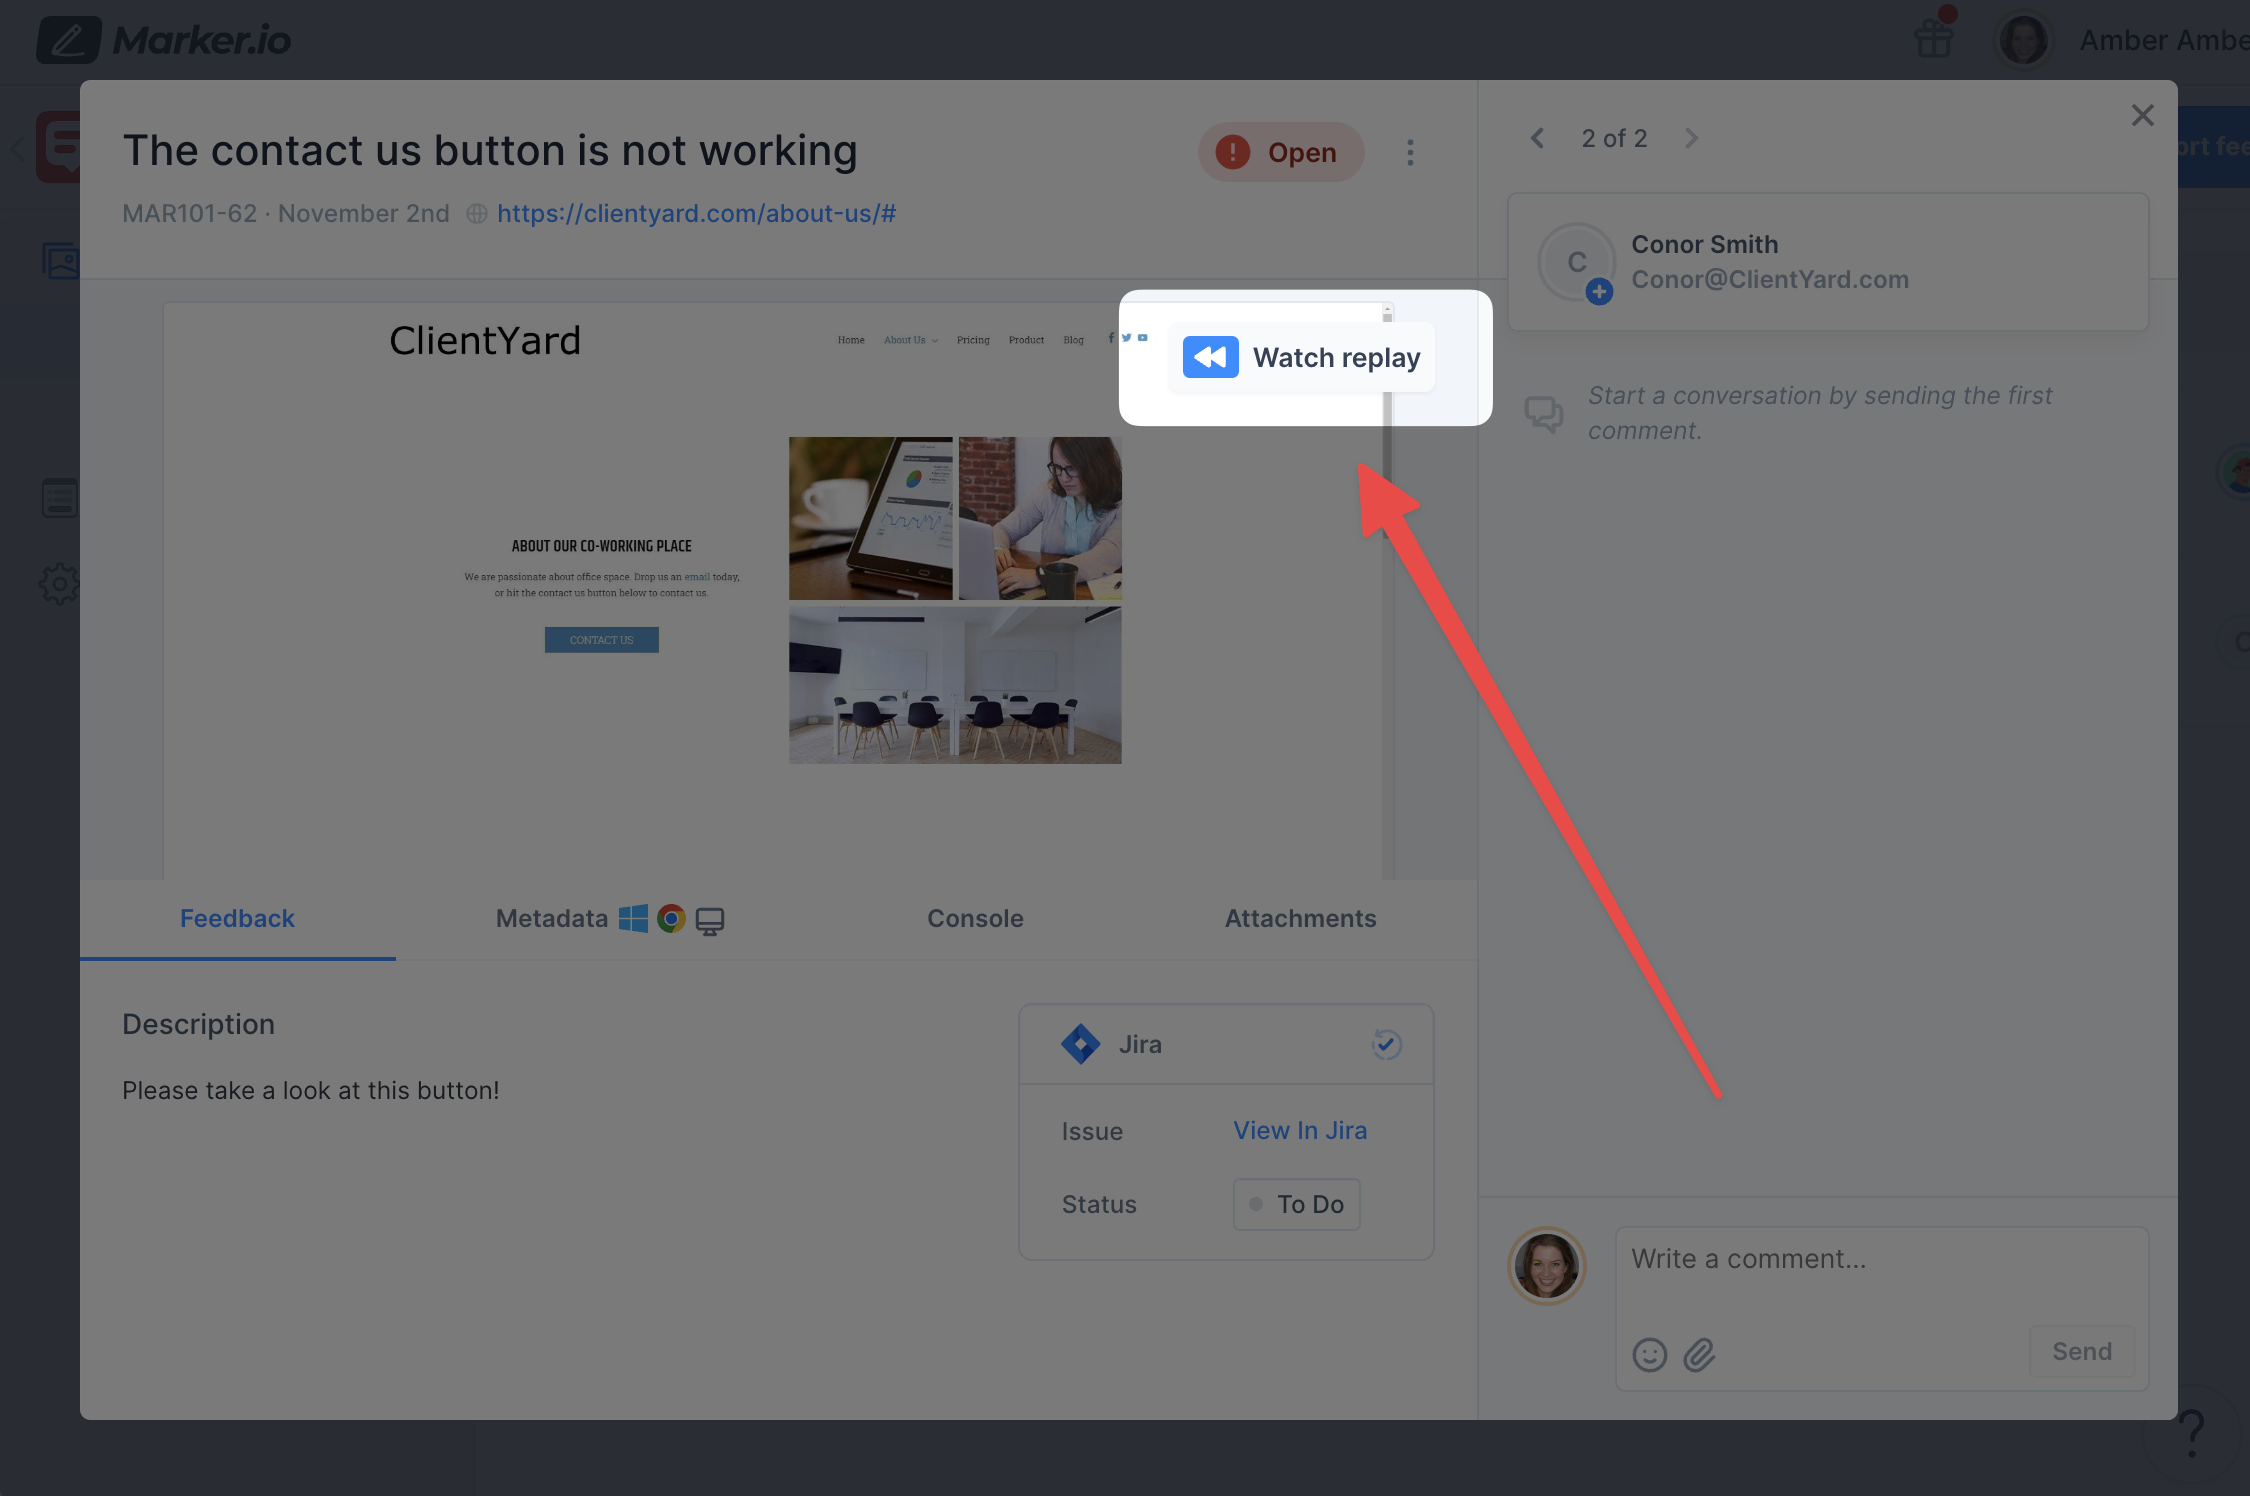
Pairing usability tests with tree tests lets you check whether your website or app structure still works once visual design, content, and real user flows are layered back in.
2. Low participant engagement
Tree testing is quick, but only if participants stay focused. If your tasks are too long, repetitive, or irrelevant, you’ll start to see drop-offs or random clicking. This can be because:
- Tasks are too wordy or unclear.
- The test feels too long (more than 10 tasks).
- Participants aren’t compensated or invested.
- Tasks feel generic or unrelated to the user.
To fix this,
- Keep the test short (6–10 tasks max).
- Use plain, direct language in your task wording.
- Offer a small incentive (gift card, early access, etc.).
- Test critical paths only, not the entire site.
- Add a warm-up task to ease users in.
3. Misinterpreting the tree testing results
A high success rate doesn’t always mean your structure is working. Sometimes, users eventually get the right answer but only after they backtracked, hesitated, or guessed.
So don’t look at the success rate alone, check for:
- Directness (Did they get it right on the first try?)
- First click (Where did they instinctively go?)
- Backtracks (How many detours did they take?)
- Path depth (How far down the tree did they have to go?)
- Time on task (Was the journey smooth or slow?)
These metrics give you context and lets you know whether to rely on your results for the actual information architecture.
Best practices for effective tree testing
Tree testing is a powerful tool, but it’s easy to underuse or misinterpret. Small decisions, like how you write a task or structure a label, can affect your results.
To avoid this, consider these best practices:
1. Write tasks that are realistic (but neutral)
The best tasks feel like real situations your users face, without revealing the answer.
Use good tasks like “You’ve returned an item and want to check when your refund will arrive.” This gives context without using the actual label (“refund policy”).
Avoid obvious tasks like “Find the refund policy,” which tells the user exactly what to look for.
2. Limit your test scope to critical journeys
Don’t try to test your entire site. Focus on what matters most, which can be top user tasks, high friction areas (where users always contact support), sections you’re redesigning, or sections that matter to your business (e.g. refunds, onboarding, account setup).
Also, focus on reducing the tasks to 6-10 to avoid exhausting participants.
3. Test only what the tree can answer
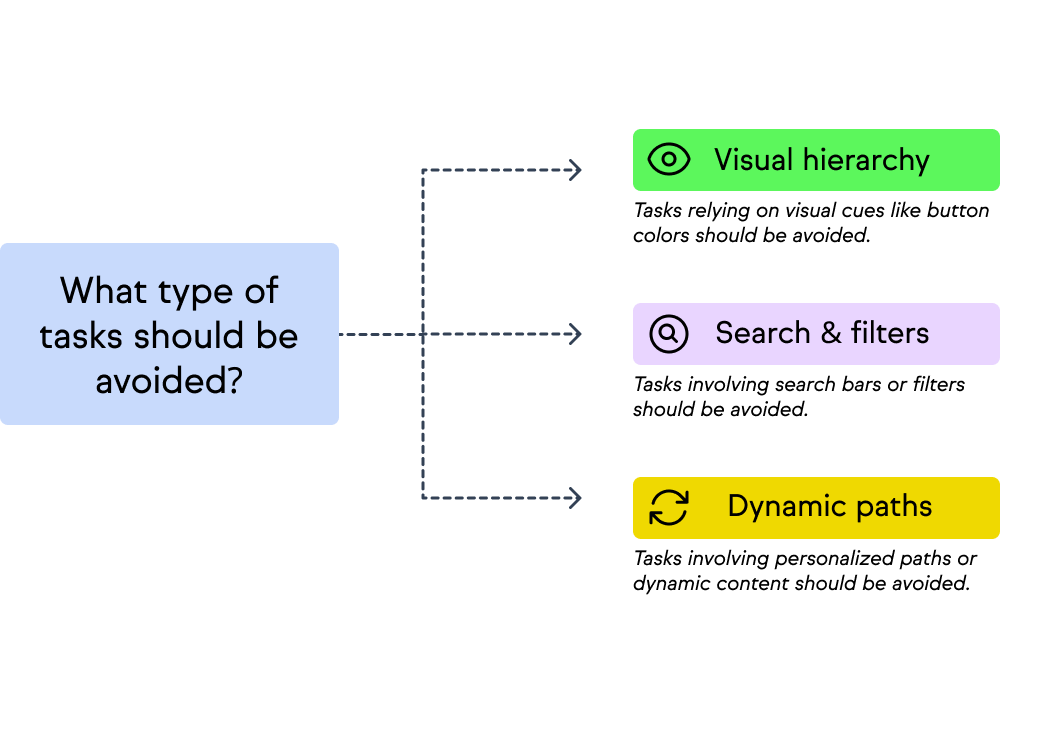
Tree testing removes visual and contextual cues. So avoid tasks that rely on things like:
- Visual hierarchy (Find the green ‘Submit’ button).
- Search or filters (Find a product using the search bar).
- Dynamic paths or personalization (Check your subscription expiry date).
Stick to what users should be able to find using only your labels and hierarchy.
4. Balance qualitative and quantitative goals
Your study should match your stage in the design process.
This means you should use qualitative testing first to explore ideas and surface pain points. Afterwards, test a draft tree and check the data on backtracking to know where you might need to improve.
Then use quantitative testing to benchmark or compare designs. Here, you’ll need more participants, use consistent tasks, and track deltas in success rate, time, and first click across versions to know if results have changed.
For example, if you’re testing a new “Help & Returns” structure, you can start with a qualitative test to explore what labels confuse users. Then follow up with a quantitative test to confirm that your final structure improves success rates over the old one.
5. Be consistent when comparing trees
If you’re testing multiple versions of your website navigation (e.g. v1 vs. v2), make sure you:
- Use the exact same tasks for both.
- Run tests with the same participant types (or split the sample evenly).
- Track metrics like success rate, directness, and time across the same paths.
This keeps your comparisons valid and avoids drawing conclusions from skewed data.
Tree testing vs. card sorting vs. A/B testing
Tree testing is often confused with other UX research methods like card sorting or A/B testing. Each of these tests serve different purposes:
1. Card sorting builds your tree
It’s about generating or validating groupings and labels from your users’ point of view. Participants are given a list of items (features, help topics, or product types) and asked to group them into categories that make sense to them.
This helps you understand how users cluster information and which labels make sense for each category.
2. Tree testing validates the structure
Tree testing assesses how users interact with the labels and paths in your navigation to test whether your current IA is user-friendly. This helps you make sure it supports the tasks users need to complete, before you move into design and development.
3. A/B testing compares the actual design
A/B testing compares two versions of a live page (e.g. different homepage layouts or checkout flows) to see which performs better. Unlike tree testing, it includes full visual design, content, and interactions.
In short:
Conclusion and next steps
Tree testing is one of the most direct and practical ways to validate your site’s navigation structure before committing to design and development.
It shows you where people get stuck or succeed when trying to find key resources, and can help you meet your user’s needs (in terms of UX) easily.
So where does Marker.io fit in?
Marker.io isn’t a tree testing tool; it complements it in the broader process of improving usability and fixing navigation issues that come out of a tree test. This is because:
- After a tree test, you’ll likely redesign or tweak your navigation structure. When those changes go live, you need a way to catch and report real-world navigation or broken link issues.
- Marker.io bridges that gap between UX research and QA. It gives your team (and even users) a way to report bugs, confusing paths, or mislabeled menu items directly on the live site or staging environment.
- It also integrates with project management tools like Jira, Trello, and ClickUp, so those findings can flow straight into your to-do list.
In other words, tree testing helps you predict where users might get stuck. Marker.io helps you see when they actually do, so you can address them within hours.
What should I do now?
Here are three ways you can continue your journey towards delivering bug-free websites:
Check out Marker.io and its features in action.
Read Next-Gen QA: How Companies Can Save Up To $125,000 A Year by adopting better bug reporting and resolution practices (no e-mail required).
Follow us on LinkedIn, YouTube, and X (Twitter) for bite-sized insights on all things QA testing, software development, bug resolution, and more.
Nathan Vander Heyden
Nathan is Head of Marketing at Marker.io. He used to work as a SEO consultant for various SaaS companies—today, he's all about helping Web Ops teams find more efficient ways to deliver bug-free websites.


Get started now
Free 15-day trial • No credit card required • Cancel anytime