How to Write a Bug Report [Step-By-Step Guide]
How do you write a bug report? What details should you include? We explore the best practices for writing a good bug report.


How do you write a good bug report? In this blog post, we cover what information to include and the best way to report bugs so they get resolved.
So, you’ve just told your developer team that you found a bug. Instantly, you get the reply:
"I need more information."
- "What was the URL?"
- "Was this on Safari or on Chrome?"
- "Did you try clearing the cache?"
- "I can't replicate the bug. Can you send a video?"
Before you know it, you’ve got an email thread a million miles long. The best way to avoid this situation by writing a better, more detailed bug report from the get-go.
This guide is all about how to write a bug report that’s actionable, easy to reproduce, and faster for your dev team to fix.
What is a bug report?
Let’s start with the basics: what is an effective bug report?
Bug reports are an unavoidable part of the software development life cycle. They provide detailed information about a problem or issue that occurred on a website or in an app.
Developers are often under a ton of pressure to solve issues quickly. They face two extremes: too much irrelevant information or too little relevant information.
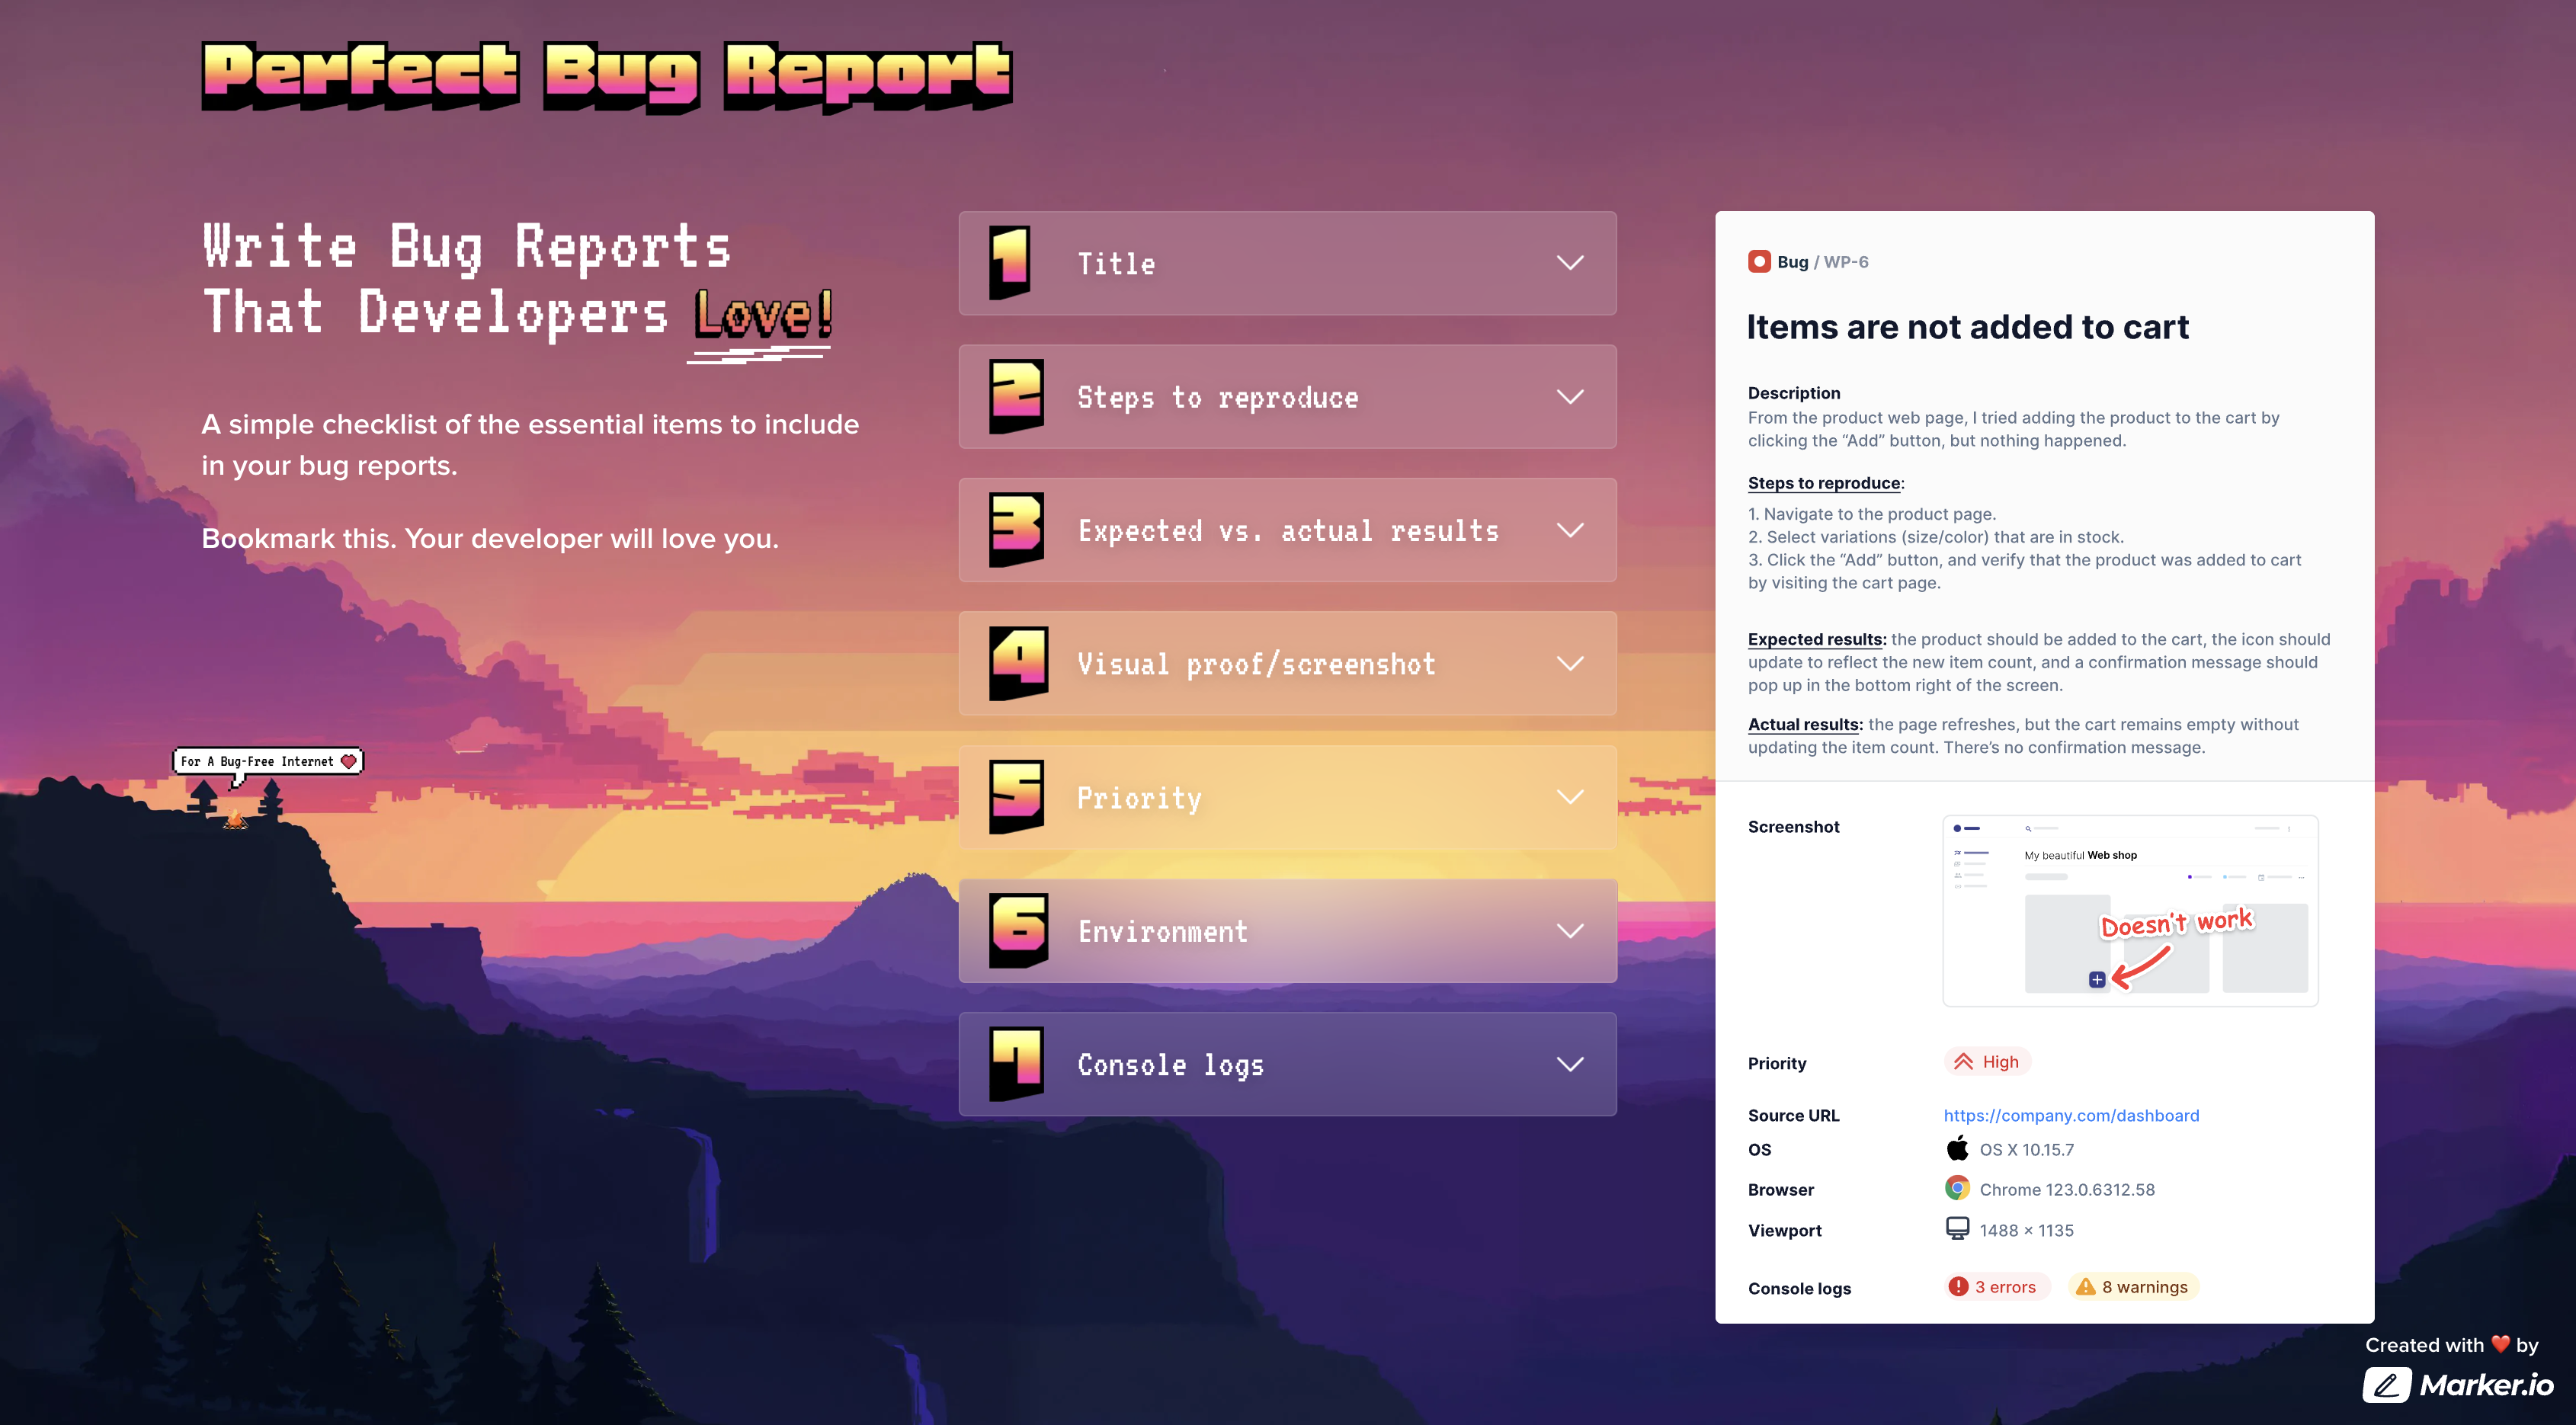
A well-written bug report will include a descriptive title, a concise summary, a detailed description, environment details, exact steps to reproduce, expected result, actual result, and more—so developers can reproduce the bug and fix the problem.
For every bug report, we highly recommend using a bug tracker like Marker.io along with a project management tool like Trello, Jira, Asana, GitHub or GitLab and following the same process with a consistent bug report form or bug report template.
A high-quality bug report makes all the difference in how fast the bug gets resolved—so let’s have a look at how to do it right!
The rest of this blog post goes over bug report elements in detail, but it’s also helpful to have a complete checklist to hand.
For this, you can use PerfectBugReport.io—a simple checklist of the essential items to include in your bug reports.
How to write a good bug report
Here's the essential information to include in a good bug report, step-by-step:
1. Title/Bug ID
Keep it short and specific.
Make sure it clearly summarizes the bug. A descriptive title makes it easier for the software engineer or dev team to find later and merge duplicate reports for the same bug.
Examples:
❌ Bad: "I can't see the product when I add it, for some reason I try and it doesn't. WHY? Fix it asap."
- vague
- aggressive
- too wordy
- asks for a solution to be implemented
✅ Good: “CART - New items added to cart do not appear”
- it helps developers instantly locate the issue (CART)
- it focuses on the actual technical problem
When developers review it, they’ll be able to instantly assess the issue and move on to other elements of the bug report.
2. Description
If your title isn’t enough, you can add a short description of the issue.
In as few words as possible, include when the bug happened and how it occurred.
Your title and description may also be used in searches, so make sure you include important keywords and relevant information.
Examples:
❌ Bad: "The other day I was trying to add stuff to test and nothing showed up when I did that or clicked on the button."
✅ Good: "On [DATE], I tried adding [PRODUCT] to the cart, nothing happened after clicking the 'add' button on the product overview webpage."
❌ Bad: “The design text on the pricing page looks super weird and doesn't seem right. It shouldn't look that big and should be in a different color.
✅ Good: The headline text size and color on the pricing page don't match the original designs.
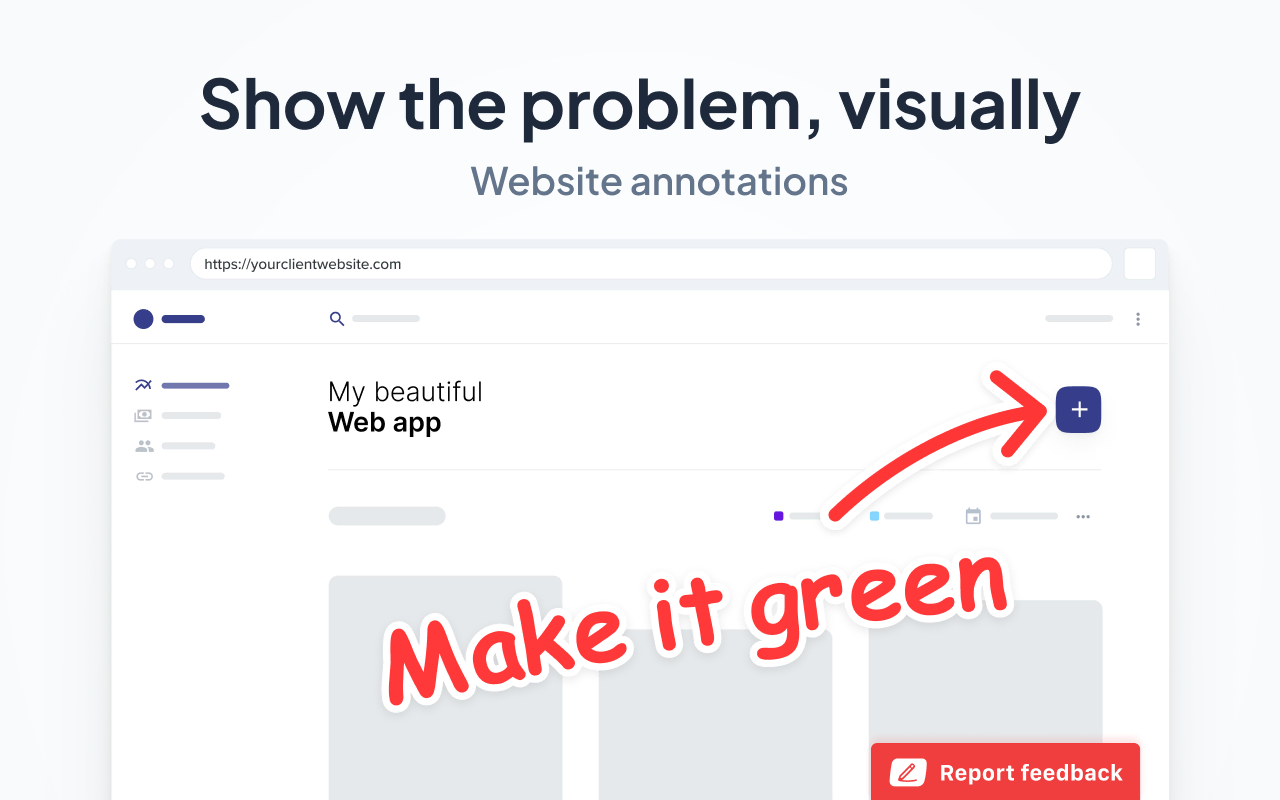
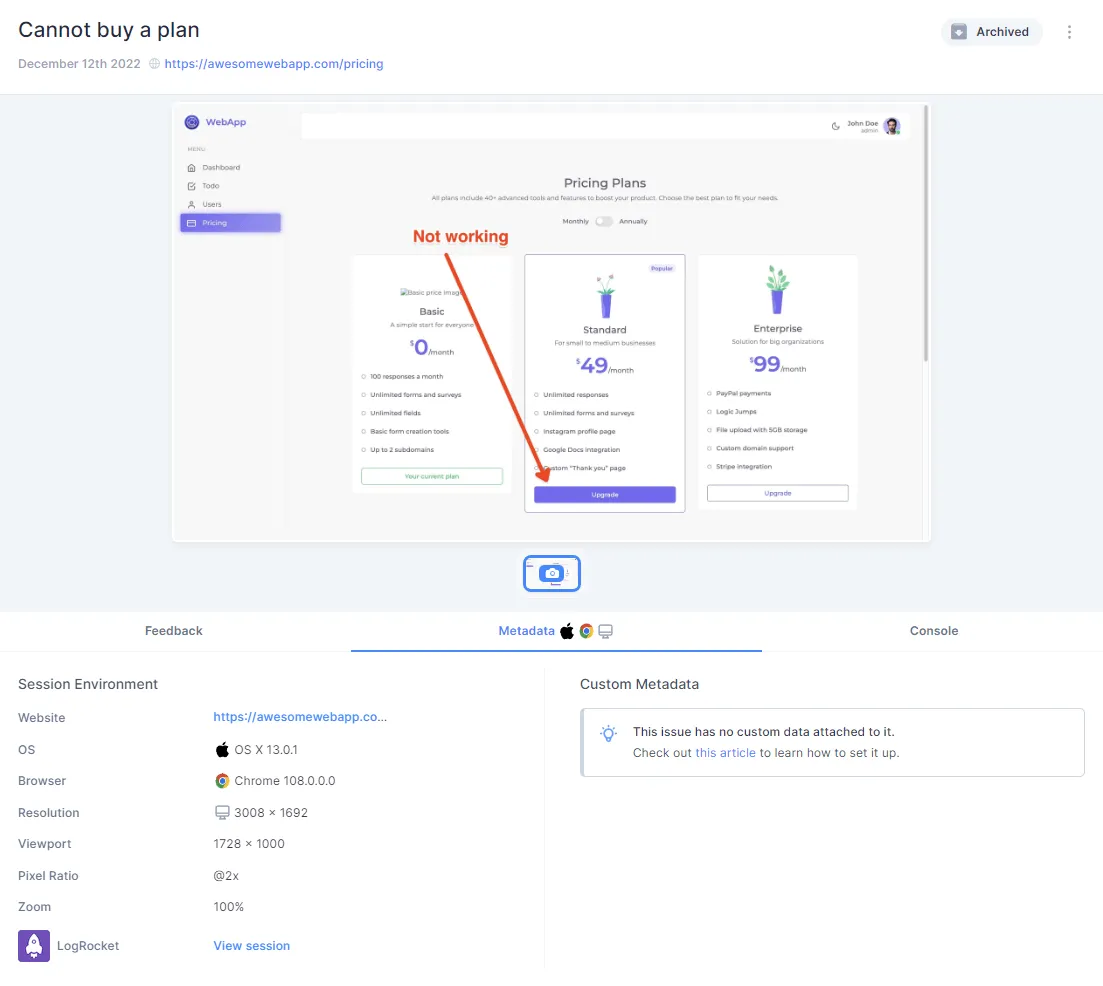
3. Visual proof/screenshot
We all know that a picture is worth a thousand words. That holds true for bug reporting. A screenshot or video gives your developers actual result visual proof and helps them see and understand the problem faster.
A good website annotation tool also goes a long way here to help you drive your point across.

4. Expected vs. actual results
When you report a bug, take some time to explain the expected behavior, expected result, and actual result.
Example:
Expected result: "Item should be added to the cart when I click ADD"
Actual result: "Item does not appear in the cart"
5. Steps to reproduce
Here is your opportunity to share the steps needed to recreate the bug!
Always assume that your developer has no idea about the bug you found—how do they reproduce the bug?
As always, keep it simple!
The steps to follow should be comprehensive, easy to understand, and short. Detailed but concise steps beat vague, overlong ones every time.
The most important goal of this step is to enable your developer to experience the bug first-hand. Use a numbered list here. If you’ve already managed to recreate the issue several times, you can include the reproducibility rate—for example: 12/12 times bug reproduced.
Example:
- Search for product XYZ.
- Click on product XYZ in search results.
- Click on “Add to Cart” button.
- Go to cart.
Want to go one step further? Add a short video recording, or use a session replay tool so the developer can watch you reproduce the bug using the same process.
6. Environment
Websites and apps can behave very differently depending on the environment used, so it’s critical that the following environment details are included in any report you share:
- Browser and browser version (Chrome, Firefox, Safari…)
- Operating system (OS) and version number (Mac, Windows…)
- Device type and screen size
- Zoom level
- Pixel ratio
Pro tips:
- Marker.io will automatically collect this technical information
- Use BrowserStack with Marker.io to automatically grab virtual device information, software version data, and capture cross-browser issues on other devices
- Additional details that can be helpful include device type, connection type, network connectivity, and battery state
7. Console logs
These logs show developers all error messages and errors that occur on a given webpage, and can also include information that tracks certain user actions.
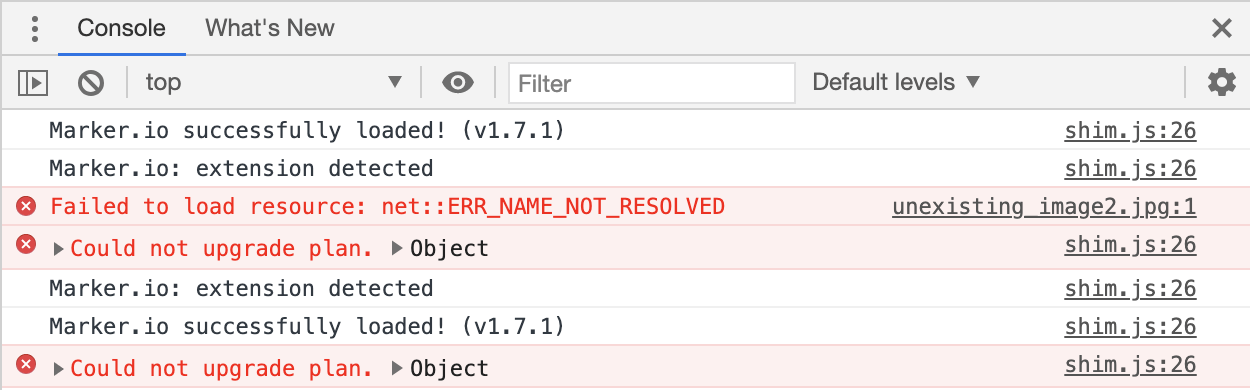
In general, including console logs and log files can be valuable for developers because it helps them dig deeper, identify the root cause of the problem, and start investigating faster.
When debugging, it saves them a bunch of time on any issue. A lot of crashes or errors are hard to replicate, so having the logs can be super informative.
Pro tip: Marker.io adds console logs automatically to every ticket you create.
8. Network requests
Network requests detail the flow of data between client and server.
Inspecting network requests helps developers investigate failed API calls, retrieval of resources (like images), and delayed responses—all things that could slow down a webpage.
It's invaluable when trying to fix bugs like content not being displayed as expected or why certain server-side functions are failing.
Modern dev tools in browsers (above, the “Network” tab in Chrome’s DevTools) already capture these requests in real-time.
Pro tip: Marker.io will attach this information automatically with every bug report.
9. Source URL
One important, but easy-to-forget item is the source URL, which will help the developers navigate faster and save everyone a lot of time.
Pro tip: If you use Marker.io, we’ll automatically include this, too!
10. Bug severity and priority
By defining the severity levels or priority of the issue in your bug report, your developer understands how quickly the bug should be fixed.
The severity of your bug can be defined by the level of impact it has on your website or product. Once this has been determined, you can label it as:
- Critical
- Major
- Minor
- Trivial
- Enhancement
Providing a priority rating helps your developer determine which bug they should investigate and fix first. Here you can choose between:
- High
- Medium
- Low
As the bug reporter, you’ll normally be responsible for identifying the severity and priority.
Pro tip: It can be difficult, as the end user, to determine bug priority and severity. In general, typos and small visual issues are minor, but if the issue affects functionality, causes a core feature issue, or hurts the user experience, it’s critical.
11. Advanced information
Whether you’re looking to write the most informative bug report ever or score brownie points with your developer, you can also include the following additional details:
- Reporter name (your own)
- Assigned person (the developer, usually)
- Due date
Sample bug report template and checklist
After lots of personal experience, (often painful) trial and error, research, and conversations with our developers, we came up with a checklist of ten essential points to consider. If you’re looking for an example of how to write a bug report, this checklist gives you the structure most engineers expect.
- Title
- Summary
- Visual proof
- Expected behavior vs. actual results
- Steps to reproduce
- Environment
- Console logs, network requests, and error messages
- Source URL
- Bug severity and priority
- Advanced info (optional)
You can also:
- Use the interactive website, PerfectBugReport.io, to keep track of what needs to be included
- Use one of our bug report templates that you can copy for your bug tracking process
And if you just need a sample bug report template in Excel or Google Spreadsheets, we've got that too:
- Access the sample bug report in Google Spreadsheets (File > Make a copy)
- Download for Microsoft Excel (.xlsx)
How to report a bug with a reporting tool
If you’re still using spreadsheets or color-coded Google Docs for bug reporting, you might be wasting valuable time. That’s when bug reporting tools and testing tools come into play if you need to report bugs faster.
With a tool like Marker.io, you can write and submit bug reports much faster, without ever leaving your website. Our AI Magic Rewrite feature will even help you phrase bug reports in a way that developers will quickly understand.
Whether you rely on manual testing or test automation, the same reporting basics still apply. Here’s our guide.
Automated, annotated screenshots
So how does that work?
We set out to make the testing process as simple as possible:
- See a bug or want to drop feedback? Click “Report a bug.”
- Add annotations and input details in the bug report form (use our checklist).
- Click on “Create issue” and you’re done!
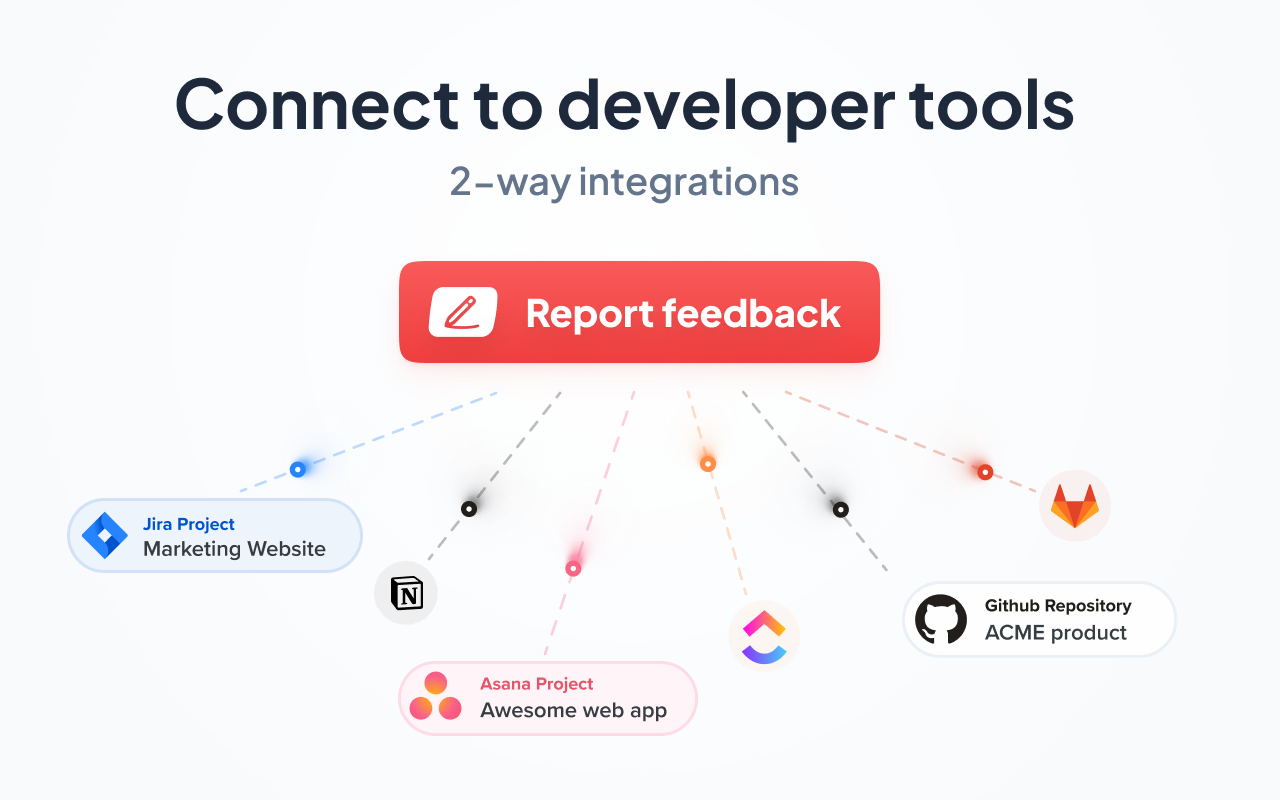
2-way integrations with PM tools
Marker.io automatically syncs up with your project management tool, meaning that whenever you click the “Create issue” button, that bug report will automatically be created in Jira/=, Trello, GitHub, Bugzilla—whichever project management software you use.
In other words, you don’t need to transfer bug reports from your inbox into your PM tool anymore. Plus, as a QA tester, you can stay on the website for the entire manual testing session.
Finally, when a task is marked as “Done” in your PM tool, that same task will also be “Resolved” in Marker.io. You get a nice little overview of all bug reports in the Marker.io dashboard:
If you need to discuss a specific bug at length, you can do that on our feedback page. All comments and attachments are, of course, synced back with your PM tool.
Ready to give it a go? Sign up for a free trial here—no credit card required.
After the report: organizing and triaging
After a bug is reported, the next steps are:
- Bug triage
- Bug fixing
- Notifying the reporter
You can also save a lot of time organizing feedback with a premade bug report template.
How to triage bugs
Without a system to triage reports, you’re going to cause yourself chaos and more headaches.
The best way is to categorize bug reports and feedback into two main categories:
- Feedback that requires a meeting. This includes complex bugs and other crucial issues that will require several team members to talk in real-time, or async if that’s not possible.
- Instant action feedback. Anything that can be fixed quickly: wrong color, wrong copy, missing elements, or other one-person fixes.
Once that’s worked out, to triage bug reports, you need to decide:
- How high a priority is this?
- Is this bug breaking the app completely?
- Does this affect sales? (e.g., free trial signup page not working)
- Is customer satisfaction and the user experience being affected (e.g., this feature isn’t working right now)?
- How many customers are affected? (sitewide, or just 1 customer? Maybe the problem is with them, which means you can transfer the issue to the customer support team)
- OR is it just a matter of personal preference (e.g., this button should be a different shade of blue)?
At the same time, you need to check for duplicate bug reports. If users are reporting issues, chances are you’re seeing several reports documenting the same bug.
For apps with a large user base, it might be worth posting a status update on the appropriate channels to keep stakeholders informed: “We’re aware of a problem with [X]: our team is working to resolve it.”
How to reproduce bugs
Reproducing a bug means following the same steps, in the same environment, that led to the bug. This means:
- Checking the bug report to recreate the user’s environment details (e.g., browser, operating system, app version, etc.)
- Check and retrace the exact steps they took to get there. Follow the same process as the user.
- Alternatively, if it’s a complex bug report, check their sessions with a session replay tool as this makes reproducing bugs much easier.
- Investigate any errors that popped up (console and network logs, etc.) for the user
- Verify the bug: If you’ve managed to reproduce the bug, make sure it’s actually the same bug the user encountered (same error messages, same environment, etc.), otherwise you might end up fixing something different entirely and leave the original bug unattended.
If there’s a bug you can’t reproduce, you’ll need to ask the reporter for more information or ultimately delete the task from your PM tool.
Pro tip: Bugs that aren’t reported initially can be discovered and fixed by having a strong error tracking solution to monitor a site or app, like Sentry.
Examples of successful bug reporting
Successful bug reporting is when it’s easy for anyone—clients, users, colleagues, consultants, and other stakeholders—to report bugs.
One-click reporting is a massive time saver over manual approaches, especially if you’re developing websites, apps, and software for dozens of clients.
Integrations with other tools are also an advantage, such as Trello and GitLab. It makes it easier for devs to do their jobs if whichever PM tool you use is the single source of truth for everything you’re working on.
Development lifecycles run faster when clients are included in the process. Make it easy for clients to give feedback and bug reports.
Here's an example of a successful, well-described bug report with all the information devs need:
Further learning, tips, and tricks
In general, it's good to keep these basic guidelines in mind:
- One bug = one issue. Don’t include multiple bugs in the same issue!
- Avoid duplicates. Always try to search your current issue tracker for existing reports of the same bug.
- Reproduce the bug before creating the bug report. This makes it more likely that the developer will also be able to reproduce the problem and identify where it comes from.
- Don’t forget KISS: keep it super simple. Keep everything as straightforward as possible. Using bullet points or numbered lists can help.
- Use a professional bug tracker. This tool will help you keep everything in one place and avoid losing files and bug reports.
- Be kind. Developers are people too, and bugs happen. They’re part of the process of making great end products and websites.
Wrapping up...
Now that you know how to write a bug report and manage your issue tracking workflow, you’ll save more than just time and money: you’ll save your developer’s sanity.
We've given you the right tools, now it's time to use them: An awesome bug report and a solid bug tracking system.
Frequently Asked Questions
What are the different types of bugs?
There are different types of bugs, such as
- Functional
- Performance
- Usability
- Security, and several others.
It’s important to categorize bugs the right way so they can be assigned to the right engineer. There’s no point assigning a UX/UI issue to a dev who only focuses on security.
What’s the difference between a bug report and a test report?
Bug reports are created whenever a bug occurs. It’s a simple and effective way for QA teams to ensure bugs are reported with the right tools, tracked, actioned, and the reporter notified.
Test reports are an expected part of the QA testing process.
The QA team creates test cases for testers to execute, then a test report is created (how did the test go, success or not, notes, etc.)
Why is it called a “bug” in testing?
Bugs are errors in code, software, and hardware that cause an app or website to perform a function incorrectly.
Grace Hopper helped popularize the story of a moth found in the Harvard Mark II on September 9, 1947. The moth was taped into the logbook and labeled “first actual case of bug being found.” However, the term “bug” for a technical problem already existed before then, so the incident did not coin the word—it made a memorable example of it
What’s the difference between a defect, an issue, and a bug?
Defects, issues, and bugs are often used interchangeably and are basically the same, except for a difference in scope:
- Bug reporting and bug tracking refer to coding and technical issue management
- Defects and defect tracking refer to cases where software, an app, or a website doesn’t meet business or operational requirements.
- Issues and issue tracking refer to any general issues that occur during software development, including bugs and defects.
What should I do now?
Here are three ways you can continue your journey towards delivering bug-free websites:
Check out Marker.io and its features in action.
Read Next-Gen QA: How Companies Can Save Up To $125,000 A Year by adopting better bug reporting and resolution practices (no e-mail required).
Follow us on LinkedIn, YouTube, and X (Twitter) for bite-sized insights on all things QA testing, software development, bug resolution, and more.
Nathan Vander Heyden
Nathan is Head of Marketing at Marker.io. He used to work as a SEO consultant for various SaaS companies—today, he's all about helping Web Ops teams find more efficient ways to deliver bug-free websites.
Related blog posts


Get started now
Free 15-day trial • No credit card required • Cancel anytime