User Acceptance Testing (UAT): Meaning, Definition, Process
In this guide, you'll learn what user acceptance testing is, and discover a process to conduct UAT—the right way.


What is user acceptance testing?

What is the purpose of UAT?
The purpose of user acceptance testing is to validate two critical aspects:
- User requirements. Does the app meet user expectations? Is it easy to navigate and use?
- Business requirements. Can the app handle real use cases efficiently and effectively?
In other words, the software should help users accomplish real-world tasks without hurdles.
Validation of these requirements usually comes in the form of stakeholder sign-off or approval (the "acceptance criteria").
For example, when your client is satisfied with the final version of the app or website.
Internal QA vs UAT
Internal QA focuses on technical issue resolution and is executed by the QA team, whereas user acceptance testing is performed by end-users or stakeholders to ensure the software meets real-world expectations.
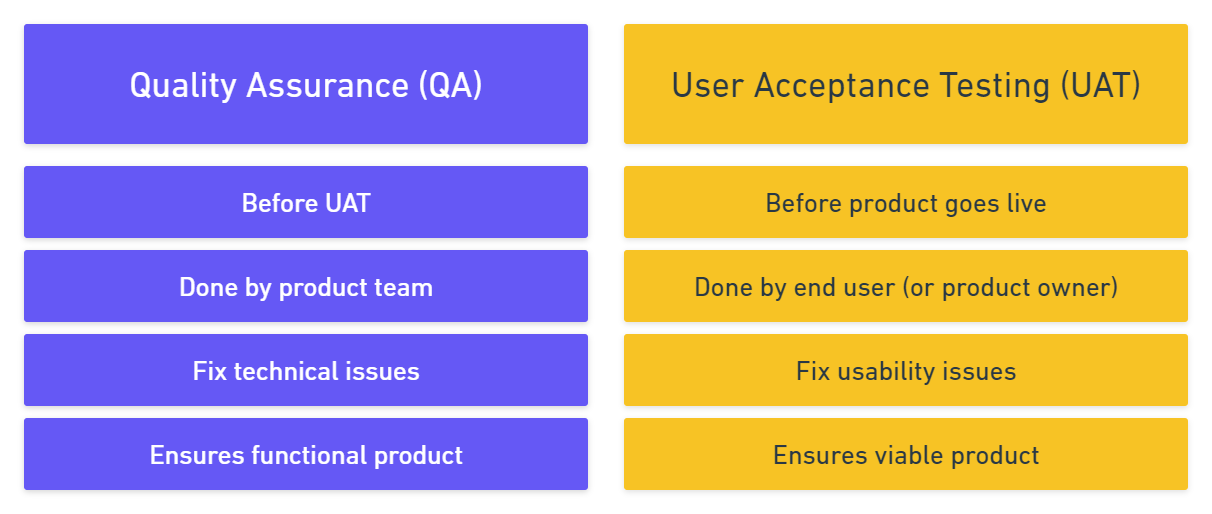
Both QA and UAT involve heavy levels of software testing and are performed at the same stage of the software development life cycle, so it's not uncommon to confuse the two. At the end of the day, user acceptance testing is a form of quality assurance.
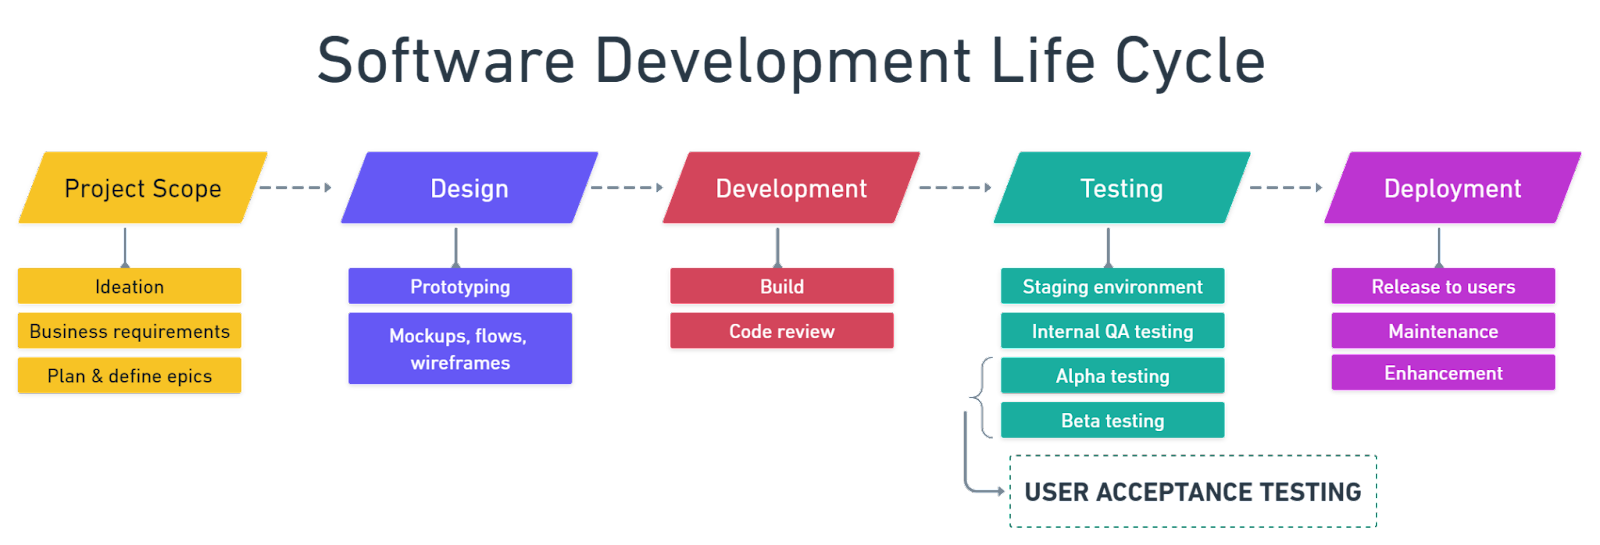
Here's a diagram of the software development lifecycle to visualize QA and UATs position in it.
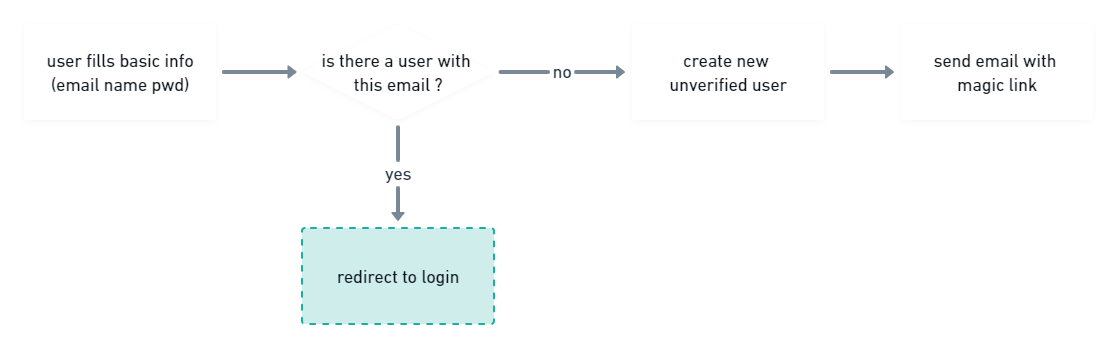
To further understand the difference between the two, let’s take a standard sign-up flow as an example.
Typical test cases in the internal QA phase for a sign-up flow might include:
- Are all input fields and buttons usable?
- Does the email verification function run properly?
- Are there any unexpected bugs at any point in the workflow?
UAT test cases, however, aim to answer user-centric questions such as:
- Are testers filling out the correct information?
- Do they understand what’s happening when being redirected to the login page?
- Are they opening their email and going through the verification steps
Read more in our blog QA vs UAT: What's the difference? Then, check out how Marker.io can combine your QA and UAT workflows.
What are the benefits of user acceptance testing?
There are plenty of benefits to running UAT, primarily that it guarantees the quality of your apps, products, and websites. If you're still on the fence, consider the following advantages:
- Early issue detection. While developers can catch many technical issues during code reviews, user acceptance testing brings the perspective of an end-user to identify potential confusion.
- Fresh perspective. Developers can sometimes miss overarching usability or flow issues. First-time users provide fresh insights. If they find any aspect of the app unintuitive, they'll raise it.
- Real-world environment. UAT offers a production-like setting for testing. By mirroring your production database, you get to observe genuine user interactions and behaviors, rather than just hypothetical or "expected" use scenarios.
- Broad testing scope. With multiple testers, you amplify the chances of spotting even the most obscure issues and bugs.
- Mitigate risks pre-launch. Identify and rectify significant issues, such as confusing user interfaces, security vulnerabilities, or critical bugs, before the software reaches the broader audience. Successful user acceptance testing ensures your app is robust, secure, and user-friendly when it goes live.
- Objective feedback. UAT often involves users who are new to your software and lack any biases. They don’t have prior notions about its functionalities or design, and so their feedback is candid and impartial.
Types of user acceptance testing
There are several different types of UAT, based on your objectives:
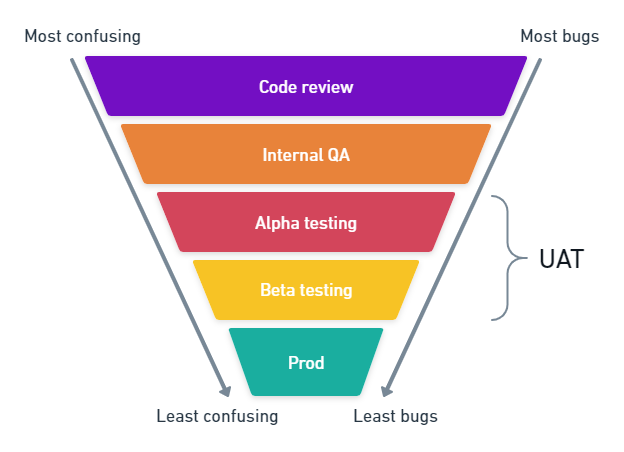
- Alpha and beta testing aim to fix critical bugs and get early feedback from stakeholders.
- Contract acceptance testing validates that software meets pre-agreed specifications.
- Operational acceptance testing ensures workflows operate smoothly.
- Regulation acceptance testing verifies compliance with laws and regulations.
- Black box testing focuses on software outputs without considering internal mechanics.
- Integration testing, unit testing, system testing, regression testing, and functional testing are all subcategories of UAT.
Read more: 6 Types of User Acceptance Testing Explained
In this guide, our spotlight will be on the paramount user acceptance testing types: alpha and beta testing.
Alpha testing vs. beta testing
Alpha testing and beta testing are two distinct testing phases.
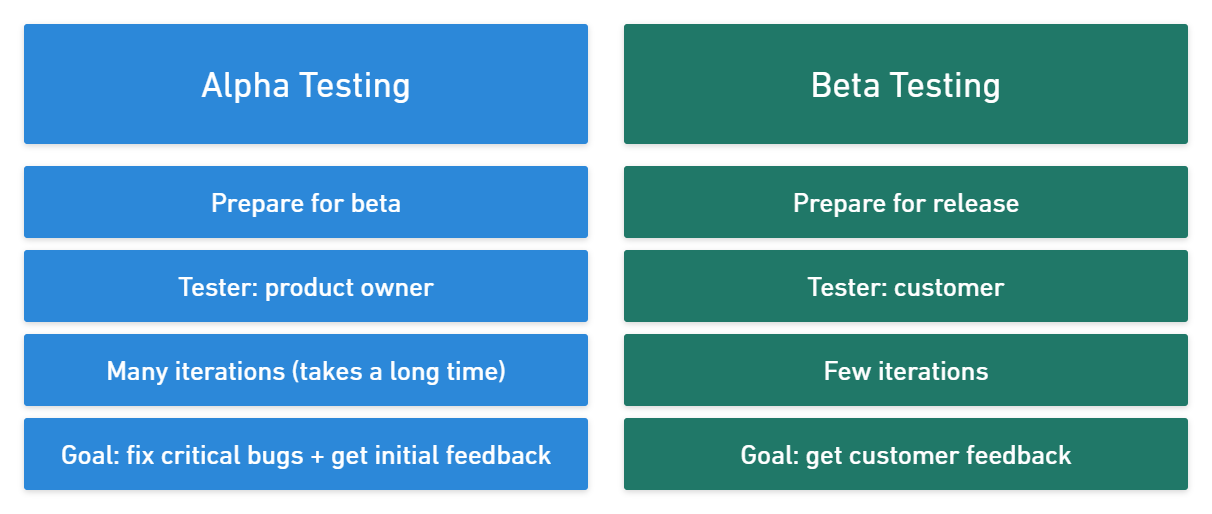
In alpha testing:
- Your testing team is the product owner. Depending on the project's scale, you might bring in friends, family, or other business analysts for comprehensive feedback.
- Critical issues still exist. Workflows might be broken or unclear functionalities. Bugs overlooked by the development team can still occur—these are immediately reported and worked on.
- It takes time. At the very least 4 weeks.
- Your main goal is to prepare for beta testing. In this phase, you eliminate potential security issues and ensure a smooth user experience for beta testers.
In beta testing:
- A subset of actual users becomes your testing team, often on a staging environment. These testers should represent your average customer and/or target audience.
- It’s a short phase. You’ve already dealt with the most critical issues during alpha testing, and are now in the monitoring stage.
- Your main goal is to experience your software from the end-user's perspective. Feedback collection is paramount. At this stage, you're gauging whether business objectives are being met and if the user experience is satisfactory.
How to conduct user acceptance testing
In this section, we'll delve into a real-world example of UAT for when we released our domain join feature.
Let's break down the key steps:
1. UAT prerequisites: project scope and objectives
The first step is to clearly define project scope and objectives.
Throughout the user acceptance testing process, we consistently go back to our documentation to verify scope, customer needs, and others.
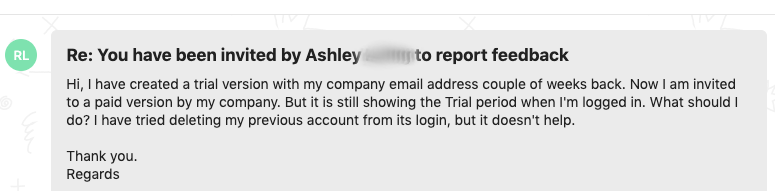
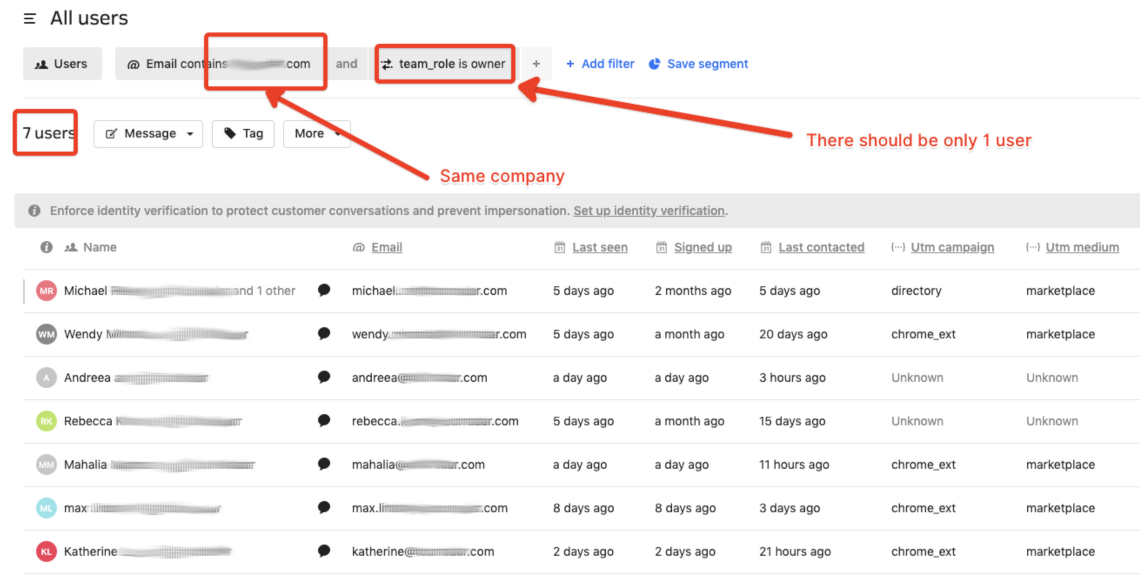
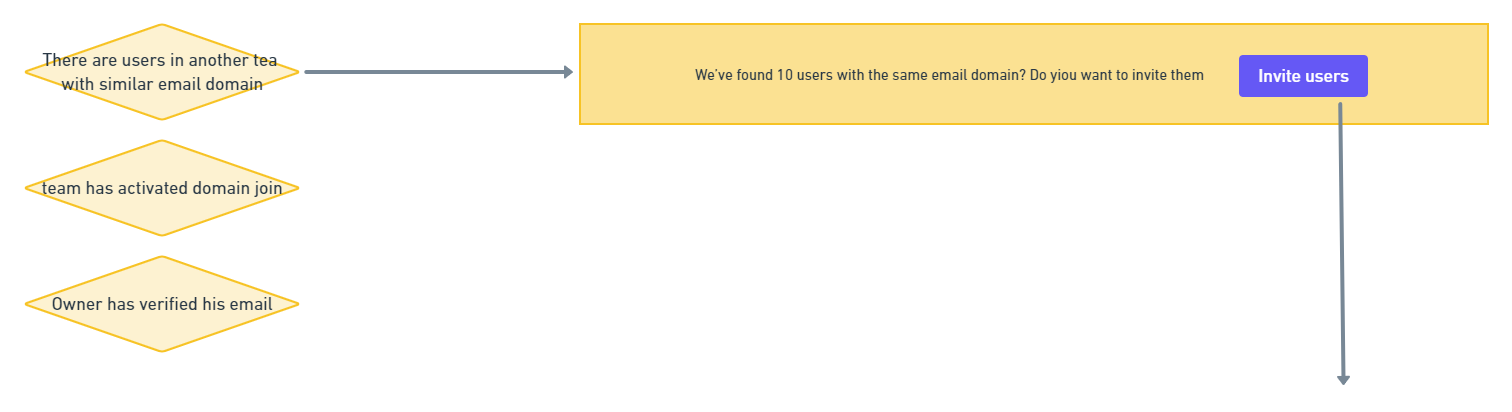
For instance, at Marker.io, we now enable members to auto-join their team when detecting a matching company email.
So, we document the pain point at the very start of the project:

With this documentation, we can verify at any point that:
- Technical objectives have been met. In this case, any new sign-up with an existing @company.com email automatically joins the company.com team;
- The pain point is gone. We no longer have complaints or support requests from confused, team-less users.
All in all, defining your project scope saves a ton of headaches.
- The whole team is aligned: “This is what we’re trying to achieve, and this is how we’re going to do it.”
- All information is centralized. If there's ever uncertainty about the app's behavior during testing, we refer back to this foundational document.
- We don’t go over (or under) scope. Avoiding unplanned features during testing is crucial.
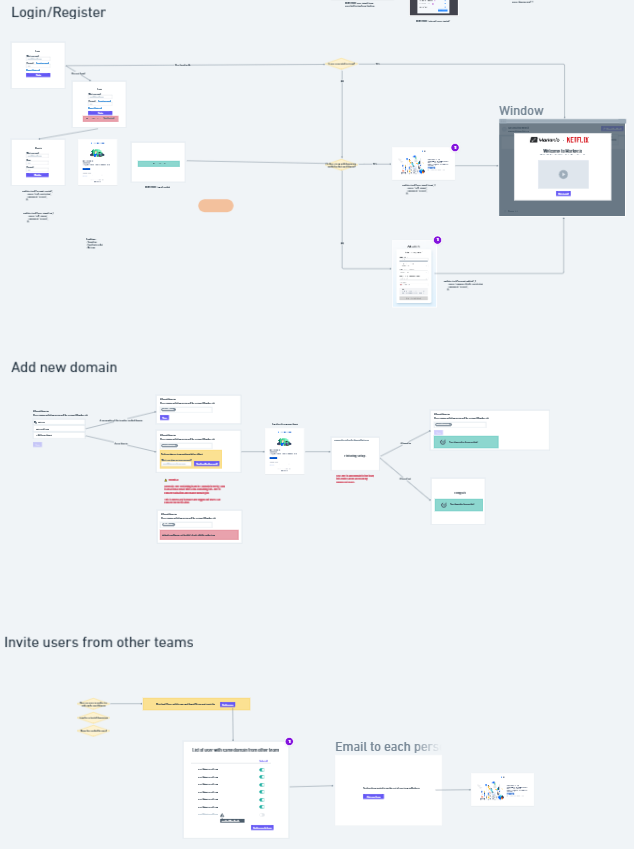
2. Prepare and document workflows & wireframes
All workflows, wireframes, and expected behaviors are shared with everyone.
The idea here is not only to align with the development team.
When we do UAT at Marker.io, part of our testing strategy is to share all workflows with the testing team as well.
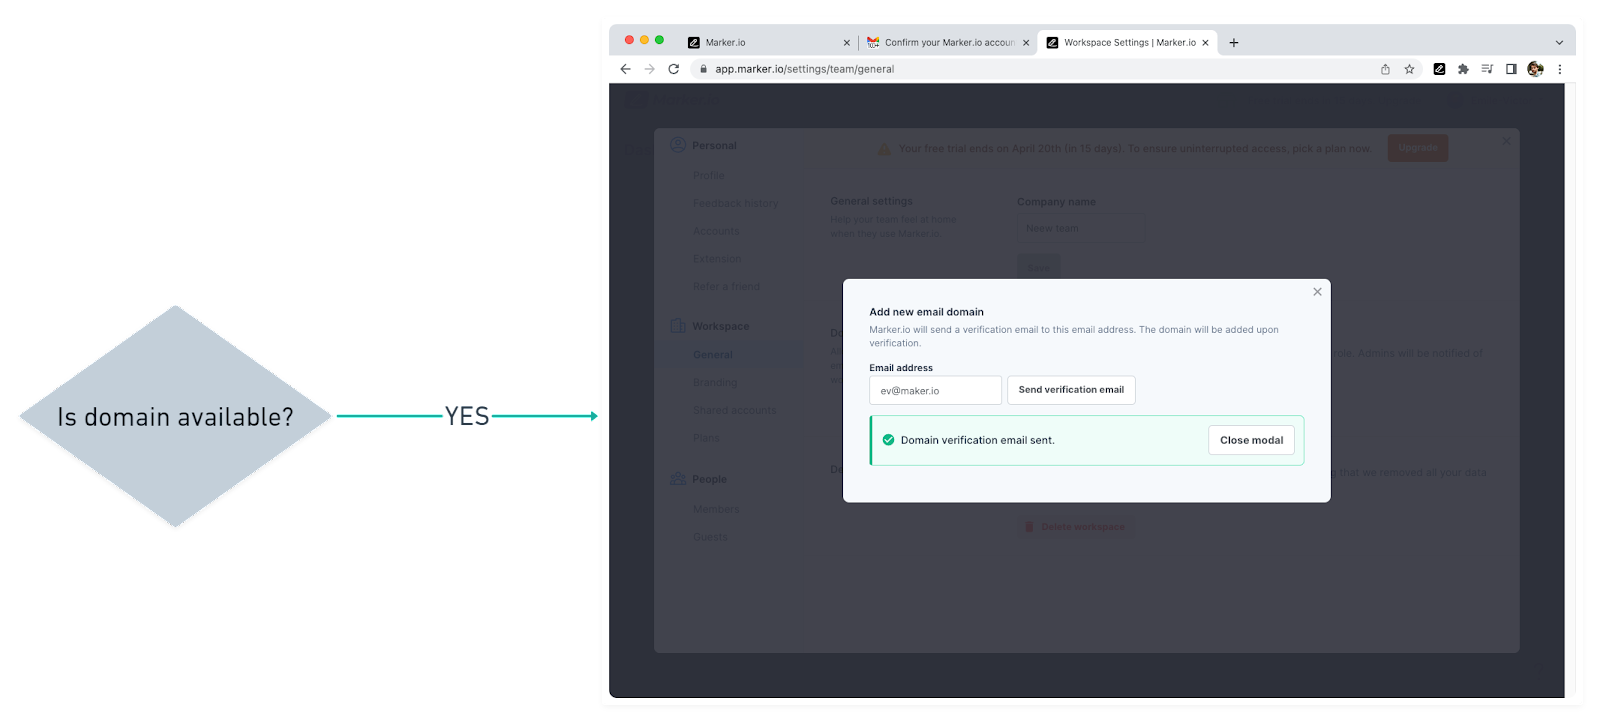
We design workflows like this with Whimsical:
We benefit from this process in multiple ways.
First, the documents are as comprehensive as possible, including:
- Conditions & states. We test our app from various perspectives (user role, plan...). We need to know who sees and does what, and under what conditions.
- Expected results. If any tester wonders “was this supposed to happen?”, or “is this the next logical step?” during the user acceptance testing process, they can check Whimsical to make sure they’re on track.
Secondly, this documentation gives testers the ability to pinpoint where problems occurred.
Workflows should be visual and easy to follow. This way, anyone can just point and say, “this is where things went wrong”.
This is invaluable for outlining test procedures ("What path should the testers take?") and analyzing test outcomes ("Why couldn't the testers reach the desired outcome?").
Bug reports like this make it easy for your dev team to identify why a flow failed, eliminating the need for guesswork.
The best part? With structured documentation and robust test cases, scaling your testing – whether for 5 or 500 testers – is feasible and efficient.
3. Set up a secure staging environment
The ideal way to observe real users testing your app would be in production, right?
But you can’t push a new version of your software to prod and “see what happens” just like that... for obvious reasons.
The next best thing is a staging environment.
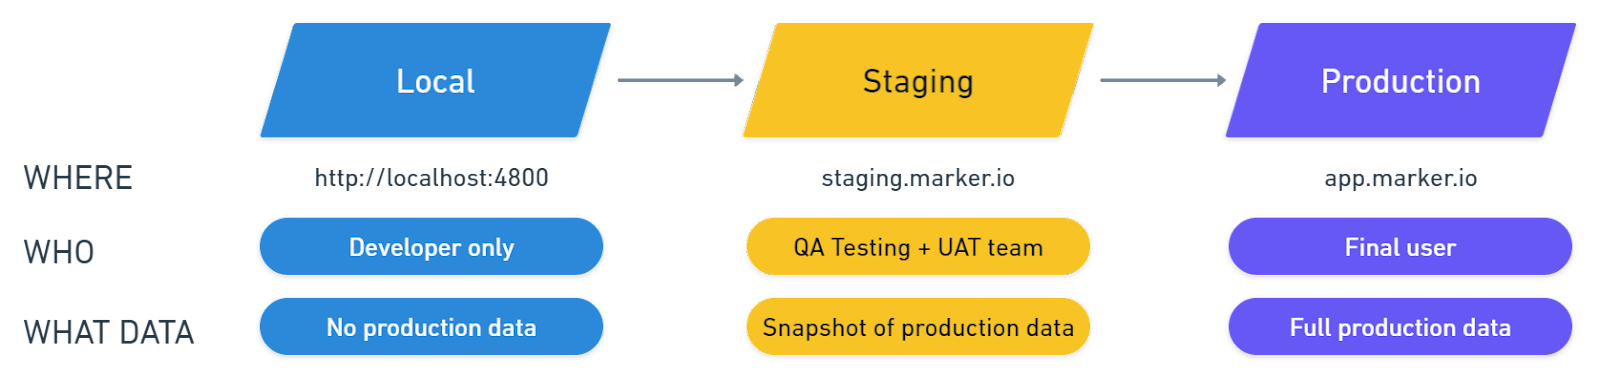
A staging environment allows you to run tests with production data and against production services , but in a non-production environment.
For example, at Marker.io, we test changes on staging.marker.io, a password-protected version of our app.
Stakeholders can then easily log on and start reporting bugs.
The same logic applies when you run UAT tests on a larger scale.
Send a URL and login credentials to your beta testers (via e-mail or otherwise) and tell them to try and break your app!
There are a couple of other added benefits:
- Save time. When your product is in staging, you can push changes and bug fixes immediately – it doesn’t matter if the whole app breaks.
- Protect live data. Beta user inadvertently caused a crash? Your production database is safe.
- Better overview. Locally testing your components is great for seeing what they do independently. But it's only through staging that you can truly see how they integrate within the full software.
- Easier testing. Suppose you forgot to update a package in production, or a function working completely fine in local suddenly breaks. These issues will show up in staging already.
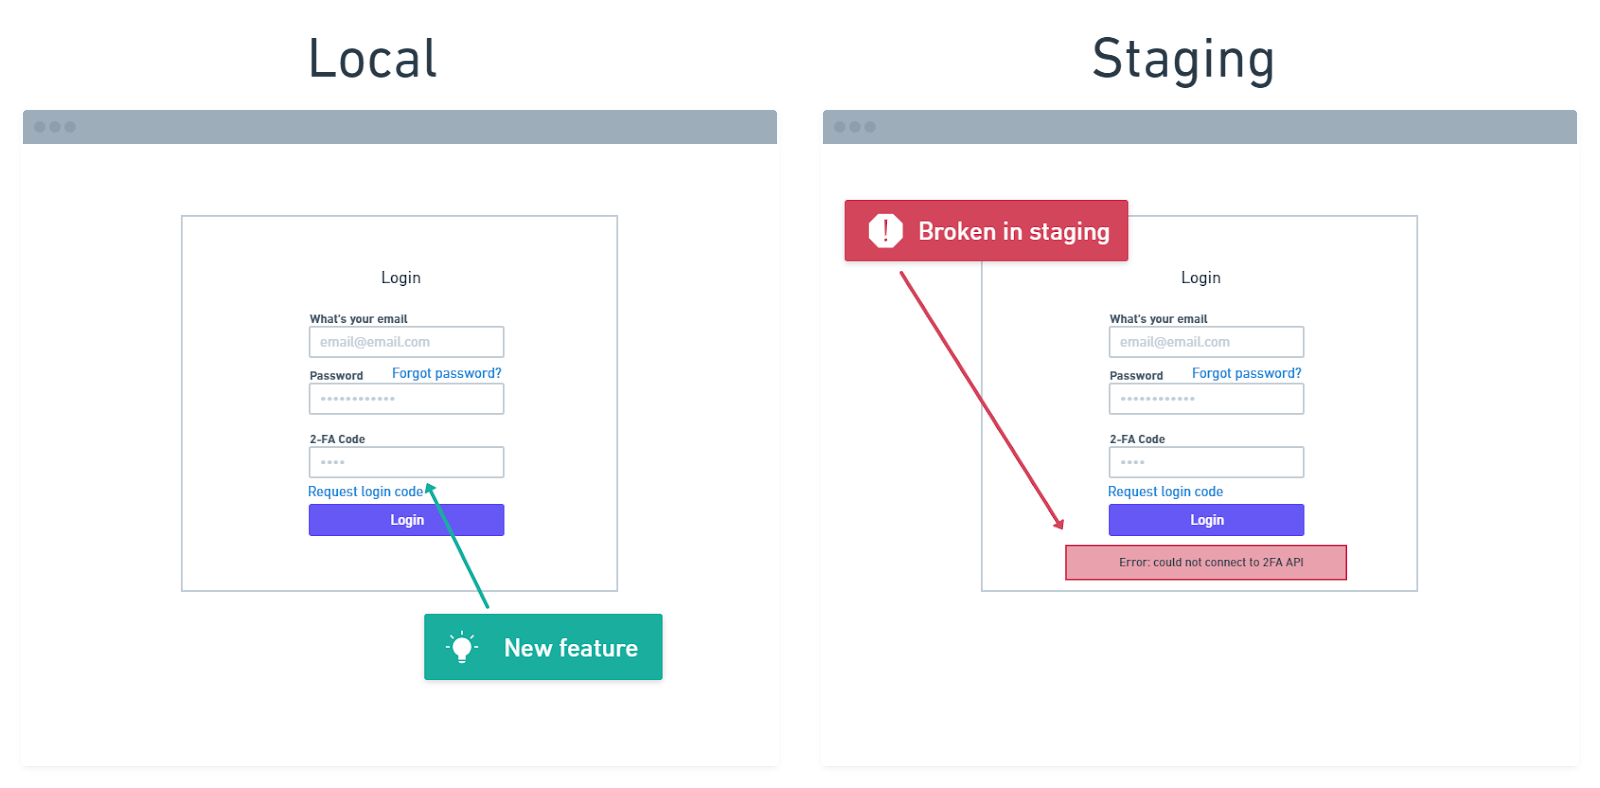
For UAT, it is paramount that your staging settings mirror your production settings.
Don’t fall into thinking, “Well, this is just another testing environment. It doesn’t need to be perfect”.
Your staging environment should be an (almost) exact copy of production.
With an accurate clone, if something doesn’t work in staging, it won’t work in production either.
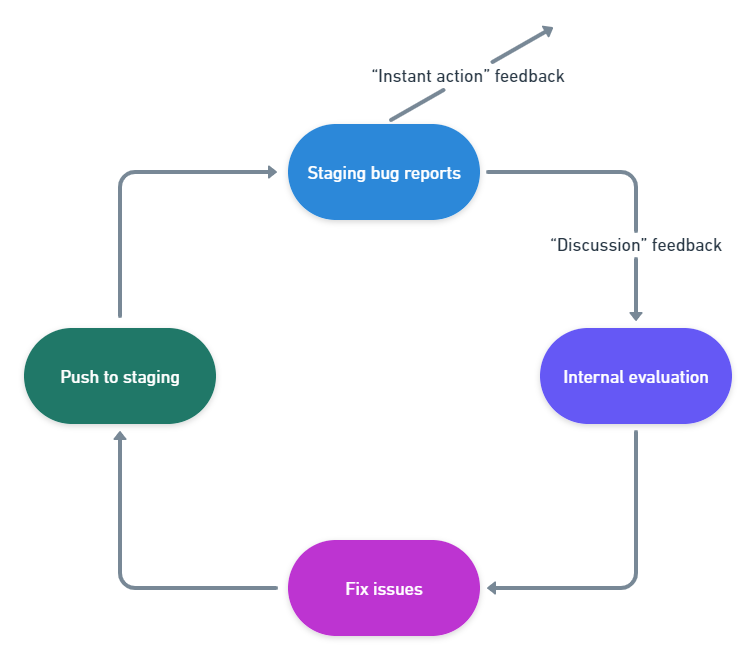
4. Pre-organize feedback
You will also need a system to triage bug reports and user feedback.
We suggest categorizing feedback into two main categories:
- Feedback that requires discussion. Complex bugs and usability issues. All issues that will require a meeting with several team members.
- Instant action feedback. Wrong color, wrong copy, missing elements, one-man job problems.
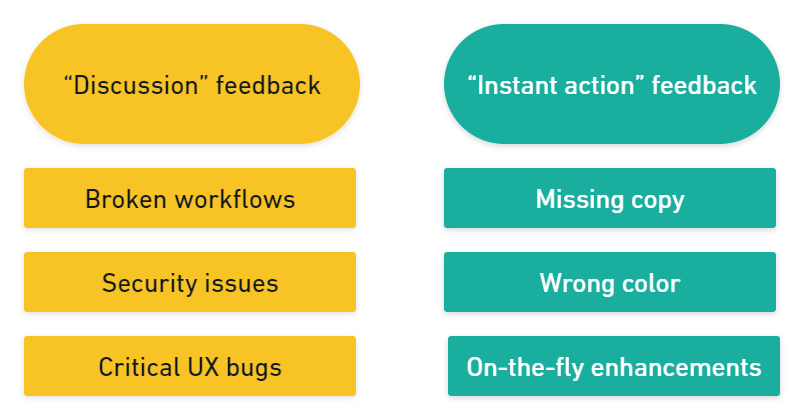
At Marker.io, the developer in charge of triage also handles instant action feedback.
Everything else goes into the “discussion” box, to review with the rest of the team later, allowing us to look at crucial bugs one by one, without getting bogged down with minor issues.
Developers need actionable, specific bug reports. Pre-categorized feedback is the key to filtering noise.
After this, it's just rinse and repeat. Fix bugs, push new version to staging, execute user acceptance testing tests, collect new round of feedback, discuss internally.
5. Install a way to collect feedback and test data
Quality reporting during the software testing process is tedious.
For every bug or usability issue, you have to:
- Open the screenshot tool, capture the bug.
- Open software to annotate the screenshots, add a few comments.
- Log into a project management tool.
- Create a new issue.
- Document the bug.
- Add technical information.
- Attach a screenshot.
- ...etc.
For a seasoned QA expert, this is a walk in the park.
But this is a user acceptance testing guide. And when you do UAT, you are bound to involve non-technical, novice QA testers—or actual software users.
We’ve found it easiest to install a website feedback widget on our staging site, using Marker.io (that’s us!).
Our bug tracker enables your testing team to report issues and send feedback straight from the website, without constantly alt-tabbing to email or PM tool.
It’s faster and more accurate for all parties involved.
On the tester side, it’s a 3-steps process:
- Go to staging, find a bug.
- Create a report and input details.
- Click on “Create issue” – done!
Check it out in action:

Early during user acceptance testing, we have our CEO and the rest of the non-developer team give early feedback via this widget.
They know what the new feature does, but they haven’t operated this version of our app yet.
Then, we collect this feedback and triage it.
6. Collect, triage, and respond to feedback
All reports sent via the widget land directly in our project management tool. For us, that’s Linear, but we integrate with dozens of other bug tracking tools.
It's crucial for bug fixing that these reports are comprehensive.
Now, don't expect dozens (or hundreds) of testers to fill in complex bug reports complete with console logs, environment info, and other technical data, and then send the whole thing over for review in an Excel file.
That sounds like a logistical nightmare.
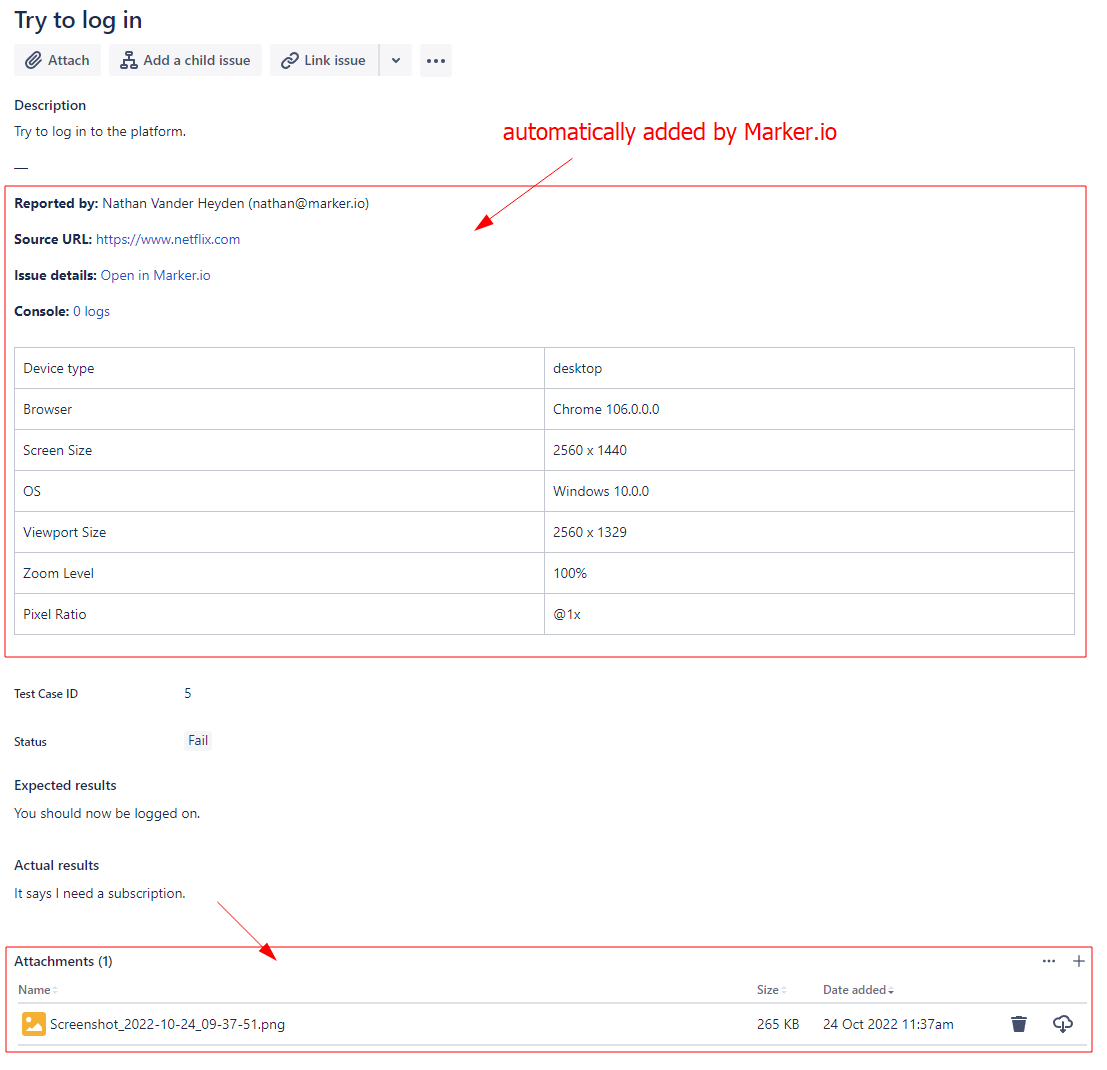
That's where Marker.io comes into play. It automates the process, ensuring each bug report includes:
- Screenshot with annotations
- Console logs
- Network requests
- Environment info
- Metadata
- Session replay, so we can see exactly what the user was doing when the error occurred
Here’s an example of what this looks like on the developer side, in Jira here:
The best part? Marker.io has 2-way sync with all bug tracking tools.
This means that when your developers mark a client issue as “Done” in your issue tracker, Marker.io will automatically mark the issue as “Resolved”.
It’ll even send a notification to your end-user if you wish.
Check it out:

Using Marker.io for UAT test cases allows direct communication with the tester, even if they’re not part of your organization, via the issue page.
Imagine the chaos of managing feedback from hundreds of beta testers via individual emails.
Streamlining the process to capture tester insights for each specific case or bug accelerates the feedback loop and eliminates unnecessary confusion.
There's one more advantage to Marker.io when it comes to user acceptance testing: Guest forms and Member forms.
While conducting UAT, detailed feedback is essential from in-house users familiar with the application.
However, for first-time users, a lengthy form with dozens of fields can be daunting.
That’s why we built guest forms and member forms:
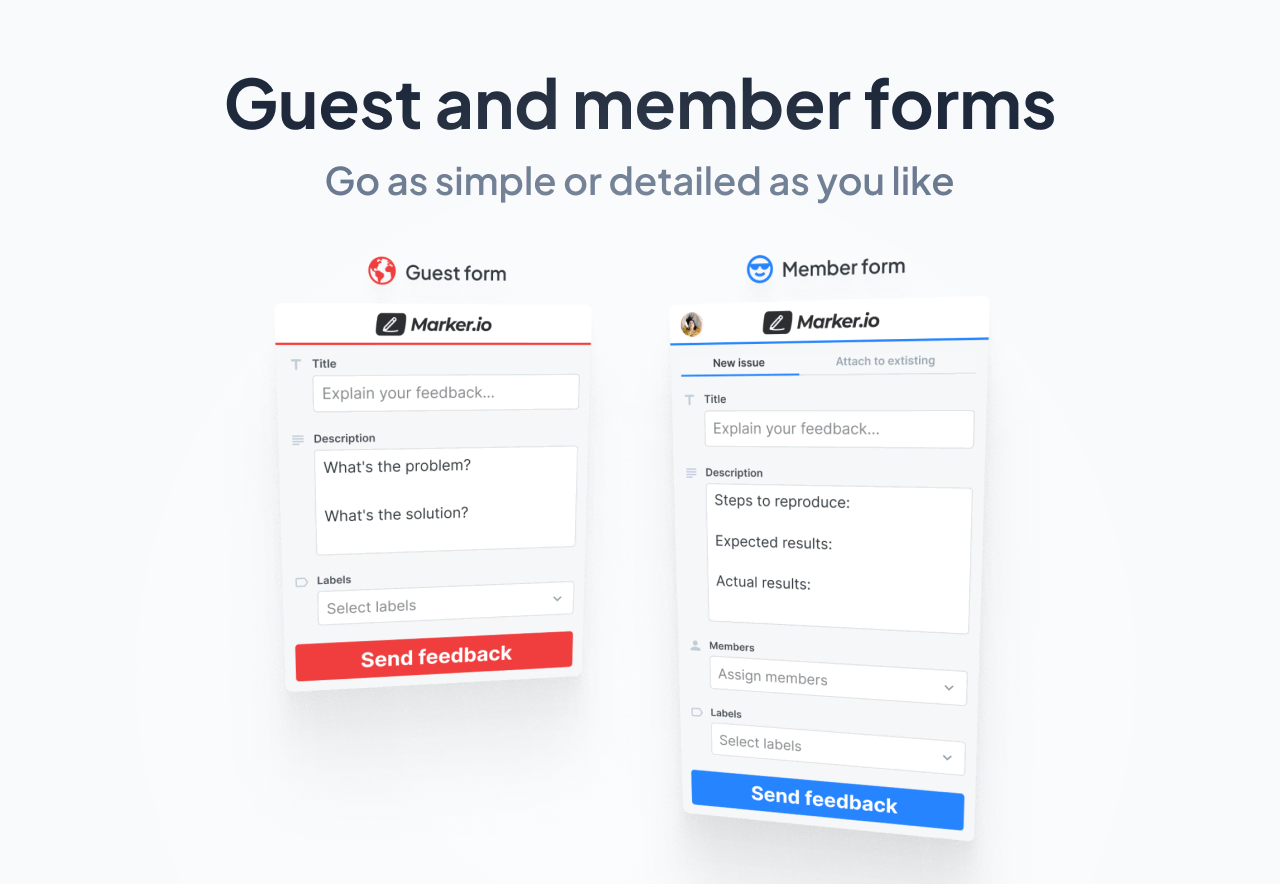
Clients and beta testers can report issues with the guest form (and automatically attach a screenshot).
The member form is a bit more advanced. You can immediately label bug reports or assign issues to a team member.
The best part? These forms are fully customizable, allowing us to tailor feedback requests in each testing round.
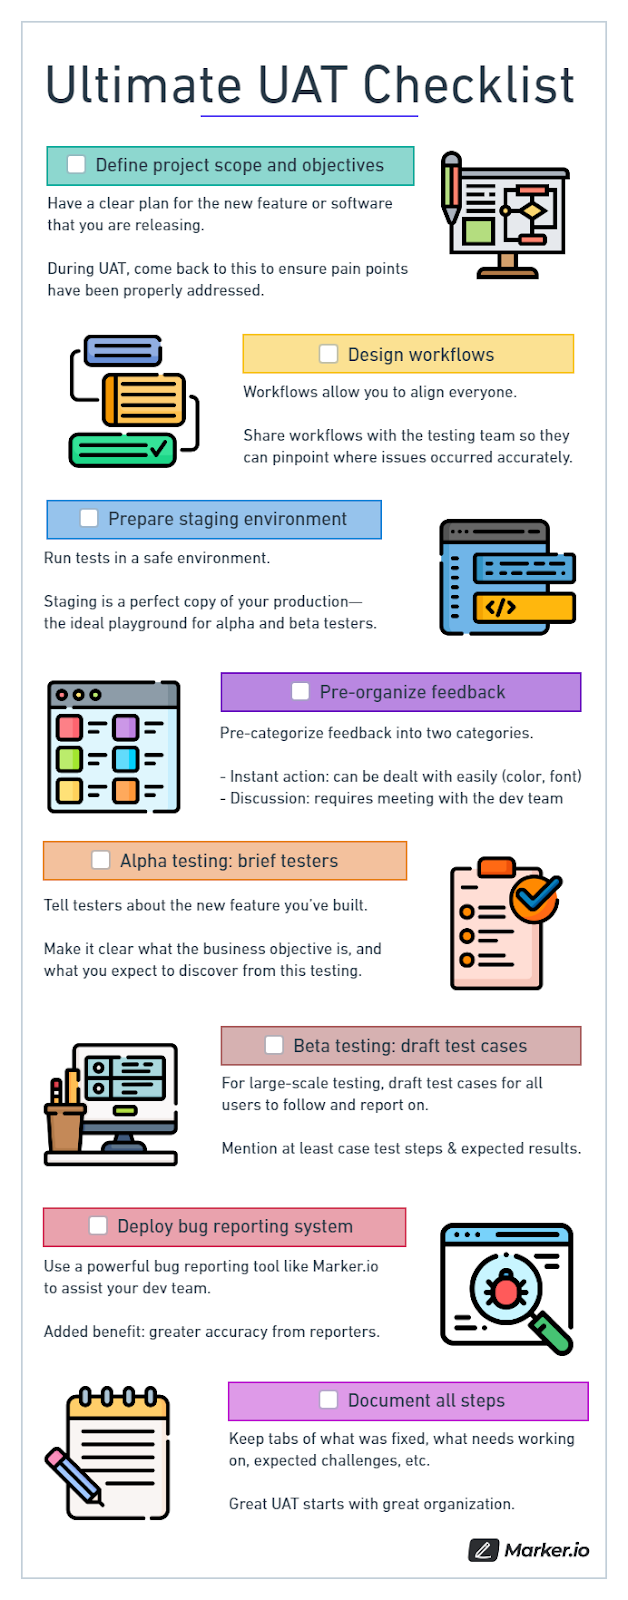
User acceptance testing best practices
This checklist is a recap of everything we’ve discussed in this post, and contains all best practices for user acceptance testing.
- Design project scope and objectives. Have a clear plan for the new feature or software that you are releasing. During UAT, come back to this document to ensure pain points have been properly addressed.
- Design workflows. Workflows allow you to align everyone. Share workflows with the testing team so they can accurately pinpoint where issues occurred and give you feedback on the fly.
- Prepare staging environment. Run tests in a safe environment. Staging is a perfect copy of your production, the ideal playground for alpha and beta testers.
- Pre-organize feedback. Pre-categorize into two categories: instant action and discussion.
- Brief testers. In alpha testing, tell testers about the new feature you’ve built in detail. Make it clear what the business objective is, and what you expect to discover from this testing.
- Draft test cases. For large-scale and beta testing, draft test cases for all users to follow and report on. Mention at least case test steps & expected results.
- Deploy a bug reporting system. Use a powerful bug reporting tool like Marker.io to assist your dev team. Added benefit: greater accuracy from reporters, and makes the dev life that much easier.
- Document all steps. Keep tabs on what was fixed, what needs working on, expected challenges in the next iteration, etc.
Great user acceptance testing starts with great organization.
A user acceptance testing checklist for websites
Here’s a downloadable version of the best practices checklist you can keep at hand for your next user acceptance testing project.
The challenges of UAT
When conducting user acceptance testing, companies can run into the following challenges:
- Poor UAT documentation. A lack of scope, undefined objectives, and no UAT testing plan will cause issues during testing – getting your entire team (and testers) aligned is crucial for success with UAT.
- Not enough extensive internal QA. Development teams can save themselves a lot of admin time by getting rid of several bugs upstream, rather than leaving it for the user acceptance testing phase. Ideally, UAT testers should operate in a nearly bug-free environment.
- Lack of a strong testing team. Pre-screen your testers and ensure they are the right target audience for your software. Train them in the different tools and processes you use for testing, and align them with your goals.
- Not using the right tools. For large-scale projects in particular, asking your testers to use Excel, Google Docs, or emails for their reports is a recipe for disaster. Prepare solid bug tracking and reporting solutions to make it easier for everyone involved.
Wrapping up...
UAT’s meaning, in short: User acceptance testing gauges how well your app or website meets customer needs and business requirements.
To conduct effective UAT, ensure you’re collecting that information in the best possible way.
In other words, have a system.
The resources and ideas shared in this post are your guide towards building that system—and plenty to help you put together your next user acceptance testing session.
Frequently asked questions
Who does the user acceptance testing at companies?
UAT is performed by the end-users.
With that said, it is QA team that will be in charge of running user acceptance testing.
They will write a complete user acceptance testing test plan, prepare a UAT environment that mirrors production, and write corresponding user acceptance test cases.
How to build the right UAT team?
The right user acceptance testing team will consist of:
- A project manager, in charge of overseeing UAT execution from start to finish.
- A documentation specialist who will define scope and objectives, create a user acceptance testing test plan, and help draft test cases.
- A QA lead in charge of pre-screening, onboarding, and training testers.
- A set of testers, ideally existing users or customers, but also business stakeholders.
Can you automate user acceptance testing?
To an extent, yes.
Instead of manual test scenarios, simply push releases to your test environment.
Then, run a couple of automated test cases that’ll test the functionality of your app.
However, we recommend having actual software users test your website. At the end of the day, this is the only way to make sure your users are satisfied with the app.
What is a user acceptance test? (with examples)
A user acceptance test is a type of testing run during UAT execution.
The goal is to find out if the end user has an easy time completing the test, and if they run into any issues.
Here’s a user acceptance testing example example:
- Sign up for the tool and upgrade to our “Standard” plan.
- Try to create a project and add a couple of tasks to this project.
- Attach a file to task #3.
- Invite your team to join you.
Not sure what you should include in your test cases? We've got your back! Check out our list of user acceptance testing templates.
How to do user acceptance testing
First, confirm business objectives and define the project scope and objectives, and the prepare all your workflows and wireframes. Make sure you have a UAT test plan, a process, and a tool, like Marker.io, for users to track feedback and for your team to triage and act upon it.
When you want to perform user acceptance testing, make sure you document everything, from the processes you put in place, to the users you engage for the work.
Who writes UAT test cases?
The QA team is in charge of test management and writing test cases.
They manage the entire process:
- Writing test scenarios that satisfy business requirements
- Setting up a staging environment
- Onboarding testers for user acceptance testing
- Analyzing results of test cases
What are some tools that help successfully perform UAT?
There are many tools that help assist your user acceptance testing process.
We recommend having:
- An error monitoring system like Sentry
- A bug report/website feedback tool like Marker.io
- A test case management system or bug tracking tool like Jira, Trello, etc.
Looking for more UAT Tools? Check out our list of the best user acceptance testing tools out there—and get even more insights from your users.
What should I do now?
Here are three ways you can continue your journey towards delivering bug-free websites:
Check out Marker.io and its features in action.
Read Next-Gen QA: How Companies Can Save Up To $125,000 A Year by adopting better bug reporting and resolution practices (no e-mail required).
Follow us on LinkedIn, YouTube, and X (Twitter) for bite-sized insights on all things QA testing, software development, bug resolution, and more.
Nathan Vander Heyden
Nathan is Head of Marketing at Marker.io. He used to work as a SEO consultant for various SaaS companies—today, he's all about helping Web Ops teams find more efficient ways to deliver bug-free websites.
Related blog posts


Frequently Asked Questions
What is Marker.io?
Who is Marker.io for?
Marker.io is for teams responsible for shipping and maintaining websites who need a simple way to collect visual feedback and turn it into actionable tasks.
It’s used by:
- Organizations managing complex or multi-site websites
- Agencies collaborating with clients
- Product, web, and QA teams inside companies
Whether you’re building, testing, or running a live site, Marker.io helps teams collect feedback without slowing people down or breaking existing workflows.
How easy is it to set up?
Embed a few lines of code on your website and start collecting client feedback with screenshots, annotations & advanced technical meta-data! We also have a no-code WordPress plugin and a browser extension.
Will Marker.io slow down my website?
No, it won't.
The Marker.io script is engineered to run entirely in the background and should never cause your site to perform slowly.
Do clients need an account to send feedback?
No, anyone can submit feedback and send comments without an account.
How much does it cost?
Plans start as low as $39 per month. Each plan comes with a 15-day free trial. For more information, check out the pricing page.
Get started now
Free 15-day trial • No credit card required • Cancel anytime