The Definitive Issue Tracker Template [Excel, Notion, and More]
We’ve put together the best issue tracker template possible, and in this article, we explain how to use it.
We’ve put together the best issue tracker template possible, and in this article, we explain how to use it.
QA testing isn’t easy.
Issue tracking and bug reporting are integral parts of every QA workflow.
As a product manager, dev leader, or agency owner, you need your QA processes to be as smooth and efficient as possible.
For that, you need strong issue tracker templates and tools so that no bugs get overlooked.
Because bug tracking is at the core of what we do at Marker.io, we know how to make this efficient and effective for every dev project.
With the right template, your job gets even easier.
Let’s dive in!
Issue Tracker Template

In this issue tracking template, you’ll find the following sections:
- Title: summarize the nature of the issue.
- Summary/issue description: provide more detail. As the reporter, including what you expected to happen vs. what actually happened.
- Status: not started, in progress, resolved, etc.
- Priority: indicate how critical the issue is.
- Issue type: bug, feature request, enhancement… (feel free to customize this!)
- System: operating system (OS) used at the time.
- Browser: what browser was the reporter using when the issue/bug happened?
- Metadata/environment info: extra information on the environment (e.g., screen size, zoom level, and other info).
- URL: on what page of the website or app did the issue occur?
- Screenshot: crucial so QA teams/engineers can see what the problem is. if you can, add a session replay and/or video recording.
- Console logs: logs of any JavaScript error accessible through developer tools.
- Reporter: who’s reporting the issue?
- Date / due date: date of the report or due date.
We go into each of these in more detail below.
Download your free issue tracker template today (we’ve put this into Notion, Google Sheets, and Excel):
Notion issue tracker template ->
Google Sheets issue tracker template ->
Excel issue tracker template ->
How to use this issue tracker template
Here’s how to fill in this issue tracking template—step-by-step.
For every bug report, we highly recommend using a dedicated bug tracker.
Alternatively, use a project management tool with bug-tracking features, such as Trello, Jira, Asana, GitHub, or GitLab, and implement a consistent, standardized approach.
And if you want your reports to land straight into your favorite project management tools, use Marker.io.
This will allow you to collect live website feedback from team members, clients, and users during (and after) software development.
Start a 15-day free trial to see how well it works with your issue tracker.
Pricing from $39/mo.
Now, let’s see how to use our issue management template!
Title
Keep it short and as specific as possible.
It’s a shorter version of the next section, a more detailed summary.
❌ A bad example of this: “When I click this link/button, it doesn’t work, why doesn’t it work, please fix it ASAP!”
It’s too:
- Vague
- Aggressive
- Wordy
✅ A better example: “CART - Broken link/button”
- The issue is located and succinctly explained
- It focuses on the specific problem
Short and specific titles make it easier for developers to find—and fix—problems quickly.
Summary
Unless everything’s been captured in the title, it helps to add a bit more detail. Aim to do this in as few words as possible.
Here are some examples:
❌ Bad: “I was trying to add content to the site/app the other day, and it didn’t work when I clicked the button. I forget where I was trying to do this, but it didn’t work.”
✅ Good: "On [DATE], I tried to upload images to the site via the CMS. It didn’t work when I clicked ‘upload images’ in WordPress.”
Status
Keeps your team—and reporter or clients—informed on the status of the bug and when to expect it to be resolved.
We recommend the basics:
- Not started
- In progress
- Resolved
Priority
Priority depends on the impact a bug/issue is having on the functionality and user experience of a website, app, or software.
Assigning priority usually comes down to the dev lead or product manager. In most cases, the choice is:
- High
- Medium
- Low
Pro Tip: For end-users, it’s difficult to determine bug priority/severity—but if it severely affects functionality and user experience, it’s critical!
Issue type
A quick record of the issue type is also useful for prioritizing the different reports.
Critical bugs, for example, will go first—while stuff like “feature request” and “enhancement” can be kept for later.
System
System data is also essential for devs to understand and recreate bugs.
Mac and Windows operate differently and have different shortcuts… and obviously, a website will behave completely differently on iOS or Android.
Pro tip: Marker.io automatically collects this data for you, too. No need to fill it in!
Browser
While most browsers use more or less the same specs and settings nowadays, it’s always good to try and reproduce a bug with the same browser as the tester.
So, include this information in your reports!
Browser info is automatically recorded with Marker.io, too.
Environment info
In order to fix a problem, you first need to understand it so it can be replicated. You can’t do that without environment info, such as:
- Browser (Chrome, Firefox, Safari…)
- Operating system (OS) and version (Mac, Windows…)
- Device (smartphone, laptop, desktop, and the specific make/model)
- Screen size
- Viewport
- Zoom level
Environment info, including the OS and loads of other technical data, is automatically logged in Marker.io.
URL
Naturally, you need to know the specific URL where a bug occurred. Identifying the right page helps devs resolve issues faster.
The URL is also logged in Marker.io.
Screenshot
Bug reports with screenshots are easier to action and fix.
Website annotation tools go a long way to drive your point across and help ensure bugs can be resolved quickly.
And if you use Marker.io, screenshots come attached automatically with every issue—and your reporters can annotate it with arrows, shapes... emojis even
Pro tip: if a screenshot is worth 1000 words… what’s a video worth? Marker.io records user sessions—attached with every bug—too!
Console logs
Console logs show developers what JavaScript errors are occurring on specific web pages.
Naturally, Marker.io automatically collects console logs.
Reporter
It helps to know who’s reported the issue, especially when collecting reports from clients and end-users.
With Marker.io, the reporter's name and email are automatically logged with every issue—you can even set it up to alert them when an issue’s been resolved.
Date
Make sure the date of the bug report is recorded—this helps when, for example, a third-party service has incidents on the day.
Alternatively, as a project manager, you can set a due date.
Project management templates are outdated—but there’s a better solution
Sure—you can use one of our free templates.
In fact, we even recommend it for smaller teams or freelancers.
But a word of caution.
Whether you use Notion, Google Sheets, or Excel—these are all difficult formats for clients and incredibly tedious to work with for a QA team/developers.
It’s too easy to forget details and technical metadata.
All clients want are websites, apps, or software that works.
So, if you’re still using an outdated tracking system, you’re making everyone’s life harder.
Plus, QA, product, or project leaders will, in most cases, need to transfer all of that information into a PM tool so that it can be actioned!
Fortunately, there’s a better alternative—Marker.io.
Here are some of the advantages of using Marker.io compared to Notion, Google Sheets, or Excel for bug tracking and issue reporting:
2-way sync with PM tools
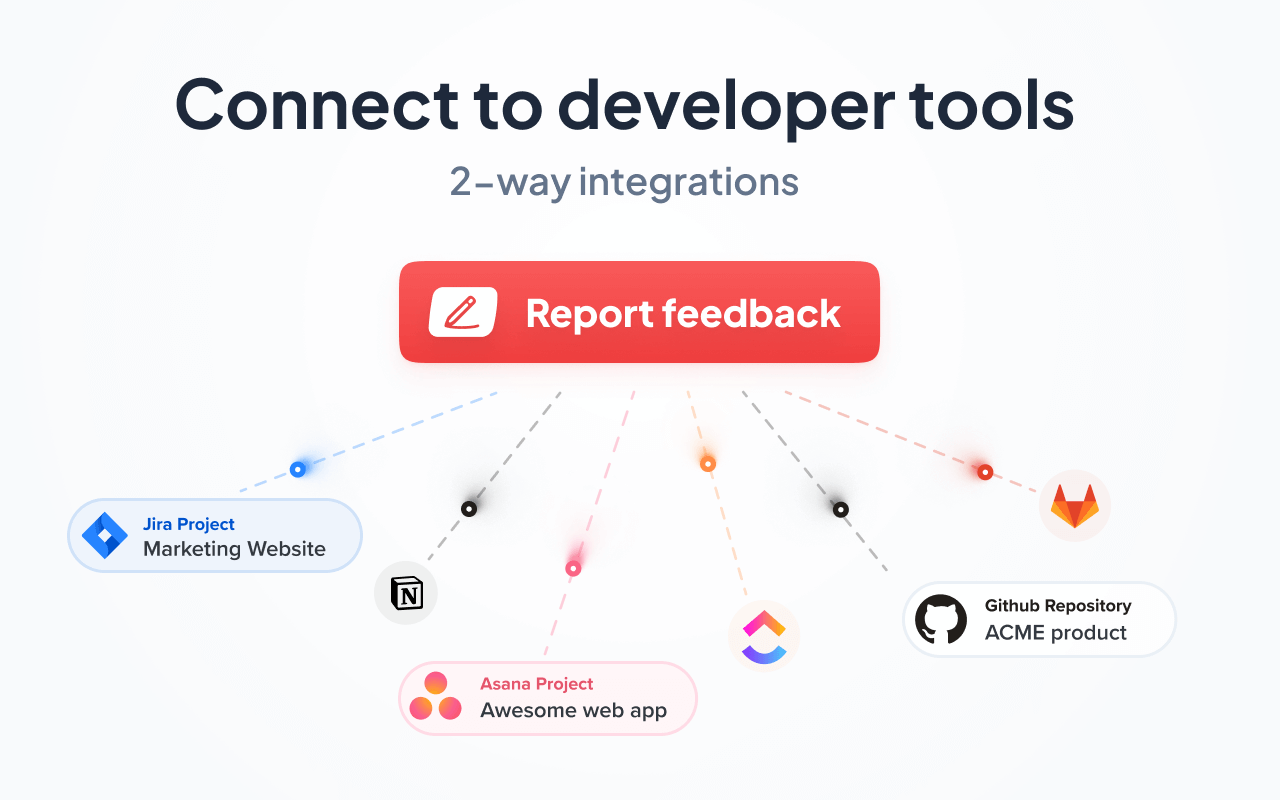
Collecting feedback is usually a time-consuming headache for devs and agencies.
With Marker.io and our 2-way sync solution, those countless hours of work are a thing of the past.
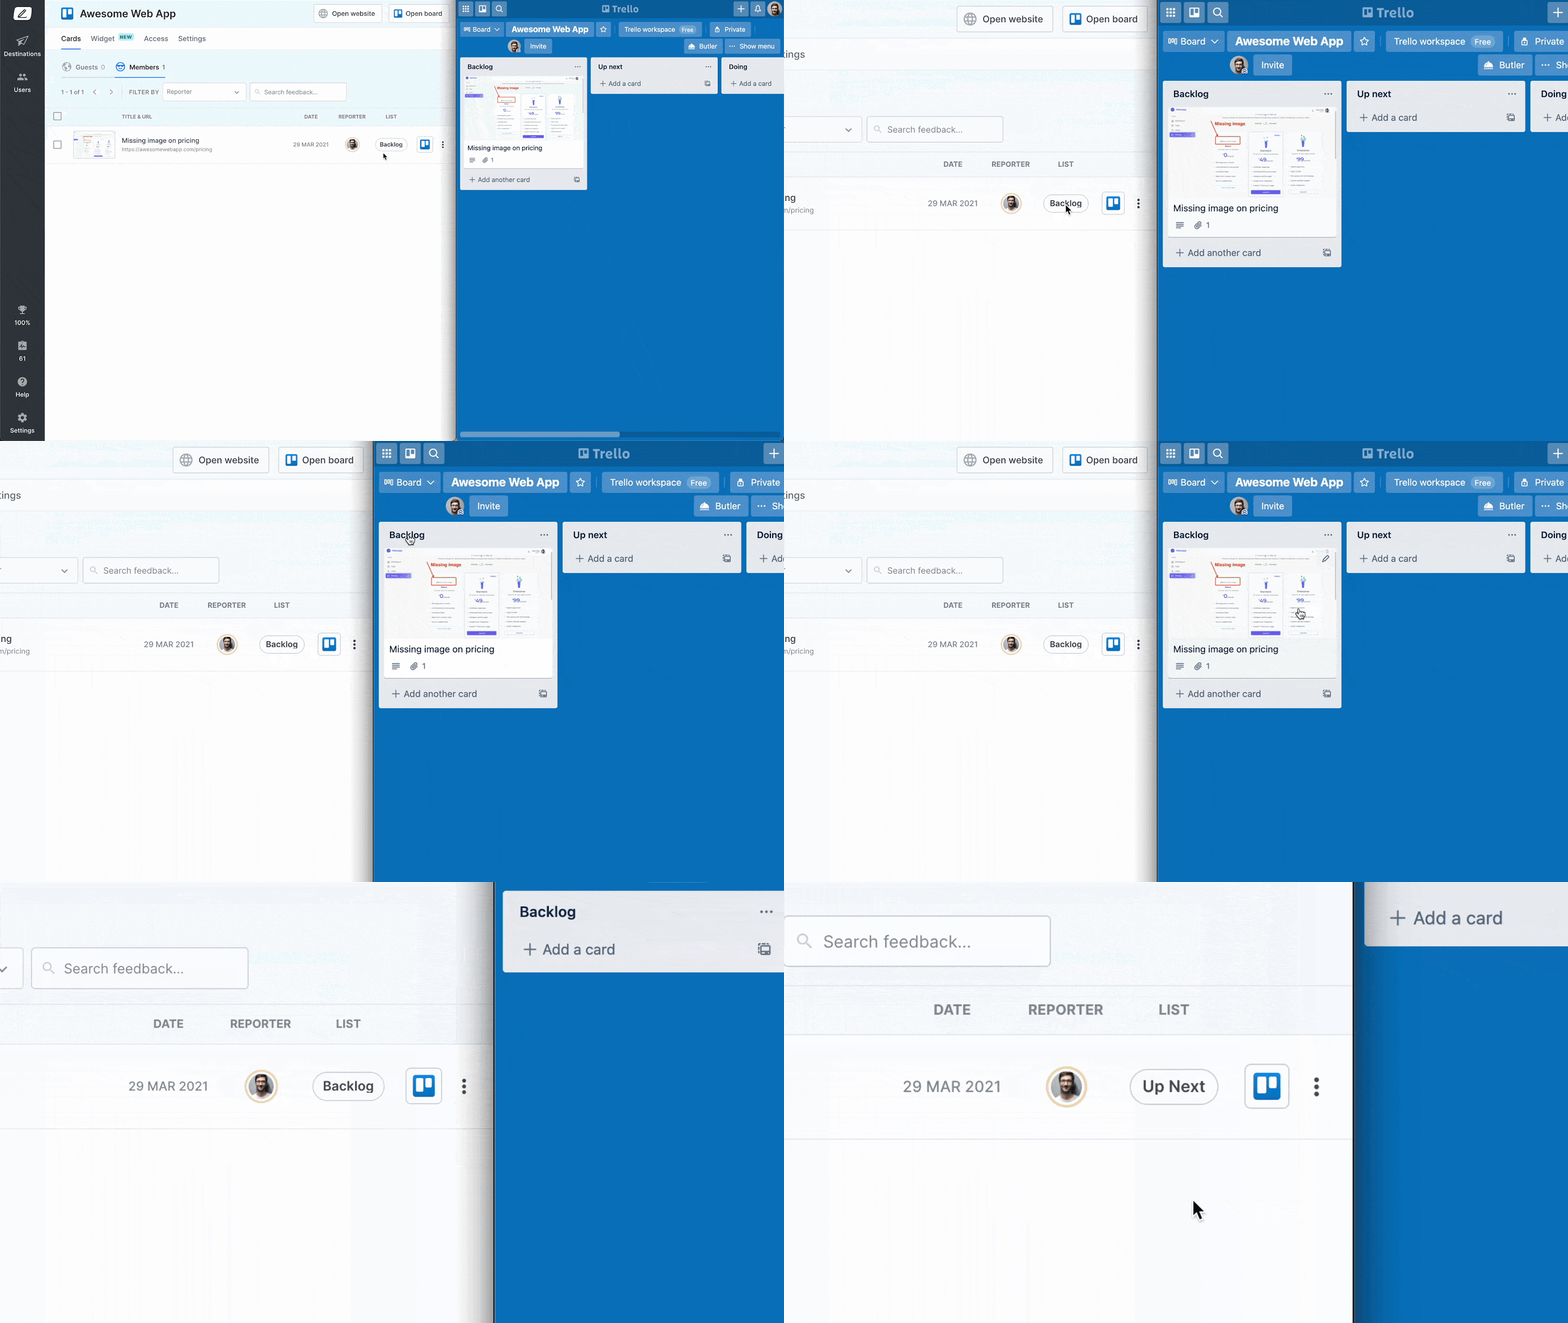
Feedback goes straight to your PM tool. Whenever an issue is marked as “Done”, it will automatically be “Resolved” in Marker.io.
Plus, the person who sent the report will receive an email notification, too.
Check it out:
Visual annotations & session replay

Fixing a bug involves reproducing the scenario where and when the bug occurred.
However, reproducing every scenario is challenging, even with all the technical metadata that comes with bug reports.
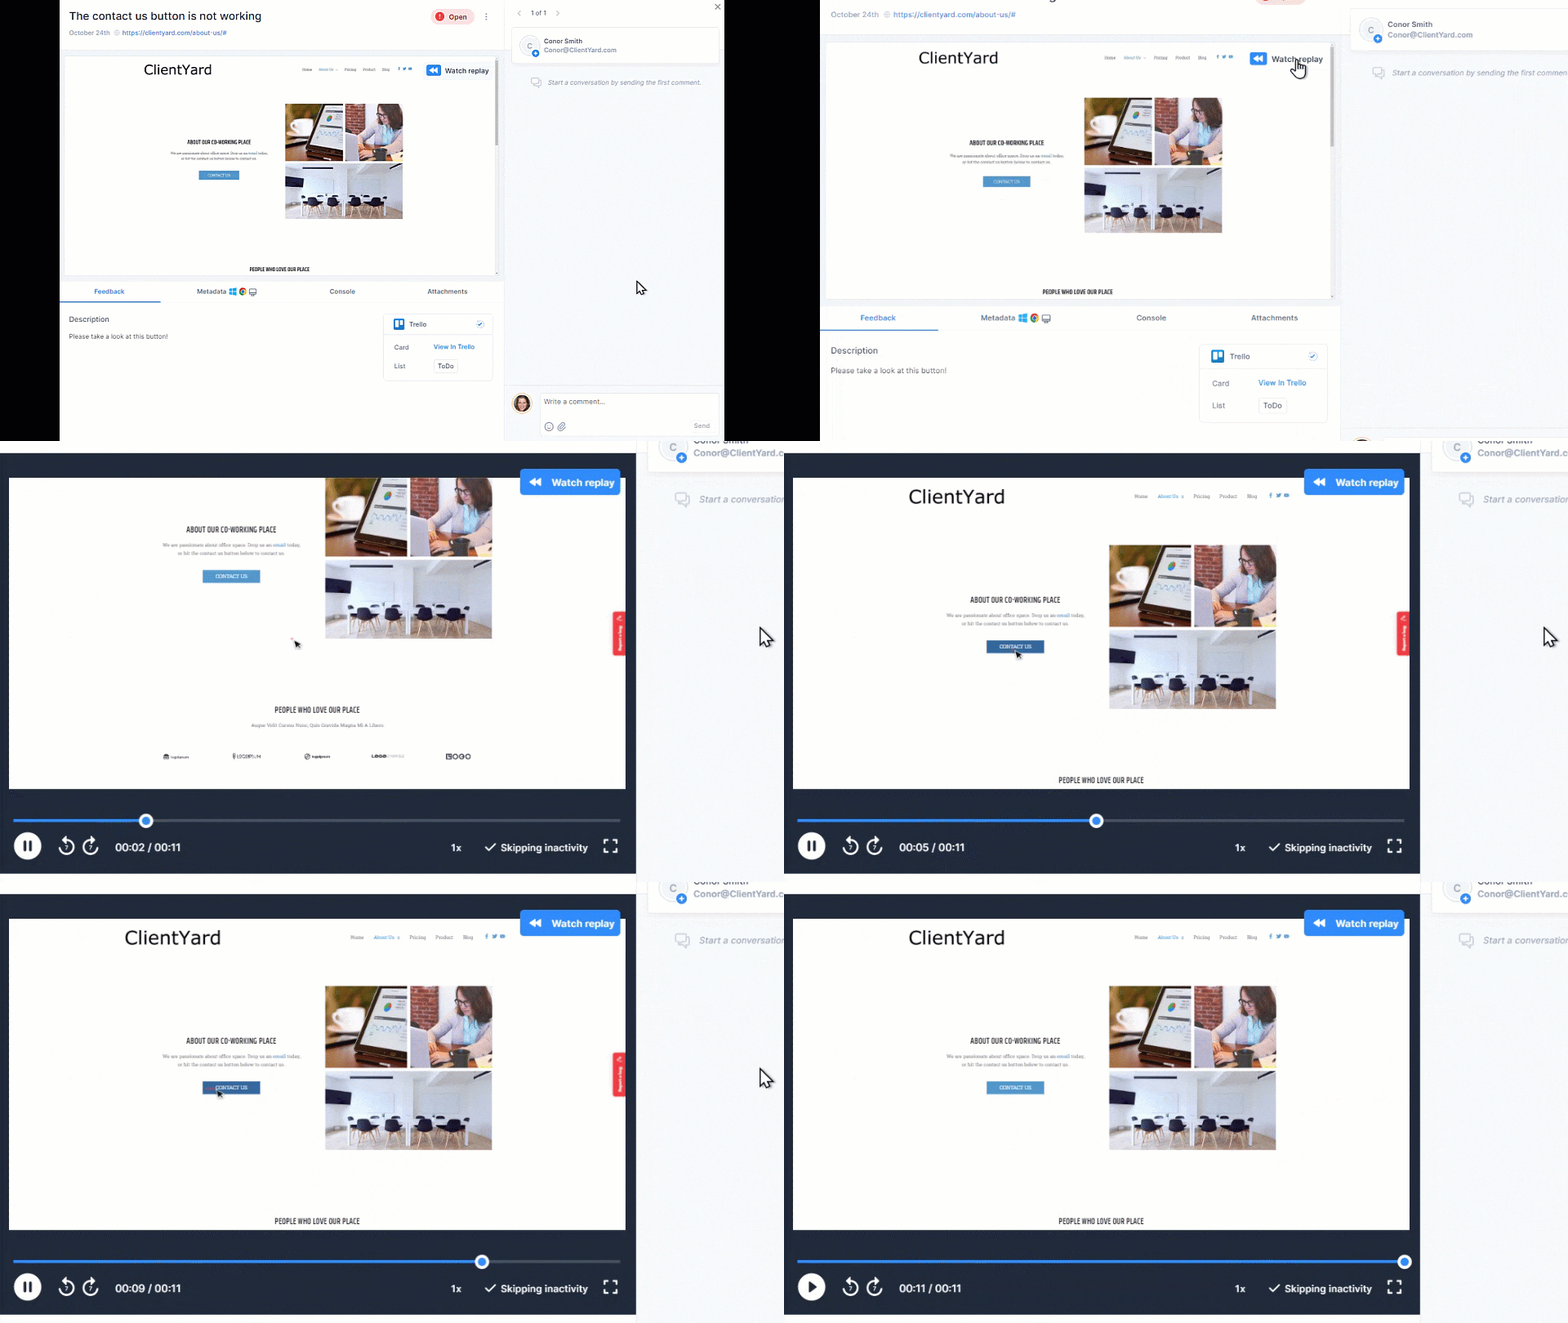
Fortunately—Marker.io's toolkit includes screenshots, visual annotations, and even session replay for that reason.
Visually annotated screenshots are much easier than going through multiple links or downloading attached images from emails.
And with session replay, you’ll be able to watch the last 30 seconds (or more) before the report was submitted, too.
All of this goes straight into your PM tool!
Check out session replay in action:
Data-rich bug reports

Most clients and end-users aren’t technically savvy.
Receiving actionable data isn’t easy. Users and clients don’t know what devs need to fix bugs or how to collect these details:
- What specific URL were they on at the time;
- Environment (browser, OS, screen size) and console logs so devs can reproduce the bugs;
- Metadata, etc.
Plus, if you’re using Excel, you need to add a new column for every single technical detail of the report.
Not a problem anymore with Marker.io!
Whenever a client or user clicks the “Report” button, this data is automatically collected—and sent off to your PM tool with the rest of the report.
We hope you’ve found this issue tracker template helpful and can easily integrate it into your QA workflows—simply copy/download one of the formats that are easiest for you: Notion, Google Sheets, or Excel.
Download your free issue tracker template today:
Notion issue tracker template ->
Google Sheets issue tracker template ->
Excel issue tracker template ->
Make your job easier, and use a dedicated website feedback tool: Marker.io.
Collect live website feedback from team members, clients, and users.
Start a 15-day free trial to see how well it works with your issue tracker.
What should I do now?
Here are three ways you can continue your journey towards delivering bug-free websites:
Check out Marker.io and its features in action.
Read Next-Gen QA: How Companies Can Save Up To $125,000 A Year by adopting better bug reporting and resolution practices (no e-mail required).
Follow us on LinkedIn, YouTube, and X (Twitter) for bite-sized insights on all things QA testing, software development, bug resolution, and more.
Frequently Asked Questions
What is Marker.io?
Who is Marker.io for?
Marker.io is for teams responsible for shipping and maintaining websites who need a simple way to collect visual feedback and turn it into actionable tasks.
It’s used by:
- Organizations managing complex or multi-site websites
- Agencies collaborating with clients
- Product, web, and QA teams inside companies
Whether you’re building, testing, or running a live site, Marker.io helps teams collect feedback without slowing people down or breaking existing workflows.
How easy is it to set up?
Embed a few lines of code on your website and start collecting client feedback with screenshots, annotations & advanced technical meta-data! We also have a no-code WordPress plugin and a browser extension.
Will Marker.io slow down my website?
No, it won't.
The Marker.io script is engineered to run entirely in the background and should never cause your site to perform slowly.
Do clients need an account to send feedback?
No, anyone can submit feedback and send comments without an account.
How much does it cost?
Plans start as low as $39 per month. Each plan comes with a 15-day free trial. For more information, check out the pricing page.
Get started now
Free 15-day trial • No credit card required • Cancel anytime


