7 Ways to Present a Website to Clients Before Going Live
In this blog post, we look at 7 ways to present a website to a client—or stakeholders—before it goes live.
In this post, we’ll cover 7 quick and easy ways to present a website and get actionable feedback for launch.
Your team has worked hard designing, building, and developing a website.
Now it’s time to present it to the client before it goes live.
Collecting client feedback is crucial for any web dev agency.
It's important to:
- Understand if the client is happy with the website
- Identify any remaining bugs and issues
- Move closer to getting sign-off
How to Present a Website to Clients Before Going Live
Before presenting a website to a client, ensure clear communication lines.
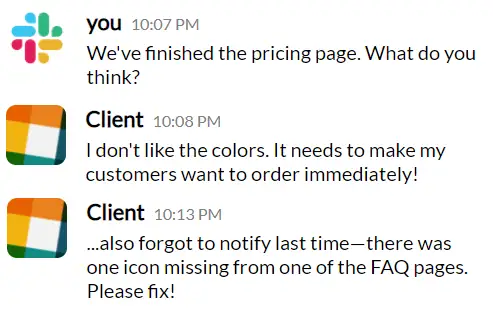
Make sure they know how to give feedback and what kind of feedback you need. Otherwise, you’ll end up with something like this:
That's not helpful when developers need specifics to make fixes or changes.
Before it’s time to present the beta version of the website:
- Involve the client at earlier stages like design mockups and assets like web copy.
- Provide clients with timescales and the feedback process for the beta website presentation.
- If you have an easy-to-use feedback tool like Marker.io, install it on the staging site. It saves time by sending feedback or bug reports directly to your PM tool.
- Conduct internal QA so the client doesn't see issues that should have been fixed beforehand.
- Ensure the website is not accessible by other sources.
Once you’ve done all of this, you’re ready to present a website to a client.
Method 1: Set up a staging environment
Staging is a clone of your live website in a staging environment, so you can test changes before it goes live without breaking the site.
With the client website in a staging environment, they can test it without worrying about breaking anything.
And then apply all of the feedback to the live but unpublished version of the site before it goes live.
This usually involves setting up a subdomain like “staging.yourwebsite.com,” where all site assets and the database are copied.
It will look exactly as it would when it goes live.
Here’s the pros and cons of using staging environments:
Pros
- Establishes a comprehensive testing environment
- You can test changes in real-time
- Use this for user acceptance testing, beta testing with dedicated testers, and other users, especially for big clients.
Cons
- Requires technical know-how to setup
- Implement changes on the live (unpublished) version, not the staging environment
Pro tips for staging environments
- Make sure this environment isn’t indexed by search engines (more about this below).
- Remember to limit access through IP whitelisting (advanced), or use password protection
Use a tool like Marker.io to collect website presentation feedback from your client.
When Marker.io is setup in the staging environment, the widget will only appear on the staging site. That means only people with access to staging can give feedback (e.g., your client and other stakeholders).
Once the site is live, you can use it on the live version, too, so that the client and web visitors/users can submit feedback.
Marker.io is a powerful, user-friendly tool for bug-reporting, crash-reporting, and visual feedback.
With Marker.io, you can:
- Collect website beta testing bug reports with screenshots and annotations for changes on live or staging sites.
- Use session replay to see what a client was doing before sending a bug or feedback report, saving time for dev teams.
- Collect data-rich bug reports, including automatic environment and record logs capture.
- Use our Network Request Recorder tool. Explore browser logs as if you were looking at the client’s browser dev tools.
- Ensure every piece of feedback and bug report is automatically synced with your PM tool (e.g., Jira, GitHub, Trello, Asana, and others).
You can do all of that and so much more with Marker.io.
Save hours on client website feedback, reviews, and approvals— try Marker.io for free today.
Pricing: starts at $39/mo.
Method 2: Use prototyping tools
Prototyping tools are incredibly useful during the design stage of a website project.
Platforms like Figma or InVision let you upload mockups/wireframes that clients can interact with in real time.
This way, your design team knows what clients like and want to change before developers implement the designs.
Clients can annotate and add comments right on the files, which is great for real-time design feedback.
If your website is live or in a staging environment, use Marker.io to collect feedback as mentioned above.
Pros
- Makes it super easy for clients to give feedback
- A professional way to present a client's website
- Simple to implement and a great solution for non-tech-savvy clients to give feedback
- Many tools have version control features to track changes, allowing you to revert to an earlier version if needed.
Cons
- Limited to the capabilities of the tool
- Requires SOME training to use the tool effectively for clients
- Mockups (Figma/InVision) show visual representations, not functional ones. Some tools allow for some interaction, but it’s limited
Method 3: Real-time presentations (virtual or in-person)
One of the best ways to present a new website is through a screen-sharing meeting via Zoom or Google Meet, going over the pre-launch website with your client step-by-step.
Real-time presentations are great for instant feedback and continuous relationship-building with the client.
If possible, do it in person by connecting your laptop to a large monitor, TV, or projector and guiding the client through the website.
Pros
- Instant client feedback
- Build better client relationships
- Easier to explain why certain features and functionality work according to the client's specs.
Cons
- Depending on the number of stakeholders involved, scheduling can be a challenge
- Not suitable for larger teams as not everyone can always attend, and waiting for key stakeholders can delay input.
Method 4: Set up a subdomain
Setting up a subdomain is another presentation method that’s similar to staging but easier and quicker to implement.
Create a subdomain like preview.yourwebsite.com where the client can see the final, pre-launch website.
It doesn’t require as much technical know-how as establishing a full staging environment. You should still password-protect the subdomain and prevent search engine indexing.
Use a bug tracking and feedback plugin like Marker.io on the subdomain for quick, easy, and integrated feedback.
Pros
- Easier to set up than a full staging site.
- Allows for client interaction and feedback, and bug reporting/feedback plugins, the next best thing to staging.
Cons
- Lacks staging features, e.g., database isolation, error logging, and version control.
- Still necessary to ensure changes are made under the primary domain, not the sub-domain.
Method 5: Password-protected websites
If the client’s website doesn’t have any traffic yet, this is the easiest method by far.
Everything is set up within the production environment, but only those with the password can access it.
It’s a basic layer of security but works for quick feedback sessions and presentations.
Perfect for new products or websites needing quick iterations without the full staging environment setup.
For WordPress, there are plugins with a simple “password protect” slider/button.
Use a strong password and change it periodically for security until the site’s ready to go live.
Pros
- Quickest to implement.
- No technical skill is needed, especially if it’s on WordPress.
Cons
- Limited access control.
- In some cases, harder to mimic user roles or permissions this way, as everyone has the same username/login.
Method 6: Temporary URLs
This way, you have a short-term, fully functional URL displaying the pre-launch website for a limited time.
Most hosting providers offer this service. So do temporary URL services.In either case, you can generate temporary URLs as a proxy for your actual site without sharing the domain name.
Make sure to de-index it first and tell your client about the URL’s expiration date
Pros
- Perfect for short-term reviews, no DNS settings need altering
- Easy to implement (should only take a few minutes)
- Useful for short review cycles
Cons
- Not suitable for long, multiple rounds of revisions
- Limited functionality compared to staging
- Not suitable for sensitive information. Anyone with the URL can access it, though de-indexing should prevent Google from seeing it
Method 7: PDFs and screenshots
Another method is to take full-page screenshots and annotate information about each web page.
This is useful for clients/stakeholders who want to review the visual aspects without real-time interactive feedback.
Make sure to take high-quality/high-resolution screenshots
Pros
- No technical skills required
- PDFs can be annotated easily, though not as much as visual feedback/design platforms
Cons
- Can be a time-consuming job (take screenshots, paste them into PDF, put the document together...).
- No live interaction or real-time feedback.
- The client may have feedback about functionality after the site goes live, making the process more time-consuming.
Wrapping up...
We hope you enjoyed our guide on how to present client websites during development and design projects.
The easiest way is to use a subdomain or temporary URL and plugin a feedback tool such as Marker.io.
Got more tips? Send ‘em our way via Twitter or email!
What should I do now?
Here are three ways you can continue your journey towards delivering bug-free websites:
Check out Marker.io and its features in action.
Read Next-Gen QA: How Companies Can Save Up To $125,000 A Year by adopting better bug reporting and resolution practices (no e-mail required).
Follow us on LinkedIn, YouTube, and X (Twitter) for bite-sized insights on all things QA testing, software development, bug resolution, and more.
Frequently Asked Questions
What is Marker.io?
Who is Marker.io for?
Marker.io is for teams responsible for shipping and maintaining websites who need a simple way to collect visual feedback and turn it into actionable tasks.
It’s used by:
- Organizations managing complex or multi-site websites
- Agencies collaborating with clients
- Product, web, and QA teams inside companies
Whether you’re building, testing, or running a live site, Marker.io helps teams collect feedback without slowing people down or breaking existing workflows.
How easy is it to set up?
Embed a few lines of code on your website and start collecting client feedback with screenshots, annotations & advanced technical meta-data! We also have a no-code WordPress plugin and a browser extension.
Will Marker.io slow down my website?
No, it won't.
The Marker.io script is engineered to run entirely in the background and should never cause your site to perform slowly.
Do clients need an account to send feedback?
No, anyone can submit feedback and send comments without an account.
How much does it cost?
Plans start as low as $39 per month. Each plan comes with a 15-day free trial. For more information, check out the pricing page.
Get started now
Free 15-day trial • No credit card required • Cancel anytime


